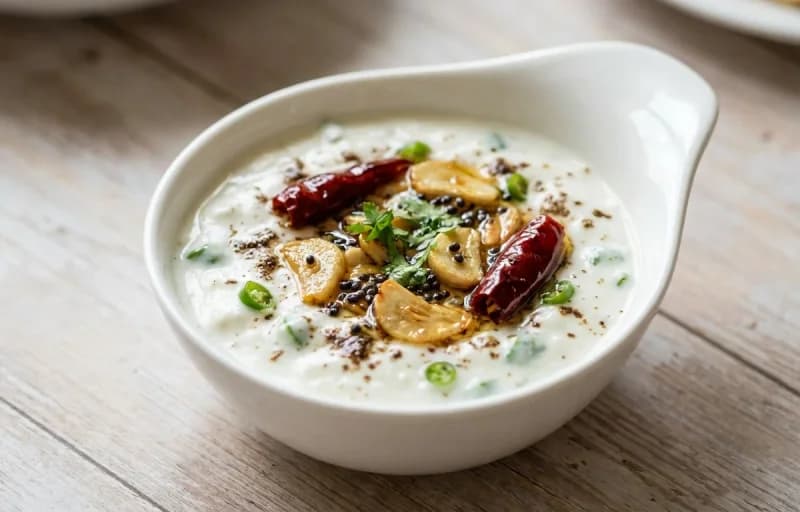
A luxurious Rajasthani mutton curry made with a rich, creamy white gravy of yogurt, cashews, and almonds. Delicately spiced and slow-cooked until the meat is fall-off-the-bone tender, this royal dish is a true celebration of Mughlai-inspired flavors.
Prep25 min
Cook75 min
Soak30 min
Servings4
Serving size: 1 serving
617cal
58gprotein
19gcarbs
Ingredients
750 g Mutton (bone-in, curry cut)
4 tbsp Ghee
300 g Onion (about 2 medium, ground to a smooth paste)
240 g Curd (full-fat, whisked well at room temperature)
Soft, thin, and light Indian flatbreads made from whole wheat flour. They puff up beautifully on an open flame, making them a perfect, healthy accompaniment to any curry or dal.
Crisp, tangy pickled pearl onions soaked in a sweet and sour vinegar brine. This classic Indian restaurant-style condiment adds a refreshing crunch to rich curries and tandoori dishes.
Creamy, melt-in-mouth Safed Maas with fluffy phulkas. A soul-satisfying, protein-packed meal!
This marwari dish is perfect for lunch. With 912.6600000000001 calories and 66.53g of protein per serving, it's a nutritious choice for your meal plan.
34gfat
5 pods Green Cardamom
5 pods Cloves
1 pod Black Cardamom
1 inch Cinnamon Stick
1 leaf Bay Leaf
1 tsp White Pepper Powder
0.5 tsp Garam Masala
0.25 tsp Mace Powder
1.5 tsp Salt (or to taste)
480 ml Water (for the gravy, use hot water)
1 tsp Kewra Water (optional, for fragrance)
2 tbsp Coriander Leaves (chopped, for garnish)
Instructions
1
Prepare Pastes and Marinate Mutton
Soak cashews and almonds in hot water for 30 minutes. After soaking, peel the skin off the almonds.
Grind the soaked cashews and peeled almonds with 2 tbsp of water into a very smooth, fine paste. Set aside.
In a large bowl, combine the mutton pieces, whisked room-temperature curd, ginger paste, garlic paste, and 1 tsp of salt. Mix thoroughly to ensure each piece is well-coated.
Cover the bowl and let the mutton marinate for at least 1 hour at room temperature, or up to 4 hours in the refrigerator.
2
Sauté Aromatics and Onions
Heat ghee in a heavy-bottomed pressure cooker over medium heat.
Add the whole spices: bay leaf, cinnamon stick, green cardamoms, black cardamom, and cloves. Sauté for 30-45 seconds until they become fragrant.
Add the onion paste. Cook for 8-10 minutes, stirring frequently, until the paste loses its raw smell and turns a pale cream color. Do not let it brown, as this will alter the final color of the gravy.
3
Sear and Cook the Mutton
Add the marinated mutton along with all the marinade to the cooker. Increase the heat to medium-high.
Sauté for 10-12 minutes, stirring continuously. Cook until the mutton is well-seared, the curd mixture thickens, and you see ghee separating at the edges of the pan.
Pour in 480 ml of hot water and the remaining 0.5 tsp of salt. Stir well to combine.
4
Pressure Cook Until Tender
Secure the lid of the pressure cooker. Bring to high pressure on medium-high heat.
Once pressure is reached, reduce the heat to medium-low and cook for 20-25 minutes (or about 5-6 whistles).
Turn off the heat and allow the pressure to release naturally. This is crucial for making the mutton exceptionally tender.
5
Finish the Gravy
Once the pressure has fully released, carefully open the cooker. Turn the heat back on to low.
Stir in the prepared cashew-almond paste. Simmer gently for 5-7 minutes, stirring constantly to prevent the paste from sticking to the bottom, until the gravy thickens to your desired consistency.
Add the white pepper powder, garam masala, and mace powder. Mix well and cook for another minute.
Turn off the heat. Stir in the fresh cream and optional kewra water. Mix gently until incorporated. Do not boil the curry after adding cream to prevent it from splitting.
6
Garnish and Serve
Transfer the Safed Maas to a serving bowl.
Garnish with freshly chopped coriander leaves.
Serve hot with traditional Rajasthani breads like bajra roti, or with naan, sheermal, or steamed basmati rice.
262cal
8gprotein
44gcarbs
8gfat
Ingredients
2 cup Atta (Also known as whole wheat flour)
0.5 tsp Salt
1 cup Lukewarm Water (Adjust as needed to form a soft, pliable dough)
2 tbsp Ghee (For brushing on top, optional)
Instructions
1
Prepare the Dough
In a large mixing bowl, combine 2 cups of atta and salt.
Gradually add lukewarm water, a little at a time, mixing with your fingers until the flour comes together to form a dough.
Knead the dough on a clean, flat surface for 8-10 minutes, pressing and stretching it with the heel of your hand. The final dough should be soft, smooth, and elastic, not sticky.
2
Rest the Dough
Lightly grease the dough with a few drops of oil or ghee to prevent it from drying out.
Cover the bowl with a damp cloth or a lid and let the dough rest for at least 20-30 minutes. This step is crucial for relaxing the gluten, which results in softer phulkas.
3
Divide and Roll
After resting, knead the dough again for one minute.
Divide the dough into 8 equal-sized portions and roll them into smooth balls.
Take one ball, flatten it between your palms, and dip it into the dry atta for dusting.
Place it on a rolling board (chakla) and roll it out evenly into a thin circle, about 6-7 inches in diameter. Use minimal dry flour for dusting to avoid making the phulka hard.
4
Cook on the Tawa (Griddle)
Heat a tawa over medium-high heat. To check if it's ready, sprinkle a pinch of dry flour; it should turn brown in a few seconds.
Place the rolled phulka on the hot tawa. Cook for about 15-20 seconds until you see small bubbles appear on the surface.
Flip the phulka using tongs and cook the other side for 30-40 seconds until light brown spots appear.
5
Puff on Open Flame
Using tongs, carefully lift the phulka off the tawa and place it directly on a high flame.
Within seconds, the phulka will puff up into a ball due to the trapped steam.
Immediately flip it to cook the other side on the flame for just a second or two. Be careful not to burn it.
6
Finish and Serve
Remove the puffed phulka from the flame. If desired, brush the top with a little ghee.
Place the finished phulka in a casserole or a container lined with a clean kitchen towel. This keeps them soft and warm.
Repeat the rolling, cooking, and puffing process for the remaining dough balls. Serve hot with your favorite dal or curry.
Peel the pearl onions. To make peeling easier, blanch them in hot water for 2 minutes, then immediately transfer to a bowl of ice-cold water.
Trim the root and stem ends of each onion, keeping them whole.
Make a small, shallow cross-shaped incision on the top of each onion. This helps the brine penetrate deeper for better flavor.
2
Make the Pickling Brine
In a non-reactive saucepan (like stainless steel or enamel), combine the water, white vinegar, sugar, and salt.
Add the julienned ginger, slit green chilies, and black peppercorns.
Bring the mixture to a rolling boil over medium-high heat, stirring occasionally until the sugar and salt dissolve completely. This should take about 3-5 minutes.
3
Assemble the Pickle
Place the peeled pearl onions and the thin slice of beetroot into a clean, sterilized 500ml (16 oz) glass jar.
Carefully pour the hot pickling brine over the onions, ensuring they are fully submerged. Gently tap the jar on the counter to release any air bubbles.
4
Cool, Store, and Serve
Allow the jar to cool to room temperature on the counter, which may take 1-2 hours.
Once completely cool, seal the jar with an airtight lid and place it in the refrigerator.
For the best flavor and crunch, let the onions pickle for at least 24 hours before serving. The flavor will continue to develop and intensify over the next few days.