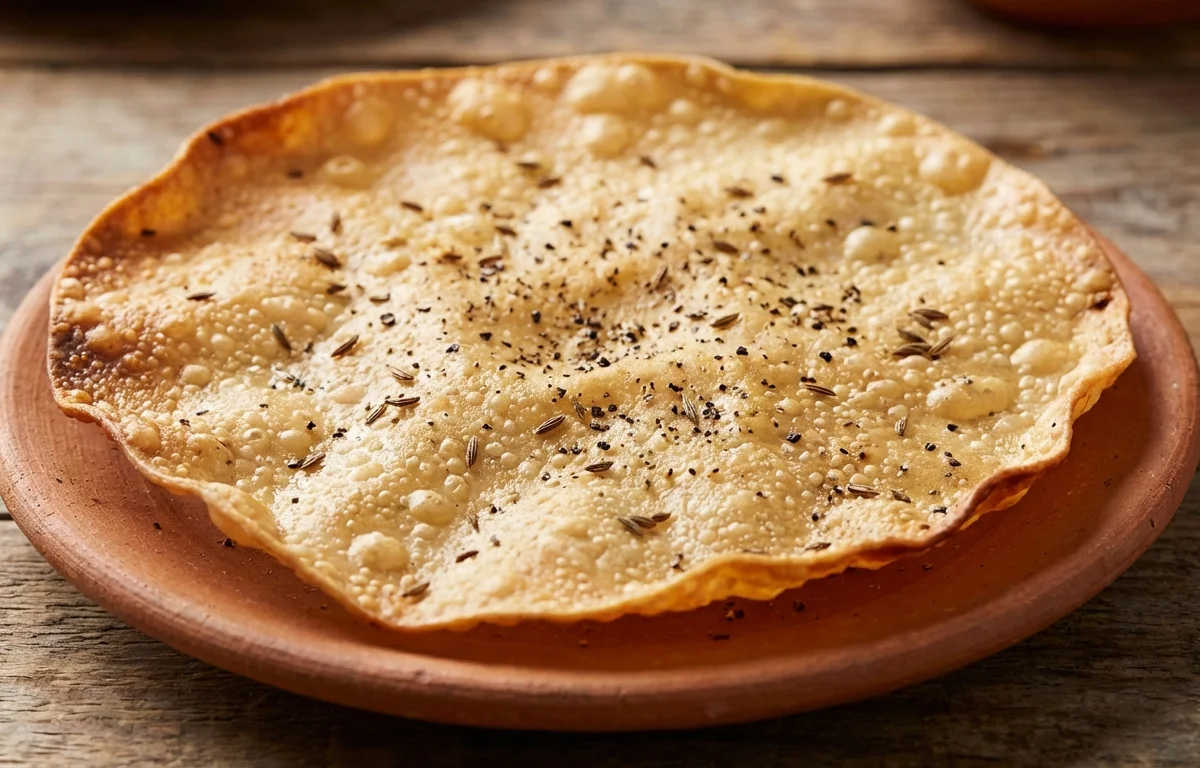
Papad
Thin, crisp lentil wafers with a peppery, lightly spiced bite. This everyday Indian side is rolled very thin, sun-dried, and quickly roasted or fried just before serving for extra crunch.
For 8 servings
- mix · ~3 min
Mix the flour and spices.
1.Add urad dal flour to a wide bowl.2.Mix in crushed black pepper, cumin seeds, asafoetida, and salt.3.Stir well so the spices are evenly spread through the flour. - knead · ~8 min
Knead a stiff dough.
Add oil and warm water little by little to make a firm, smooth dough. Knead well for 6 to 8 minutes so the dough feels tight and elastic.
TIPKeep the dough stiff, not soft, so the papad rolls thin and dries crisp. - rest · ~15 min
Rest the dough.
Cover the dough and let it rest for 15 minutes. This helps the flour hydrate and makes rolling easier.
- prep · ~4 min
Divide and shape the dough.
1.Divide the dough into 8 equal small balls.2.Flatten each ball lightly between your palms.3.Keep the pieces covered so they do not dry out while you roll. - other · ~10 min
Roll the papad very thin.
Roll each dough ball into a very thin circle, about 5 to 6 inches wide. If needed, use a tiny smear of oil on the rolling surface to prevent sticking.
TIPRoll evenly from the center out so the papad cooks and crisps at the same rate. - rest
Dry the papad.
Lay the rolled papad on clean cloths or plates and dry them in direct sun until fully dry and firm. Turn once midway so both sides dry evenly.
TIPThe papad must be completely dry before storing, or it will turn chewy instead of crisp. - roast · ~5 min
Roast the papad before serving.
Roast each dried papad over low flame or on a hot tawa for a few seconds on each side until it blisters and turns crisp. Serve right away.
TIPMove it constantly over the heat to avoid burning one spot.
What to keep in mind.
7 tips from the recipe — small details that make a real difference to the final dish.
- 1Keep the dough quite stiff; a soft dough makes papad hard to roll thin and can turn leathery after drying.
- 2Cover the divided dough balls with a cloth while rolling so the surface does not crust and crack.
- 3Roll from the center outward and rotate often to keep the papad evenly thin, especially at the edges.
- 4Dry the rolled papad until fully firm with no cool, damp spots; any residual moisture makes them chewy in storage.
- 5If sun-drying is slow, bring the papad indoors in the evening so they do not absorb overnight moisture.
- 6Roast on low flame or a hot tawa just until blistered; over-roasting makes the urad papad taste bitter.
- 7Store fully dried papad in an airtight container with parchment between layers to prevent sticking and breakage.
Adapt it for your goals.
Fried
Deep-fry the dried papad for a few seconds instead of roasting for a more evenly puffed, richer finish.
spicierSpicier
Add a little red chili powder with the pepper for a hotter papad that pairs well with simple dal-rice meals.
garlicGarlic
Mix in a small amount of garlic paste or garlic powder for a more robust, savory flavor.
jeera heavyJeera-heavy
Increase cumin slightly if you want a more aromatic, earthy papad to serve with yogurt-based sides.
Why this is on our healthy list.
Lentil-Based Protein
Made from urad dal flour, this papad brings the satisfying, protein-rich qualities of pulses to a small side dish.
Digestive Spice Support
Cumin, black pepper, and asafoetida are classic Indian seasonings often used to make legume-based foods feel lighter and more digestible.
Low Added Fat When Roasted
Because the papad is dried first and then dry-roasted, it can be served crisp with very little added oil.
Frequently asked questions
They were likely not dried fully before storing or roasting. Dry them until completely firm, then roast briefly over steady heat.