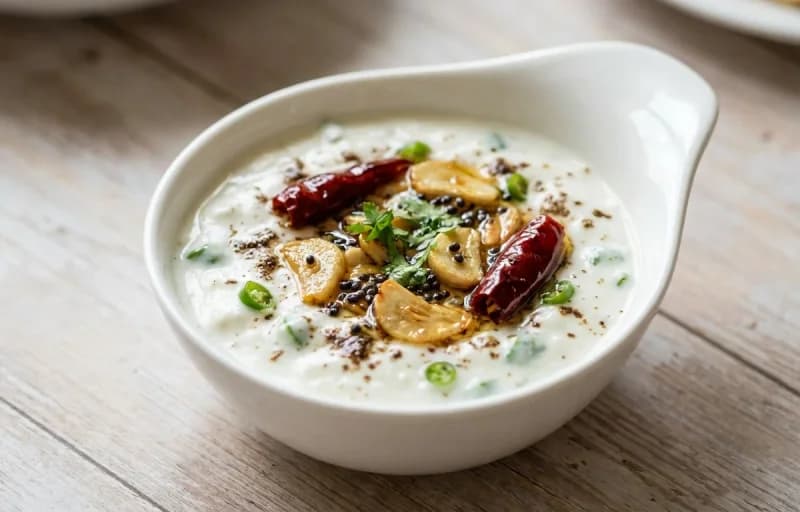
A comforting and protein-packed twist on the classic dal tadka. Creamy lentils are simmered with perfectly boiled eggs and finished with a fragrant tempering of spices, creating a wholesome and satisfying meal.
Prep15 min
Cook30 min
Soak30 min
Servings4
Serving size: 1 serving
370cal
19gprotein
39gcarbs
Ingredients
1 cup Toor Dal (Also known as Arhar Dal or split pigeon peas)
5 cup Water (2 cups for soaking and 3 cups for cooking)
4 large Eggs
3 tbsp Ghee (Divided, 2 tbsp for base and 1 tbsp for final tadka)
Soft, unleavened whole wheat flatbread, a daily staple in Indian households. Perfect for scooping up curries and dals, this simple, wholesome bread is puffed up on an open flame for that classic, airy texture.
Crisp, tangy pickled onions just like the ones you get at your favorite Indian restaurant. This simple recipe uses vinegar, a hint of sugar, and beetroot for that classic pink hue. The perfect crunchy side for rich curries and tandoori dishes.
Protein-packed Egg Tadka Dal with soft roti - a fiber-rich, soul-satisfying comfort food meal.
This marwari dish is perfect for breakfast. With 616.54 calories and 27.2g of protein per serving, it's a high-fiber, muscle-gain option for your meal plan.
16gfat
1 tbsp Ginger Garlic Paste
1 large Tomato (Finely chopped)
2 whole Green Chillies (Slit lengthwise)
0.5 tsp Turmeric Powder
1 tsp Kashmiri Red Chilli Powder (Divided, for color)
2 tbsp Coriander Leaves (Freshly chopped, for garnish)
Instructions
1
Preparation
Rinse the toor dal thoroughly until the water runs clear. Soak it in 2 cups of water for at least 30 minutes.
While the dal soaks, place the eggs in a saucepan, cover with water, and bring to a boil. Cook for 10-12 minutes to hard-boil them.
Once boiled, transfer the eggs to cold water, peel them, and make 2-3 shallow diagonal slits on each egg. This helps them absorb the dal's flavors. Set aside.
2
Pressure Cook the Dal
Drain the soaked dal and transfer it to a pressure cooker.
Add 3 cups of fresh water, turmeric powder, and 1 tsp of salt. Stir well.
Secure the lid and pressure cook on medium heat for 4-5 whistles (about 15 minutes) until the dal is completely soft and mushy.
Allow the pressure to release naturally. Open the cooker and whisk the dal gently to achieve a smooth, creamy consistency.
3
Prepare the Base Masala
Heat 2 tbsp of ghee in a kadai or deep pan over medium heat.
Add the mustard seeds and cumin seeds. Once they start to splutter, add the hing and dried red chillies. Sauté for 30 seconds.
Add the finely chopped onion and sauté for 5-7 minutes until it turns light golden brown.
Stir in the ginger-garlic paste and cook for another minute until the raw aroma disappears.
Add the chopped tomatoes, green chillies, and the remaining 0.5 tsp of salt. Cook for 4-5 minutes until the tomatoes are soft and pulpy.
Add 0.5 tsp Kashmiri red chilli powder and coriander powder. Sauté for a minute until the oil begins to separate from the masala.
4
Combine and Simmer
Pour the cooked dal into the kadai with the masala. Mix everything together thoroughly.
If the dal seems too thick, add up to 1 cup of hot water to reach your desired consistency.
Gently slide the slit boiled eggs into the dal.
Bring the mixture to a gentle simmer and cook for 5-7 minutes, allowing the eggs to absorb the flavors.
Stir in the garam masala and crushed kasuri methi. Cook for one more minute and then turn off the heat.
5
Prepare Final Tadka and Serve
For the final tempering (tadka), heat the remaining 1 tbsp of ghee in a small tadka pan.
Once hot, turn off the heat and add the remaining 0.5 tsp of Kashmiri red chilli powder. Swirl the pan to mix.
Immediately pour this sizzling tadka over the dal in the serving bowl.
Garnish with freshly chopped coriander leaves. Serve hot with steamed rice, jeera rice, or roti.
213cal
8gprotein
44gcarbs
2gfat
Ingredients
2 cup atta (Use a fine-milled whole wheat flour for best results.)
1 cup lukewarm water (Adjust quantity as needed; dough should be soft and pliable.)
1 tsp ghee (For the dough, plus extra for brushing (optional).)
Instructions
1
Prepare the dough
In a large mixing bowl, combine the atta and 1 tsp of ghee.
Gradually add lukewarm water, a little at a time, mixing with your fingers to form a shaggy dough.
Knead the dough on a clean surface for 8-10 minutes, using the heel of your palm to push and fold until it is smooth, soft, and pliable, but not sticky.
Cover the dough with a damp cloth or a lid and let it rest for at least 20-30 minutes. This step is crucial for relaxing the gluten and ensuring soft rotis.
2
Divide and roll the rotis
After resting, knead the dough for another minute.
Divide the dough into 8 equal-sized portions and roll each into a smooth, crack-free ball.
Take one dough ball, flatten it, and dip it in dry atta for dusting.
On a rolling board, use a rolling pin to roll it into an even circle about 6-7 inches in diameter. Ensure the edges are as thin as the center for proper puffing.
3
Cook the roti
Heat a flat griddle (tawa) over medium-high heat. It's ready when a pinch of flour sprinkled on it sizzles and turns brown in seconds.
Place the rolled roti on the hot tawa. Cook for about 20-30 seconds, until you see small bubbles appear on the surface.
Using tongs, flip the roti. Cook the second side for about 45-60 seconds, until light brown spots appear.
4
Puff the roti
Using tongs, carefully remove the roti from the tawa and place it directly over a medium-high open flame. It should puff up into a ball almost instantly. Flip it once and remove immediately to avoid burning.
Alternatively, if you don't have a gas stove, flip the roti back onto the tawa and gently press the edges with a folded kitchen towel. This traps steam and helps the roti puff up.
Once puffed, immediately remove the roti from the heat.
5
Finish and serve
Brush one side with ghee, if desired, for extra flavor and softness.
Place the finished roti in a casserole dish or a container lined with a clean kitchen towel to keep them soft and warm.
Repeat the process for all remaining dough balls. Serve hot with your favorite dal, curry, or sabzi.
250 g Pearl Onions (Peeled. Can substitute with shallots.)
1 cup White Vinegar (Standard distilled white vinegar.)
1 cup Water
2 tbsp Sugar (Adjust to taste.)
1.5 tsp Salt
25 g Beetroot (Peeled and thinly sliced.)
2 pcs Green Chilli (Slit lengthwise.)
1 inch Ginger (Peeled and cut into thin juliennes.)
1 tsp Black Peppercorns (Whole peppercorns.)
Instructions
1
Prepare the Onions and Aromatics
Wash and peel the pearl onions. If they are large, you can slice them in half. Make a small cross slit at the root end of each onion to help the pickling liquid penetrate.
Thinly slice the peeled beetroot. Slit the green chillies lengthwise, keeping the stem intact. Julienne the ginger.
2
Create the Pickling Brine
In a medium saucepan, combine the water, white vinegar, sugar, salt, and whole black peppercorns.
Place the saucepan over medium-high heat and bring the mixture to a rolling boil, stirring until the sugar and salt are completely dissolved. This should take about 3-4 minutes.
Once boiling, turn off the heat.
3
Assemble the Pickle Jar
In a clean, sterilized glass jar (at least 500ml capacity), place the prepared pearl onions, beetroot slices, slit green chillies, and ginger juliennes.
Carefully pour the hot pickling brine directly over the onions in the jar, ensuring they are fully submerged. The heat from the brine helps to keep the onions crisp.
Allow the jar to cool down to room temperature, which may take about 1-2 hours. Do not seal the jar while it's hot.
Once cooled, secure the lid tightly and transfer the jar to the refrigerator.
For best results, let the onions pickle for at least 24 hours before serving. This allows the flavors to meld and the onions to develop their signature pink color.