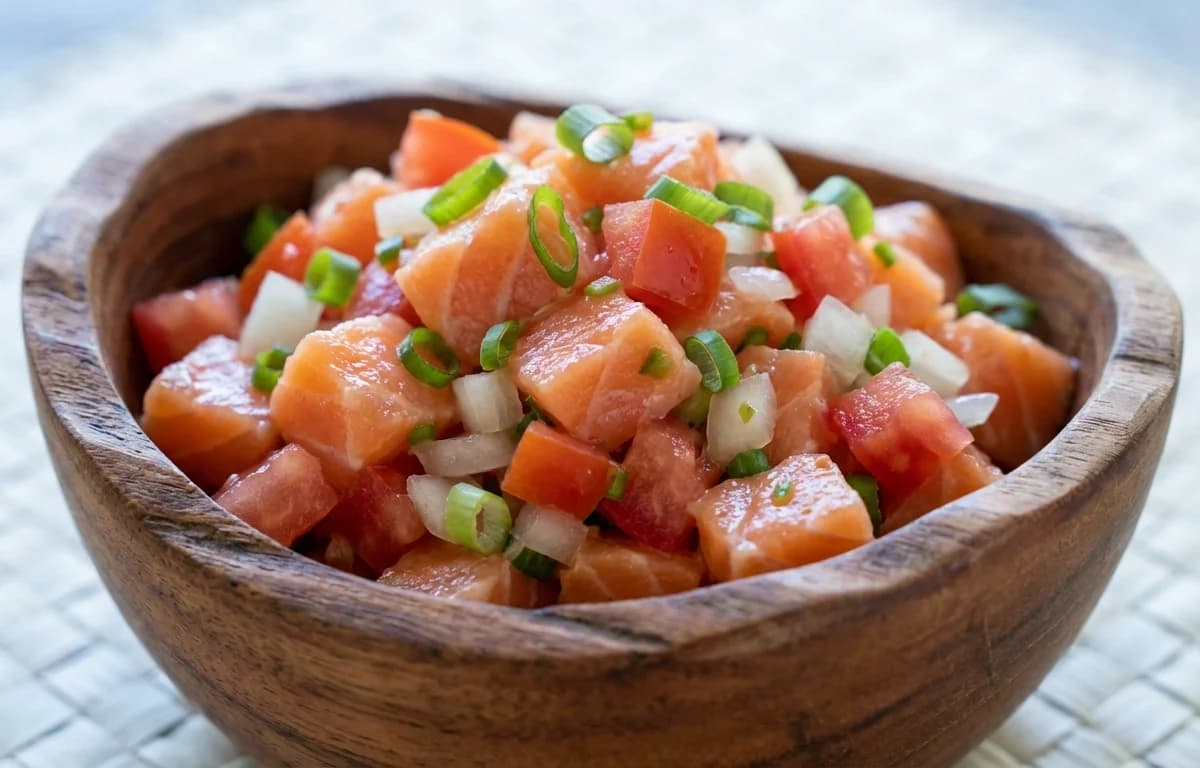
A refreshing Hawaiian classic, this no-cook salad features salt-cured salmon tossed with fresh tomatoes, sweet onion, and a hint of chili. It's the perfect vibrant side for any luau or summer gathering.
Prep20 min
Cook0 min
Servings4
Serving size: 1 serving
263cal
24gprotein
6gcarbs
15g
Ingredients
1 lb Sushi-Grade Salmon Fillet (Skinless and boneless)
3 tbsp Coarse Sea Salt (For curing the salmon)
4 pcs Roma Tomatoes (Medium, ripe but firm)
1 pcs Sweet Onion (Medium (e.g., Maui or Vidalia))
4 stalks Green Onions (Thinly sliced)
1 pcs Serrano Pepper (Optional, finely minced with seeds removed for less heat)
0.5 cup Ice Cubes (Optional, for serving to keep it extra cold)
Instructions
1
Cure the Salmon (2-4 hours)
Pat the salmon fillet completely dry with paper towels.
A classic Goan leavened bread with a soft, hollow center and a rustic wheat bran coating. This slightly sweet, whole wheat bread is perfect for mopping up curries or making sandwiches.
Crisp, flaky, and incredibly buttery homemade crackers that melt in your mouth. They're surprisingly easy to make and perfect for snacking, cheese boards, or dipping into your favorite soup.
About Lomi-Lomi Salmon, Goan Poi and Buttery Crackers
Tangy Lomi-Lomi Salmon with poi – a fresh, unique dish that's a true taste of the islands!
This hawaiian dish is perfect for lunch. With 619.39 calories and 32.379999999999995g of protein per serving, it's a nutritious choice for your meal plan.
fat
In a non-reactive dish (like glass or ceramic), rub the coarse sea salt all over the salmon, ensuring it's fully coated.
Cover the dish with plastic wrap and refrigerate for 2 to 4 hours. A shorter time yields a softer texture, while a longer time results in a firmer, saltier fish.
2
Rinse and Dice the Salmon (5 minutes)
After curing, remove the salmon from the refrigerator. You will notice liquid has been drawn out.
Rinse the salmon fillet thoroughly under cold running water to remove all the salt.
Pat the fillet completely dry again with fresh paper towels. This step is crucial for the right texture.
Using a very sharp knife, dice the salmon into small, uniform 1/4-inch cubes and place them in a large mixing bowl.
3
Prepare the Vegetables (10 minutes)
Cut the tomatoes in half and gently squeeze out the seeds and excess liquid. Dice the tomato flesh into 1/4-inch pieces.
Finely dice the sweet onion to a similar size as the tomatoes.
Thinly slice the green onions, including both the white and green parts.
If using, finely mince the serrano pepper. For less heat, ensure all seeds and white membranes are removed.
4
Combine and Chill (5 minutes active, 30 minutes passive)
Add the diced tomatoes, sweet onion, green onions, and serrano pepper to the bowl with the salmon.
Using your clean hands or a spoon, gently mix all the ingredients together. The traditional method is to 'lomi' or massage them gently with your fingertips.
Cover the bowl and chill in the refrigerator for at least 30 minutes to allow the flavors to meld together.
5
Serve
Give the Lomi-Lomi Salmon a final gentle stir before serving.
For an extra cold and refreshing presentation, serve it over a bed of crushed ice or mix in a few ice cubes just before serving.
Enjoy immediately with traditional accompaniments like poi, steamed rice, or taro chips.
8
Serving size: 1 serving
132cal
4gprotein
25gcarbs
3gfat
Ingredients
1 cup Warm Water (Around 105-115°F or 40-46°C)
1 tsp Sugar
1 tsp Active Dry Yeast
1.5 cup Atta (Indian whole wheat flour)
0.5 cup Maida (All-purpose flour)
1 tsp Salt
1 tbsp Vegetable Oil (Plus extra for greasing the bowl)
0.5 cup Wheat Bran (For coating the dough balls)
Instructions
1
Activate the Yeast
In a small bowl, combine the warm water, sugar, and active dry yeast.
Stir gently to dissolve and let the mixture stand for 5-10 minutes.
It is ready when it becomes frothy and bubbly, which indicates the yeast is active.
2
Prepare and Knead the Dough
In a large mixing bowl, whisk together the atta, maida, and salt.
Create a well in the center and pour in the activated yeast mixture and the vegetable oil.
Mix with a spoon or your hands until a shaggy dough forms.
Transfer the dough to a lightly floured surface and knead for 8-10 minutes until it is smooth, soft, and elastic.
3
First Proofing
Lightly grease the mixing bowl with a few drops of oil.
Place the kneaded dough in the bowl, turning it once to coat the surface with oil.
Cover the bowl with a damp cloth or plastic wrap.
Let the dough rise in a warm, draft-free place for 60-75 minutes, or until it has doubled in volume.
4
Shape and Coat the Poi
Gently punch down the risen dough to release the trapped air.
Divide the dough into 8 equal portions and roll each portion into a smooth ball.
Spread the wheat bran on a flat plate.
Take one dough ball at a time and roll it in the wheat bran, pressing gently to ensure it is evenly coated on all sides.
5
Second Proofing
On a lightly floured surface, gently roll each bran-coated ball into a disc about 4-5 inches in diameter and approximately 1/4 inch thick.
Arrange the rolled discs on a baking sheet lined with parchment paper, ensuring they don't touch.
Cover them with a clean kitchen towel and let them rest for 20 minutes. They will puff up slightly.
6
Bake the Poi
During the last 10 minutes of the second proofing, preheat your oven to its highest temperature, typically 450-475°F (230-245°C). Place a baking stone or an inverted heavy-duty baking sheet inside to heat up.
Carefully transfer 2-3 poi discs directly onto the hot baking stone or sheet.
Bake for 5-6 minutes. The poi will puff up dramatically like a balloon and develop light golden-brown spots.
Remove the puffed poi from the oven and immediately wrap them in a clean cloth. This traps the steam and keeps them soft.
0.5 cup Unsalted Butter (113g, cold and cut into small cubes)
4 tbsp Whole Milk (60ml, very cold)
1 tsp Flaky Sea Salt (For sprinkling)
Instructions
1
Prepare the Dough
In the bowl of a food processor, combine the all-purpose flour, granulated sugar, baking powder, and fine sea salt. Pulse 2-3 times to combine.
Add the cold, cubed butter to the flour mixture. Pulse 8-10 times, or until the mixture resembles coarse crumbs with some pea-sized pieces of butter remaining.
With the processor on low, slowly drizzle in the cold milk. Process just until the dough begins to clump together. Do not overmix.
2
Chill the Dough
Turn the dough out onto a clean surface, gather it into a ball, and flatten it into a 1-inch thick disk. Avoid kneading.
Wrap the disk tightly in plastic wrap and refrigerate for at least 30 minutes, or up to 2 days. This step is crucial for flaky crackers.
3
Preheat and Prepare
Position racks in the upper and lower thirds of your oven and preheat to 400°F (200°C).
Line two large baking sheets with parchment paper.
4
Roll and Cut Crackers
Lightly flour a work surface and a rolling pin. Unwrap the chilled dough and roll it out as thinly as possible, aiming for about 1/16-inch thickness. Work quickly to keep the dough cold.
Using a 1.5-inch round cookie cutter or a sharp knife, cut out the crackers. Arrange them about 1/2-inch apart on the prepared baking sheets.
Gather and re-roll the scraps once to cut more crackers.
Using a fork or a skewer, prick each cracker 2-3 times in the center. This prevents them from puffing up into bubbles while baking.
5
Bake the Crackers
Bake for 12-15 minutes, rotating the baking sheets from top to bottom and front to back halfway through the baking time.
The crackers are done when they are firm to the touch and golden brown around the edges. Watch them carefully in the last few minutes as they can burn quickly.
6
Finish and Cool
Immediately after removing the crackers from the oven, brush them lightly with the melted butter.
Sprinkle evenly with the flaky sea salt.
Let the crackers cool on the baking sheets for 5 minutes before transferring them to a wire rack to cool completely. They will become crispier as they cool.