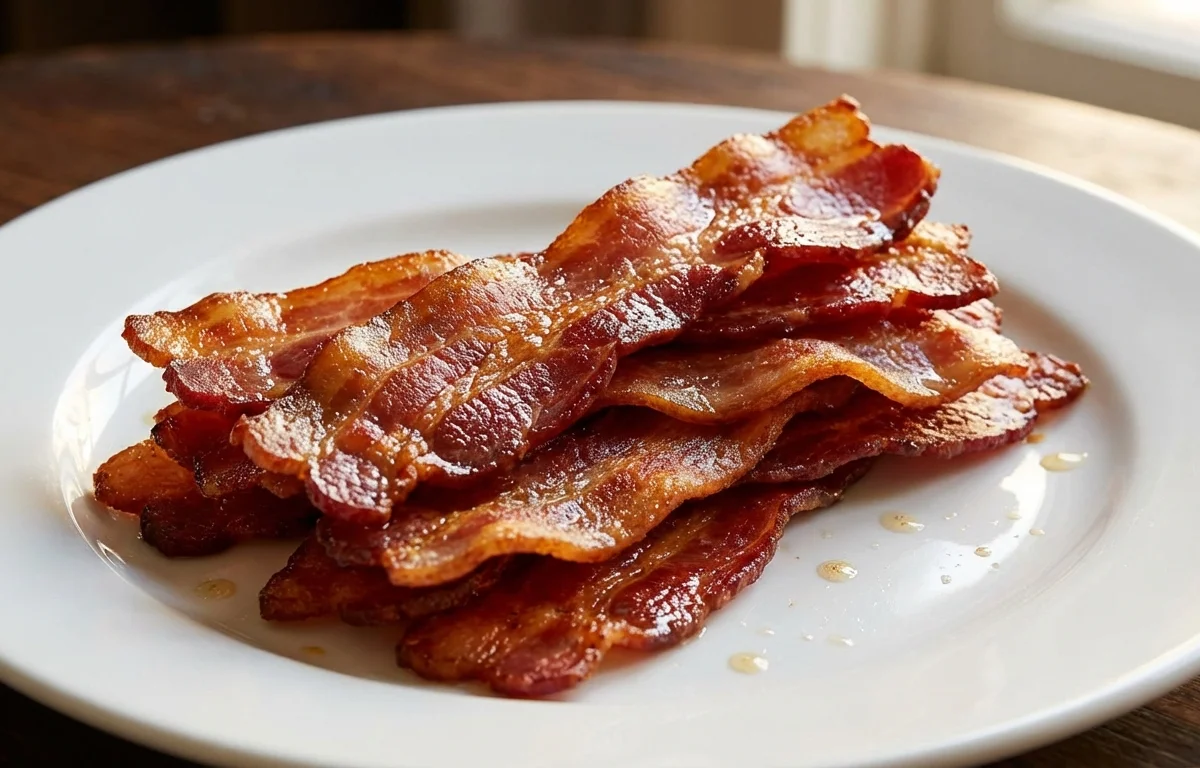
Pan-Fried Bacon Rashers
Crispy, golden strips of bacon with a smoky, savory flavor and perfect crunchy texture. Pan-fried in a skillet for maximum control over doneness, these rashers are an essential breakfast side or a delicious topping for burgers, salads, and pasta. Ready in under 15 minutes with just one ingredient and a cold-start technique that renders the fat beautifully.
For 4 servings
- prep
Arrange bacon in the cold skillet.
Lay the bacon rashers in a single layer in a large cold skillet. They can touch slightly but should not overlap.
TIPStarting with a cold pan gives the fat time to render slowly, resulting in evenly crisp bacon without burnt spots. - fry · ~5 min
Cook over medium heat until fat renders.
Set the skillet over medium heat. Cook undisturbed for 4 to 5 minutes as the bacon begins to sizzle and the fat turns translucent and pools in the pan.
- fry · ~5 min
Flip and cook until golden and crispy.
Use tongs to flip each rasher. Continue cooking for another 3 to 5 minutes, adjusting the heat slightly if needed, until the bacon reaches your desired level of crispness. The bacon should be deep golden with crispy edges.
TIPFor evenly flat bacon, press gently with a spatula after flipping. For chewier bacon, pull it a minute earlier; for extra crispy, let it go a minute longer. - prep · ~1 min
Drain on paper towels and serve.
Transfer the cooked bacon to a plate lined with paper towels to drain excess fat. Let it rest for 1 minute—it will continue to crisp as it cools. Serve immediately.
TIPDon't skip the paper towel drain. It removes excess grease and is what separates floppy bacon from truly crisp rashers.
What to keep in mind.
6 tips from the recipe — small details that make a real difference to the final dish.
- 1Thick-cut bacon works best for pan-frying as it renders fat slowly without burning.
- 2Use a cold-start method: lay bacon in a cold skillet to render fat gradually and prevent curling.
- 3Press flipping rashers with a spatula to ensure even contact with the pan for flat, uniform crispness.
- 4Reserve the rendered bacon fat in a jar for cooking eggs, roasting vegetables, or flavoring beans.
- 5For extra-crispy bacon, cook an additional minute per side and drain thoroughly on paper towels.
- 6Do not crowd the pan; cook in batches if needed to ensure each rasher crisps evenly.
Adapt it for your goals.
Baked bacon
Omit the skillet and place rashers on a wire rack over a baking sheet. Bake at 400°F (200°C) for 15-20 minutes for hands-off, perfectly flat bacon with less splatter.
peppered baconPeppered bacon
Before cooking, press freshly cracked black pepper onto both sides of the rashers. Adds a spicy crust that complements the smoky bacon flavor.
maple glazedMaple-glazed
In the last minute of cooking, brush each rasher with a thin layer of pure maple syrup. Flip and cook 30 more seconds for sweet-savory candied bacon.
turkey baconTurkey bacon
Substitute turkey bacon for a leaner option. Cook over medium-low heat for 3-4 minutes per side; do not cold-start as it contains less fat and may stick.
Why this is on our healthy list.
High-Quality Protein
Bacon provides a concentrated source of animal protein, essential for muscle repair and satiety in a breakfast or meal topping.
Rich in B Vitamins
Bacon contains B vitamins, particularly B12 and niacin, which support energy metabolism and nervous system function.
Source of Selenium
Pork bacon is a natural source of selenium, a mineral that supports thyroid function and antioxidant defenses.
Frequently asked questions
Starting cold allows the fat to render gradually, giving you evenly crispy bacon without burnt edges or undercooked centers.