A tangy and spicy black chickpea curry from the heart of Rajasthan. This Jaisalmeri specialty features a unique, creamy gravy made from yogurt and chickpea flour, giving it a distinctive flavor that's both rustic and rich.
Prep15 min
Cook45 min
Soak480 min
Servings4
Serving size: 1 cup
294cal
13gprotein
37gcarbs
Ingredients
1 cup Kala Chana (soaked overnight and drained)
1 cup Curd (whisked until smooth, preferably slightly sour)
Golden, puffy, and irresistibly crisp, these deep-fried Indian breads are a festive favorite. Made from a simple whole wheat dough, they pair perfectly with savory curries like chole or a sweet shrikhand.
A luscious and smooth Indian mango pulp, bursting with the flavor of fresh seasonal mangoes. This beloved Maharashtrian dessert is often enjoyed with hot puris and is the perfect way to celebrate summer.
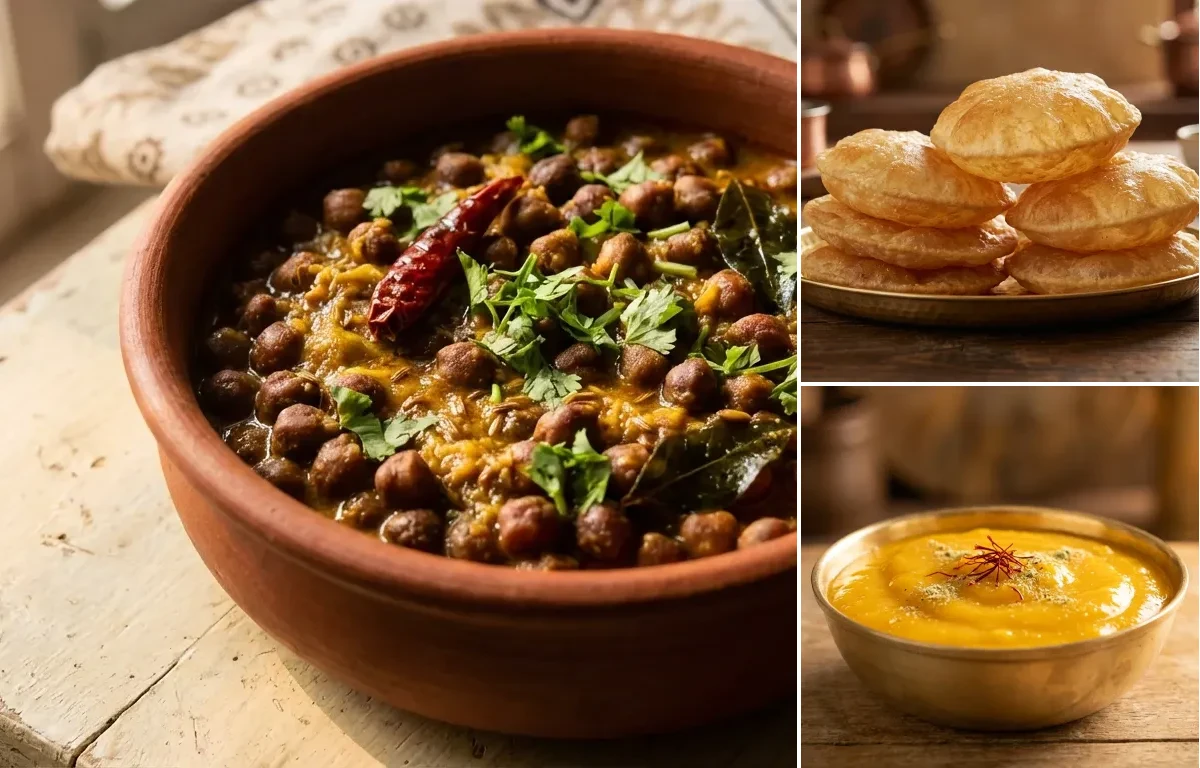
Tangy, protein-packed Chane Jaiselmeri with fluffy puris and sweet aamras – a truly festive meal!
This rajasthani dish is perfect for dinner. With 864.5699999999999 calories and 23.01g of protein per serving, it's a nutritious choice for your meal plan.
12gfat
1 tsp Red Chili Powder (adjust to taste)
1.5 tsp Coriander Powder
0.5 tsp Garam Masala
1.25 tsp Salt (divided, or to taste)
3 cup Water (for pressure cooking)
2 tbsp Coriander Leaves (chopped, for garnish)
Instructions
1
Pressure Cook the Chickpeas
Place the soaked and drained black chickpeas in a pressure cooker.
Add 3 cups of water and 0.5 tsp of salt.
Secure the lid and pressure cook on high heat for one whistle. Then, reduce the heat to low and cook for 20-25 minutes, or until the chickpeas are completely soft.
Allow the pressure to release naturally. Do not discard the cooking water, as it is full of flavor and will be used for the gravy.
2
Prepare the Yogurt-Besan Slurry
In a medium bowl, combine the whisked curd, besan, turmeric powder, red chili powder, and coriander powder.
Whisk vigorously until the mixture is completely smooth and free of lumps. This step is crucial to prevent the gravy from splitting.
3
Sauté the Aromatics
Heat ghee in a heavy-bottomed pan or kadai over medium heat.
Once the ghee is hot, add the cumin seeds and let them splutter for about 30 seconds.
Add the asafoetida and sauté for a few seconds.
Add the finely chopped onion and cook until it turns soft and golden brown, which should take about 6-7 minutes.
Add the ginger-garlic paste and slit green chilies. Sauté for another minute until the raw aroma disappears.
4
Combine and Simmer the Curry
Reduce the heat to the lowest setting. Slowly pour the yogurt-besan slurry into the pan while stirring continuously.
Continue to stir constantly for 4-5 minutes until the mixture thickens and you see the first bubbles of a boil. This prevents the curd from curdling.
Once the gravy has come to a boil, add the cooked chickpeas along with all their cooking water. Add the remaining 0.75 tsp of salt.
Mix everything well. Bring the curry to a gentle simmer and let it cook on low heat for 10-12 minutes, allowing the flavors to meld and the gravy to thicken to your desired consistency.
5
Garnish and Serve
Turn off the heat and stir in the garam masala.
Garnish with freshly chopped coriander leaves.
Let the curry rest for 5 minutes before serving. Serve hot with bajra roti, phulka, or steamed rice.
426cal
9gprotein
47gcarbs
24gfat
Ingredients
2 cup Atta (Also known as whole wheat flour.)
2 tbsp Rava (Use fine semolina (sooji) for extra crispiness.)
1 tsp Salt (Adjust to taste.)
1 tbsp Ghee (Can be substituted with a neutral oil.)
0.75 cup Lukewarm Water (Add gradually as needed to form a stiff dough.)
3 cup Vegetable Oil (For deep frying. Use a high smoke point oil like canola or sunflower.)
Instructions
1
Prepare the Dough
In a large mixing bowl, combine the atta, rava, and salt. Whisk to mix everything evenly.
Add the ghee to the flour mixture. Using your fingertips, rub the ghee into the flour until it resembles coarse breadcrumbs. This process, known as 'moin', is key for a flaky texture.
Gradually add lukewarm water, a little at a time, while mixing. Knead to form a stiff and firm dough. It should be noticeably tighter than a chapati dough to prevent it from absorbing too much oil during frying.
2
Knead and Rest the Dough
Transfer the dough to a clean work surface and knead for 5-7 minutes until it is smooth and firm.
Cover the dough with a damp cloth or place it in a container with a lid. Let it rest for at least 20-30 minutes. This step is crucial for relaxing the gluten, which makes rolling easier and the puris softer inside.
3
Shape and Roll the Puris
After resting, knead the dough again for one minute to make it smooth.
Divide the dough into 16-20 small, equal-sized balls. Roll each ball between your palms until smooth and crack-free.
Lightly grease your rolling pin and rolling surface with a drop of oil. Avoid using dry flour for dusting, as it can burn in the hot oil and affect its quality and color.
Take one dough ball and roll it into an even circle, about 3-4 inches in diameter and 2-3 mm thick. Ensure the thickness is uniform to help it puff up perfectly.
4
Fry the Puris
Heat the oil for deep-frying in a kadai or deep pan over medium-high heat. The ideal temperature is 180-190°C (355-375°F). To test, drop a tiny piece of dough into the oil; it should sizzle and rise to the top quickly without changing color too fast.
Gently slide a rolled puri into the hot oil. It will sink briefly before floating to the surface.
Using a slotted spoon, gently press down on the center of the puri as it fries. This pressure helps trap steam inside, causing it to puff up beautifully.
Once puffed (this takes about 10-15 seconds), flip it over and fry the other side for another 10-15 seconds until it's a light golden brown.
Fry one or two puris at a time to maintain the oil temperature and avoid overcrowding the pan.
5
Drain and Serve
Remove the fried puri with the slotted spoon, allowing excess oil to drip back into the pan.
Place the puris on a wire rack or a plate lined with paper towels to drain any remaining oil.
Repeat the frying process for all the dough balls.
Serve immediately while hot and puffy with your favorite accompaniments like Aloo Sabzi, Chole, or Shrikhand.
4 large Ripe Alphonso Mangoes (Should be sweet, ripe, and non-fibrous. Kesar mangoes are a great alternative.)
3 tbsp Sugar (Adjust based on the sweetness of the mangoes. You can also use powdered jaggery.)
0.5 tsp Cardamom Powder (Freshly ground is best.)
0.25 tsp Dry Ginger Powder (Optional, but adds a traditional warming flavor that balances the mango.)
0.25 cup Chilled Milk (Use as needed to adjust consistency. For a vegan version, use chilled water or oat milk.)
1 pinch Saffron (For garnish.)
Instructions
1
Prepare the Mangoes
Wash the mangoes thoroughly under cool running water and pat them dry.
Gently press and roll the mangoes on a countertop for a minute to loosen the pulp from the skin. This is a traditional technique.
Peel the skin from the mangoes using a sharp knife or peeler.
Carefully slice the mango flesh away from the seed and chop it into rough chunks. Scrape any remaining pulp from the seed.
2
Blend to a Smooth Pulp
Transfer the mango chunks into a high-speed blender.
Add the sugar, cardamom powder, and optional dry ginger powder.
Blend for 1-2 minutes until you achieve a completely smooth, velvety puree without any lumps.
Check the consistency. If the aamras is too thick, add a few tablespoons of chilled milk or water and blend again for 10-15 seconds. Repeat until you reach your desired thickness, which should be like a thick but pourable smoothie.
3
Chill and Serve
Pour the blended aamras into a serving bowl or individual bowls.
Garnish with a few strands of saffron on top.
Cover the bowl and refrigerate for at least 30-60 minutes. Aamras tastes best when served chilled.
Serve cold with hot, fluffy puris for a classic Maharashtrian meal, or enjoy it as a standalone dessert.