A fiery and aromatic Andhra-style egg stir-fry where hard-boiled eggs are tossed in a masala of deeply browned onions and bold spices. It's a quick, protein-packed side dish that pairs wonderfully with plain rice and sambar.
Perfectly fluffy, long-grained basmati rice with a delicate aroma. This simple, foolproof recipe gives you separate, non-sticky grains every time, making it the perfect base for any curry or dal.
A comforting Andhra classic, this simple dal combines creamy toor dal with fresh spinach, simmered with tamarind and green chilies. Finished with a fragrant garlic tempering, it's the perfect wholesome meal with hot rice and a dollop of ghee.
A classic North Indian condiment, 'Aam ka Achar' is made with raw, tangy mangoes, a robust blend of aromatic spices, and pungent mustard oil. This traditional sun-cured pickle is the perfect spicy and sour accompaniment to any meal, from dal-rice to stuffed parathas.
Prep45 min
Cook10 min
Ferment10080 min
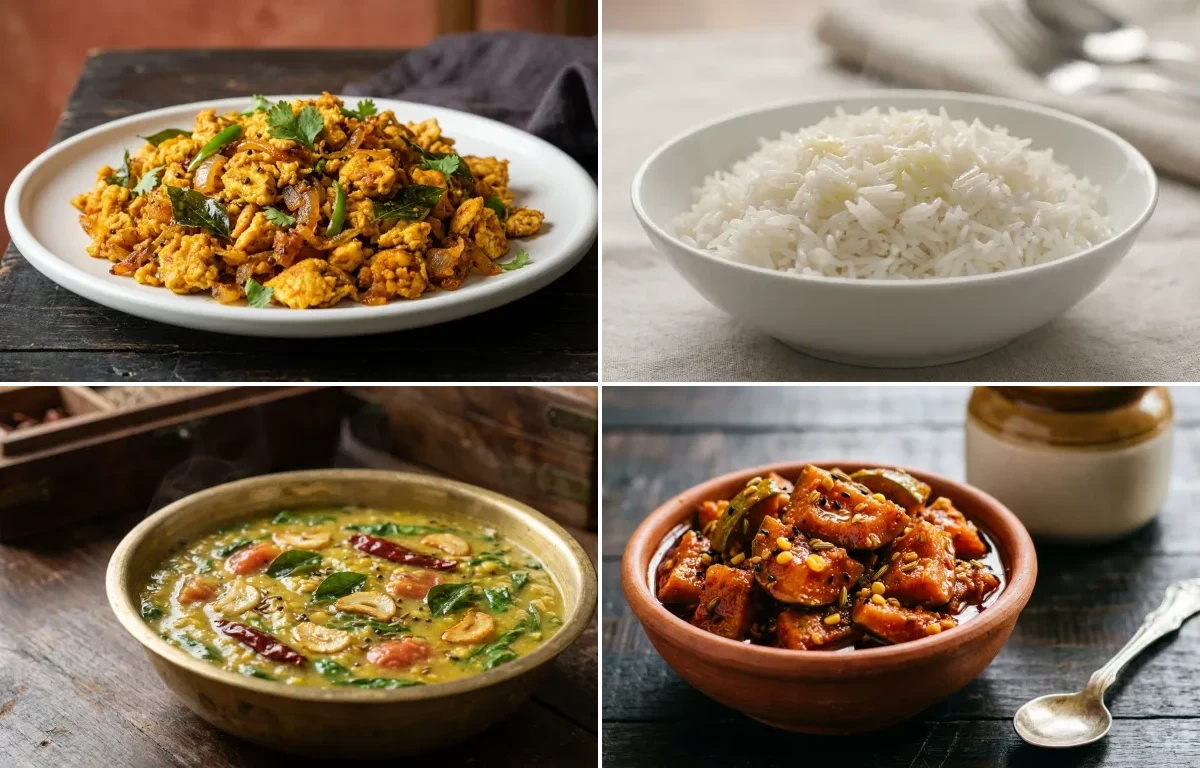
About Egg Vepudu, Steamed Basmati Rice, Palakura Pappu and Mango Pickle
Flavorful egg vepudu with iron-boosting spinach dal & fluffy rice. A protein-packed homestyle meal!
This andhra dish is perfect for dinner. With 916.39 calories and 33.35g of protein per serving, it's a muscle-gain option for your meal plan.
Other Cuisines to Explore
Discover authentic meals from cuisines around the world.
Place eggs in a saucepan and cover with cold water by at least an inch. Bring to a rolling boil, then reduce heat to a simmer and cook for 10 minutes for hard-boiled eggs.
Drain the hot water and immediately transfer the eggs to an ice bath or run under cold water for 5 minutes to stop the cooking process. This makes them easier to peel.
Once cool, peel the eggs and slice them in half lengthwise. Make a few shallow slits on the rounded side of each half.
Heat 1 tbsp of oil in a wide, non-stick pan over medium heat. Gently place the egg halves, cut-side down. Sprinkle with a pinch of turmeric and red chilli powder. Fry for 1-2 minutes until the cut side is lightly golden and crisp. Carefully remove and set aside.
2
Sauté the Onion Masala Base
In the same pan, add the remaining 2 tbsp of oil. Once hot, add the mustard seeds and cumin seeds. Allow them to splutter for about 30 seconds.
Add the curry leaves and slit green chillies. Sauté for another 30 seconds until the leaves are crisp and fragrant.
Add the thinly sliced onions and a pinch of salt (this helps them brown faster). Sauté on medium heat, stirring occasionally, for 10-12 minutes. Be patient and cook until the onions are deeply caramelized and golden brown for maximum flavor.
Add the ginger-garlic paste and cook for 1-2 minutes, stirring continuously, until the raw aroma disappears.
3
Add Spices and Finish the Vepudu
Reduce the heat to low to prevent the spices from burning. Add the turmeric powder, red chilli powder, coriander powder, and the remaining salt. Stir well and cook for 30-40 seconds until aromatic.
Gently return the fried egg halves to the pan. Using a spatula, carefully toss the eggs to coat them evenly with the onion masala without breaking the yolks.
Let the eggs cook in the masala for 2-3 minutes, allowing them to absorb all the flavors.
Sprinkle the garam masala and freshly chopped coriander leaves over the top. Give it one final, gentle mix and turn off the heat.
4
Serve
Serve the Egg Vepudu hot as a side dish with steamed rice and sambar, rasam, or dal.
4
Serving size: 1 serving
262cal
5gprotein
55gcarbs
1gfat
Ingredients
1.5 cup Basmati Rice (Use good quality, aged basmati rice for best results)
2.25 cup Water (For the absorption cooking method)
0.75 tsp Salt (Adjust to taste)
1 tsp Ghee (Optional, for flavor and to prevent sticking)
Instructions
1
Rinse and Soak the Rice (35 minutes)
Place the basmati rice in a large bowl. Add cold water and gently swirl the rice with your fingers. Drain the cloudy water. Repeat this process 3-4 times until the water runs mostly clear. This removes excess starch and prevents stickiness.
Cover the rinsed rice with fresh water and let it soak for 30 minutes. Soaking allows the grains to absorb water, ensuring they cook evenly and elongate beautifully.
After 30 minutes, drain the rice completely using a fine-mesh sieve and set aside.
2
Cook the Rice (15 minutes)
In a medium, heavy-bottomed saucepan with a tight-fitting lid, combine the drained rice, 2.25 cups of fresh water, salt, and ghee (if using).
Bring the mixture to a rolling boil over medium-high heat, uncovered.
As soon as it boils, give it one gentle stir, then immediately reduce the heat to the lowest possible setting. Cover the saucepan tightly with the lid.
Let the rice simmer for 12-15 minutes, or until all the water has been absorbed. Do not lift the lid during this time to prevent steam from escaping.
3
Rest and Fluff (10 minutes)
Turn off the heat but leave the saucepan on the stove, still covered. Let the rice rest and steam for 10 minutes. This step is crucial for finishing the cooking process and achieving a perfect texture.
After resting, remove the lid. Use a fork to gently fluff the rice, separating the long, delicate grains.
Serve hot as a perfect accompaniment to curries, dals, or grilled dishes.
Prepare the Dal: Rinse the toor dal under running water until the water runs clear. This removes excess starch and impurities. Soaking for 30 minutes is optional but helps in faster cooking.
2
Pressure Cook: In a 3-liter pressure cooker, combine the rinsed dal, chopped spinach, onion, tomato, green chilies, 4 whole garlic cloves, turmeric powder, and red chili powder. Add 3 cups of water and mix well.
3
Cook until Soft: Secure the lid and pressure cook on medium heat for 4-5 whistles, which takes about 15 minutes. Turn off the heat and allow the pressure to release naturally.
4
Mash and Season: Once the pressure has subsided, carefully open the cooker. Using a whisk or a wooden masher (pappu gutti), gently mash the dal mixture to your desired consistency—creamy or slightly chunky. Stir in the tamarind paste and salt.
5
Simmer the Dal: Place the cooker back on the stove over low heat. Let the dal simmer for 5-7 minutes, allowing the flavors to meld together. If the dal is too thick, add a little hot water to adjust the consistency.
6
Prepare the Tempering (Tadka): While the dal simmers, heat oil in a small pan (tadka pan) over medium heat.
Add mustard seeds and let them splutter completely (about 30 seconds).
Add cumin seeds and broken dried red chilies. Sauté for a few seconds until fragrant.
1 kg Raw Mangoes (Use a firm, sour, pickling variety like Ramkela or Rajapuri)
2 cup Mustard Oil (To be heated to smoking point and then cooled completely)
0.75 cup Salt (Use non-iodized or sea salt for best results)
5 tbsp Red Chili Powder (Adjust to your spice preference)
2 tbsp Turmeric Powder
4 tbsp Fennel Seeds (Also known as Saunf)
4 tbsp Split Mustard Seeds (Also known as Rai ki Dal)
2 tbsp Fenugreek Seeds (Also known as Methi Dana)
2 tsp Nigella Seeds (Also known as Kalonji)
1 tsp Asafoetida (Also known as Hing)
Instructions
1
Prepare the Mangoes (Day 1)
Wash the raw mangoes thoroughly. Wipe them completely dry with a clean kitchen towel. It is critical that there is no moisture.
Cut the mangoes into 1-inch cubes, discarding the inner stone but keeping the peel on.
Place the mango pieces in a large, dry glass or ceramic bowl. Add 1/2 cup of the salt and all the turmeric powder.
Mix well to coat every piece. Cover the bowl with a cloth or a loose lid and let it sit at room temperature for 24 hours. The mangoes will release a significant amount of water.
2
Dry the Mangoes (Day 2)
After 24 hours, drain all the water released by the mangoes. You can discard this brine.
Spread the mango pieces in a single layer on a clean cloth or a large tray.
Let them dry under a fan or in a shady, well-ventilated area for 4-5 hours until the surface moisture has evaporated. They should feel dry to the touch but not hard.
3
Prepare the Spice Mix and Oil
While the mangoes are drying, gently dry roast the fennel seeds and fenugreek seeds in a pan on low heat for 1-2 minutes until fragrant. Let them cool completely.
Add the 4 crushed garlic cloves and fry until they turn golden brown and aromatic, about 1 minute. Do not let them burn.
Finally, add the curry leaves and hing. Stand back as the leaves will splutter. Cook for 10 seconds.
7
Combine and Serve: Immediately pour the sizzling tempering over the simmering dal. Mix well, cover the pot with a lid for 2 minutes to infuse the aromas, then turn off the heat. Serve Palakura Pappu hot with steamed rice and a dollop of ghee.
Grind the roasted seeds along with the split mustard seeds into a coarse powder using a spice grinder or mortar and pestle.
In a large, dry mixing bowl, combine this coarsely ground spice mix, red chili powder, nigella seeds, asafoetida, and the remaining 1/4 cup of salt.
In a separate pan, heat the mustard oil until it reaches its smoking point (you'll see faint white fumes). Turn off the heat and let it cool down completely to room temperature. This step is crucial to mellow the oil's raw pungency.
4
Combine and Bottle the Pickle
Add the dried mango pieces to the bowl containing the spice mix. Toss well until each piece is thoroughly coated.
Pour about 1.5 cups of the completely cooled mustard oil over the mango-spice mixture. Mix everything thoroughly with a clean, dry spoon.
Carefully transfer the pickle into a sterilized, completely dry glass or ceramic jar (a 'barnī'). Pack it down gently to remove air pockets.
5
Mature the Pickle (7-10 Days)
Cover the mouth of the jar with a clean piece of muslin cloth and secure it with a string. This allows moisture to escape while keeping dust out.
Place the jar in direct sunlight for 7 to 10 days. Shake the jar gently or stir with a dry spoon once every day to redistribute the oil and spices.
After 3-4 days, the mango pieces will have softened and settled. Pour the remaining 0.5 cup of cooled mustard oil over the top to create a protective layer that submerges the mangoes.
After the sunning period, the mangoes will have softened and absorbed the flavors. The pickle is now ready. Replace the muslin cloth with an airtight lid and store in a cool, dry place. It can last for over a year.