Perfectly fluffy, long-grained basmati rice with a delicate aroma. This simple, foolproof recipe gives you separate, non-sticky grains every time, making it the perfect base for any curry or dal.
Prep35 min
Cook25 min
Soak30 min
Servings4
Serving size: 1 serving
262cal
5gprotein
55gcarbs
Ingredients
1.5 cup Basmati Rice (Use good quality, aged basmati rice for best results)
2.25 cup Water (For the absorption cooking method)
0.75 tsp Salt (Adjust to taste)
1 tsp Ghee (Optional, for flavor and to prevent sticking)
Instructions
1
Rinse and Soak the Rice (35 minutes)
Place the basmati rice in a large bowl. Add cold water and gently swirl the rice with your fingers. Drain the cloudy water. Repeat this process 3-4 times until the water runs mostly clear. This removes excess starch and prevents stickiness.
Cover the rinsed rice with fresh water and let it soak for 30 minutes. Soaking allows the grains to absorb water, ensuring they cook evenly and elongate beautifully.
After 30 minutes, drain the rice completely using a fine-mesh sieve and set aside.
Tender baby eggplants stuffed with a fragrant spice blend, shallow-fried and simmered in a tangy tamarind gravy. A classic Tamil delicacy that's bursting with flavor and pairs perfectly with hot rice.
A simple and healthy South Indian stir-fry where tender green beans are cooked with aromatic spices and finished with fresh grated coconut. This classic side dish comes together in under 30 minutes and pairs perfectly with rice and sambar.
Creamy, tangy, and light homemade curd (dahi), a staple in every Indian household. This simple recipe uses just two ingredients to create a probiotic-rich food perfect for raita, lassi, or enjoying on its own. Note that this recipe requires 6-12 hours of inactive time for fermentation.
Prep5 min
Cook15 min
Ferment480 min
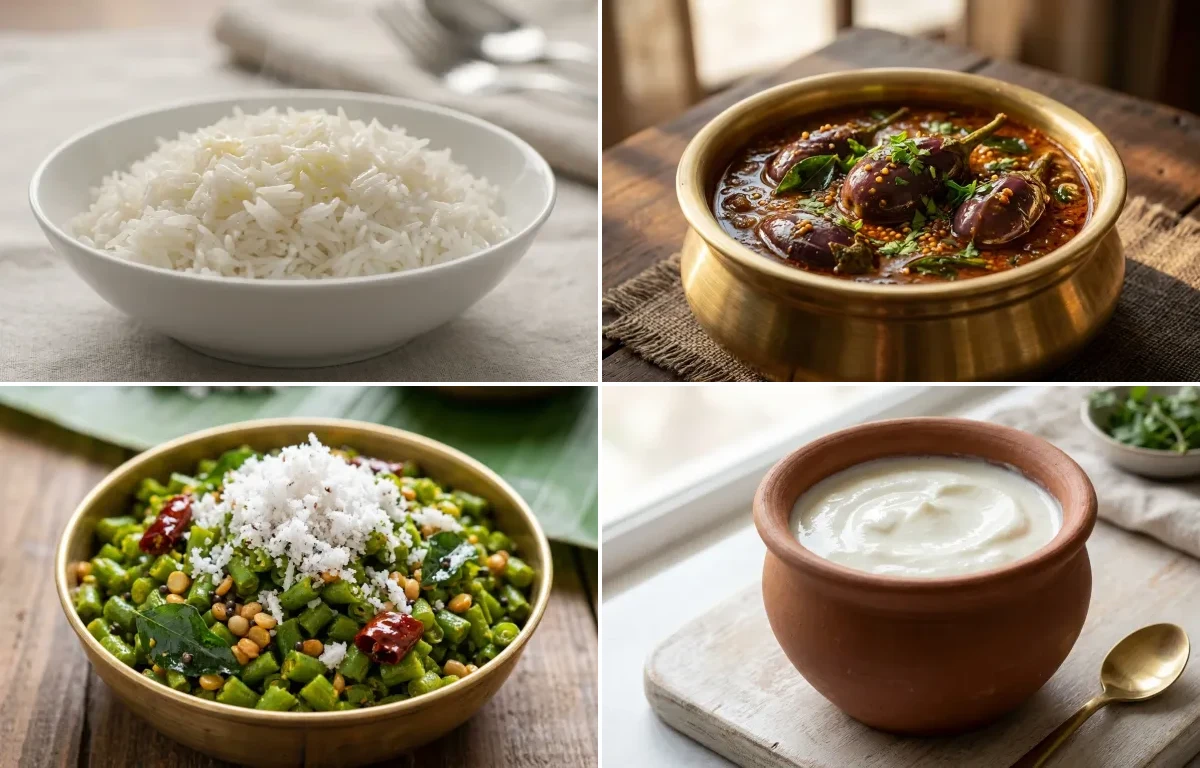
About Steamed Basmati Rice, Ennai Kathirikai Kuzhambu, Beans Poriyal and Curd
Melt-in-mouth brinjal kuzhambu with fiber-rich beans and cooling curd. A homestyle, soul-satisfying meal.
This chettinad dish is perfect for dinner. With 835.77 calories and 21.53g of protein per serving, it's a nutritious choice for your meal plan.
Other Cuisines to Explore
Discover authentic meals from cuisines around the world.
In a medium, heavy-bottomed saucepan with a tight-fitting lid, combine the drained rice, 2.25 cups of fresh water, salt, and ghee (if using).
Bring the mixture to a rolling boil over medium-high heat, uncovered.
As soon as it boils, give it one gentle stir, then immediately reduce the heat to the lowest possible setting. Cover the saucepan tightly with the lid.
Let the rice simmer for 12-15 minutes, or until all the water has been absorbed. Do not lift the lid during this time to prevent steam from escaping.
3
Rest and Fluff (10 minutes)
Turn off the heat but leave the saucepan on the stove, still covered. Let the rice rest and steam for 10 minutes. This step is crucial for finishing the cooking process and achieving a perfect texture.
After resting, remove the lid. Use a fork to gently fluff the rice, separating the long, delicate grains.
Serve hot as a perfect accompaniment to curries, dals, or grilled dishes.
Servings
4
Serving size: 1 serving
249cal
4gprotein
22gcarbs
17gfat
Ingredients
250 g Baby Brinjal (About 10-12 small brinjals)
0.25 cup Sesame Oil (Gingelly oil is highly recommended for authentic flavor)
20 g Tamarind (A small lemon-sized ball)
1.5 cup Water (Hot, for soaking tamarind)
1 cup Pearl Onions (Peeled, about 150g)
1 pcs Tomato (Medium-sized, finely chopped)
5 cloves Garlic (Lightly crushed)
2 tbsp Sambar Powder (Adjust to your spice preference)
0.5 tsp Turmeric Powder
1 tsp Jaggery (Powdered, balances the tanginess)
1.5 tsp Salt (Adjust to taste)
1 tsp Mustard Seeds
10 pcs Curry Leaves (Fresh)
1 tbsp Chana Dal (For the stuffing masala)
1 tsp Urad Dal (For the stuffing masala)
1 tbsp Coriander Seeds (For the stuffing masala)
4 pcs Dry Red Chillies (For the stuffing masala)
0.25 cup Grated Coconut (Fresh or frozen, for the stuffing masala)
0.25 tsp Asafoetida (Hing, for the stuffing masala)
2 tbsp Coriander Leaves (Freshly chopped, for garnish)
Instructions
1
Prepare Tamarind and Brinjals
Soak the tamarind in 1.5 cups of hot water for 20 minutes. Squeeze the pulp thoroughly to extract all the flavor, then strain the liquid through a fine-mesh sieve. Discard the pulp and set the tamarind water aside.
While the tamarind soaks, wash the baby brinjals. Make two perpendicular slits from the bottom end, going about three-quarters of the way up, keeping the stem and crown intact. This creates a '+' shape for stuffing.
Immediately place the slit brinjals in a bowl of water with a pinch of salt to prevent them from oxidizing and turning brown.
2
Roast and Grind the Stuffing Masala
In a small, dry pan over low-medium heat, add the chana dal, urad dal, coriander seeds, and dry red chillies.
Dry roast for 3-4 minutes, stirring continuously, until the dals turn golden brown and the spices release a rich aroma.
Turn off the heat and let the mixture cool completely. Transfer to a grinder jar, add the grated coconut and asafoetida, and grind to a slightly coarse powder without adding any water.
3
Stuff and Fry the Brinjals
Drain the brinjals and pat them completely dry with a kitchen towel.
500 g Green Beans (Trimmed and finely chopped into ¼-inch pieces)
1 medium Onion (Finely chopped)
0.5 cup Fresh Grated Coconut (Fresh is preferred, but frozen (thawed) works too)
2 tbsp Coconut Oil
1 tsp Mustard Seeds
1 tsp Urad Dal (Split and skinned black gram lentils)
1 tsp Chana Dal (Split Bengal gram)
2 whole Dried Red Chili (Broken into halves)
1 sprig Curry Leaves (About 10-12 leaves)
0.25 tsp Asafoetida (Also known as Hing)
0.25 tsp Turmeric Powder
0.75 tsp Salt (Adjust to taste)
3 tbsp Water (For steaming the beans)
Instructions
1
Prepare the Vegetables
Wash the green beans thoroughly under running water.
Trim the ends and finely chop them into uniform ¼-inch pieces. This ensures they cook quickly and evenly.
Finely chop the onion and set aside.
2
Temper the Spices (Tadka)
Heat coconut oil in a heavy-bottomed pan or kadai over medium heat.
Once the oil is hot, add the mustard seeds and wait for them to splutter completely, which should take about 30-45 seconds.
Lower the heat and add the urad dal and chana dal. Sauté for 1-2 minutes, stirring continuously, until they turn golden brown and become aromatic. Be careful not to burn them.
Add the broken dried red chilies, curry leaves, and a pinch of asafoetida. Sauté for another 30 seconds until the curry leaves are crisp.
3
Sauté and Cook the Beans
Add the finely chopped onion to the pan and sauté for 2-3 minutes until it becomes soft and translucent.
Add the chopped green beans, turmeric powder, and salt. Mix everything thoroughly to coat the beans with the spices.
1 litre Whole Milk (Full-fat milk yields the thickest, creamiest curd. You can use low-fat milk, but the result will be less thick.)
1 tbsp Yogurt Starter (Must contain live active cultures. Ensure the starter is fresh and not sour for the best results.)
Instructions
1
Boil the Milk
Pour the milk into a heavy-bottomed pot or saucepan.
Bring the milk to a rolling boil over medium heat, then reduce the heat to low. Let it simmer for 5-7 minutes, stirring occasionally to prevent a skin from forming and to avoid scorching at the bottom. This process helps thicken the milk slightly, resulting in a creamier curd.
2
Cool to Lukewarm Temperature
Turn off the heat and allow the milk to cool down until it is lukewarm. The ideal temperature is between 40-45°C (105-115°F).
To test without a thermometer, dip a clean finger into the milk. You should be able to hold it in for about 10 seconds without it feeling uncomfortably hot. If it's too hot, it will kill the bacteria; if it's too cold, the curd won't set.
3
Inoculate with Starter
In a small bowl, whisk the yogurt starter until it is smooth and lump-free.
Add 2-3 tablespoons of the warm milk to the starter and mix well. This process, called tempering, helps the culture mix evenly without curdling.
Pour this tempered starter mixture back into the pot of milk and stir gently just a few times to combine everything thoroughly.
4
Ferment and Set the Curd
Pour the inoculated milk into the container you wish to set the curd in (earthenware, glass, or steel containers work well).
Cover the container with a lid and place it in a warm, draft-free spot to ferment. An oven (turned off) with the light on, a warm cupboard, or an Instant Pot on the 'Yogurt' setting are great options.
Let it sit undisturbed for 6 to 12 hours. The time will vary based on the climate; warmer weather requires less time (6-8 hours), while colder weather may take longer (10-12 hours).
5
Chill and Serve
Once the curd is set (it should be firm and not jiggle like a liquid), carefully transfer it to the refrigerator without disturbing it.
Chill for at least 3-4 hours. This crucial step stops the fermentation process (preventing it from becoming too sour) and helps the curd to thicken and set further.
Serve chilled as a side dish, or use it as a base for raita, lassi, or marinades.
Carefully open the slits of each brinjal and fill them with about 1-2 teaspoons of the prepared masala powder. Reserve any leftover powder.
Heat the sesame oil in a wide, heavy-bottomed pan or kadai over medium heat. Gently place the stuffed brinjals in the hot oil in a single layer.
Shallow-fry for 8-10 minutes, turning them occasionally, until the skin is wrinkled and they are about 75% cooked. Carefully remove the brinjals from the pan and set them aside.
4
Prepare the Kuzhambu Gravy
In the same pan with the remaining oil, add the mustard seeds. Once they begin to splutter, add the curry leaves and let them sizzle for a few seconds.
Add the peeled pearl onions and crushed garlic. Sauté for 3-4 minutes until the onions become soft and translucent.
Add the finely chopped tomato and cook for another 4-5 minutes, until it turns soft and mushy.
Reduce the heat to low. Add the turmeric powder and sambar powder. Sauté for one minute until fragrant, being careful not to burn the spices.
5
Simmer and Finish
Pour the prepared tamarind water into the pan. Add salt, jaggery, and any leftover stuffing masala. Stir well to combine.
Bring the gravy to a vigorous boil and let it cook for 5-7 minutes on medium heat. This step is crucial to cook out the raw taste of the tamarind.
Gently place the fried brinjals back into the simmering gravy. Reduce the heat to low, cover the pan, and let it simmer for 10-12 minutes.
The kuzhambu is ready when the brinjals are fully tender and the gravy has thickened to your desired consistency. You will see a layer of oil separating and floating on top.
Garnish with freshly chopped coriander leaves. Let it rest for 15-20 minutes before serving for the flavors to meld.
Sprinkle 3 tablespoons of water over the beans. This will help create steam to cook them.
Cover the pan with a lid and cook on low to medium heat for 8-10 minutes. Stir once or twice in between to prevent sticking.
Cook until the beans are tender but still have a slight bite (al dente). Avoid overcooking to retain their texture and color.
4
Garnish and Serve
Once the beans are cooked, remove the lid and cook for another minute if there is any excess moisture.
Turn off the heat. Add the fresh grated coconut and gently mix it into the poriyal.
Let it sit for a minute for the flavors to meld.
Serve hot as a side dish with steamed rice, sambar, rasam, or curd rice.