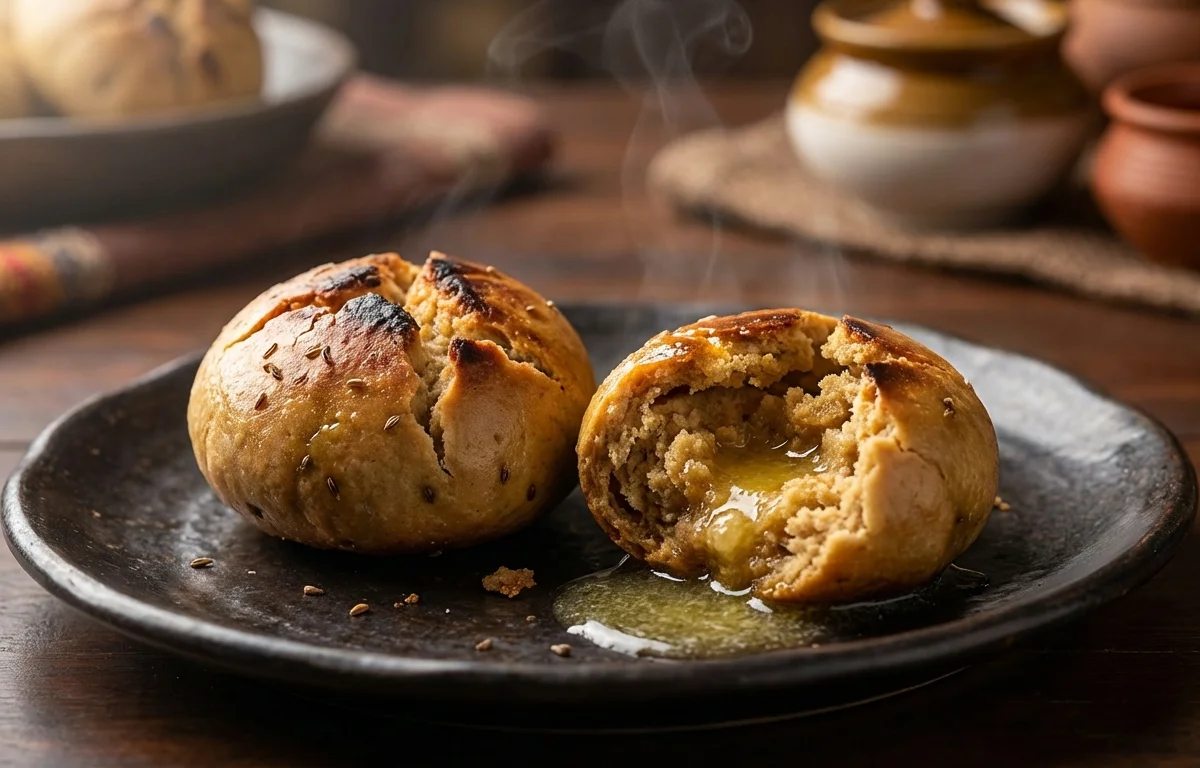
Rajasthani Baati
Golden, crackly wheat baatis with a firm crust and soft center, baked until rustic and hearty. This Rajasthani staple is traditionally finished with ghee and served alongside dal or churma for a comforting meal.
For 8 servings
- prep · ~10 min
Preheat the oven and prepare the tray.
Heat the oven to 200°C. Lightly grease a baking tray with a little ghee or line it so the baatis do not stick.
- mix · ~3 min
Mix the dry ingredients.
1.Add whole wheat flour to a wide bowl.2.Add semolina, carom seeds, salt, and baking powder.3.Mix well so the ingredients are evenly combined. - knead · ~8 min
Rub in ghee and knead a firm dough.
1.Add 2 tbsp ghee to the flour mixture.2.Rub it in with your fingers until the mixture looks crumbly.3.Add water little by little and knead into a stiff, smooth dough.4.Do not make the dough soft.TIPA firm dough helps the baatis hold their shape and gives them the traditional dense texture. - rest · ~15 min
Cover and rest the dough.
Cover the dough and let it rest for 15 minutes so the flour hydrates and the baatis shape easily.
- assemble · ~7 min
Shape the baatis.
1.Divide the dough into 8 equal portions.2.Roll each portion into a smooth ball.3.Press each one lightly and make a small dent or crack on top. - bake · ~35 min
Bake the baatis until golden and cooked through.
1.Arrange the baatis on the prepared tray with a little space between them.2.Bake for 20 minutes.3.Turn them over and bake again for 15 minutes until evenly golden and firm.TIPIf the tops brown too fast, lower the heat slightly and keep baking until the centers are cooked. - garnish · ~2 min
Brush the hot baatis with ghee.
Take the baatis out of the oven and brush or drizzle the remaining 2 tbsp ghee over them while still hot for the classic finish.
- serve
Serve hot with dal or churma.
What to keep in mind.
7 tips from the recipe — small details that make a real difference to the final dish.
- 1Keep the dough stiff, not soft, or the baatis will spread and lose their signature dense bite.
- 2Rub the ghee into the flour until it looks sandy; this helps create a crackly crust after baking.
- 3Make a small dent or crack on top of each baati so heat reaches the center more evenly.
- 4Turn the baatis after the first bake so both sides brown and the crust firms up evenly.
- 5If they brown outside but feel heavy, bake a few minutes longer at slightly lower heat to finish the center.
- 6Brush with ghee while the baatis are still hot so it soaks into the crust instead of sitting on top.
- 7Leftover baatis reheat best in the oven, not the microwave, to bring back the crisp exterior.
Adapt it for your goals.
Low-ghee
Use less finishing ghee and brush lightly instead of drenching; good if you want the traditional texture with a lighter finish.
stuffedStuffed
Fill each baati with a spiced sattu or paneer mixture before baking for a more substantial, festive version.
no semolinaNo-semolina
Replace semolina with more whole wheat flour for a slightly softer baati if semolina is unavailable.
tandoor styleTandoor-style
Cook in a tandoor or over a charcoal setup for a smokier, more rustic flavor closer to traditional village-style baati.
Why this is on our healthy list.
Whole Grain Base
Made mainly with whole wheat flour, these baatis offer the hearty qualities of whole grains and keep the dish filling.
Satisfying Energy
The combination of wheat, semolina, and ghee makes baati a sustaining accompaniment, especially when paired with dal.
Digestive Spice Touch
Carom seeds add distinctive flavor and are traditionally valued in Indian cooking for making rich breads feel easier to eat.
Frequently asked questions
The dough may be too dry or the baatis may be too large. Bake until firm and golden, and lower the heat slightly if the outside browns before the center cooks.