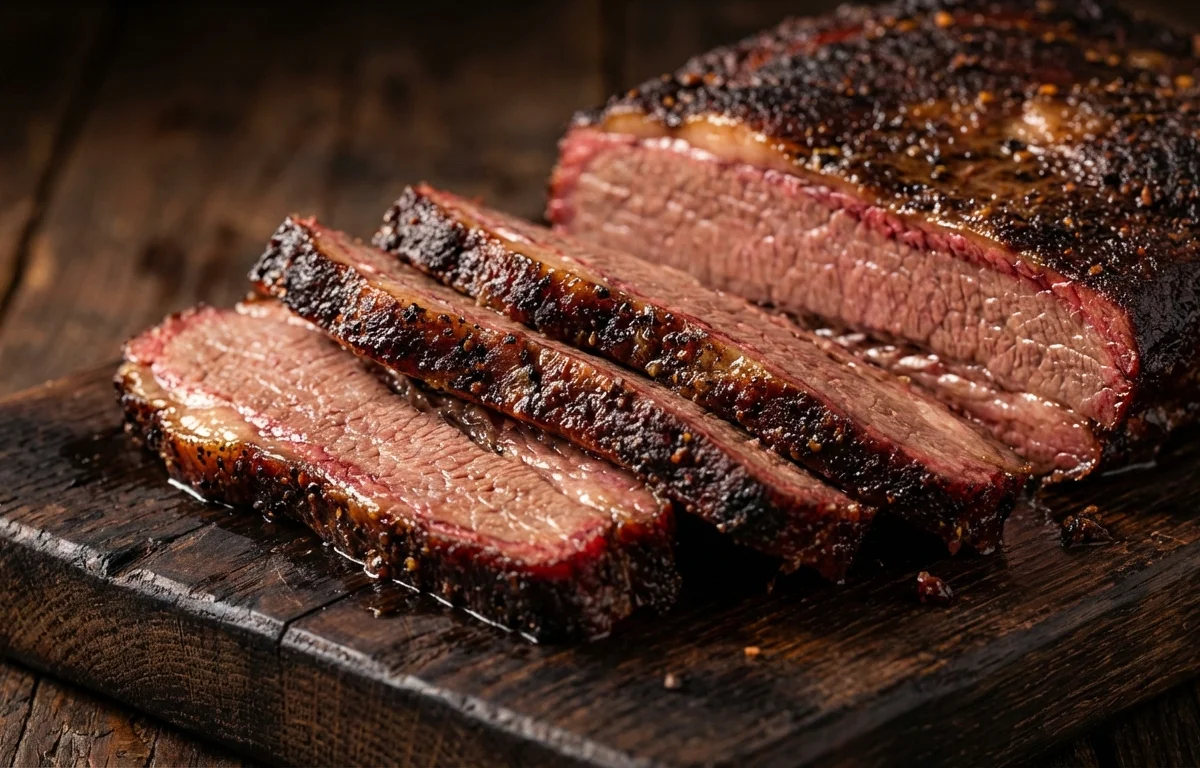
Texas Beef Brisket
A legendary Texas-style smoked beef brisket with a deeply flavorful black pepper and salt bark. Smoked low and slow over oak wood for hours until the meat is so tender it jiggles on the cutting board. This is the centerpiece of any true Texas barbecue spread, served with sliced white bread, pickles, and onions.
For 8 servings
- prep · ~15 min
Trim the brisket.
1.Place brisket fat-side up on a large cutting board.2.Trim the fat cap to an even 1/4 inch thickness all over.3.Flip and trim any excessive silver skin or hard fat on the meat side.4.Pat the brisket completely dry with paper towels.TIPCold brisket is easier to trim; keep it refrigerated until just before trimming. - prep · ~45 min
Season the brisket with the dry rub.
1.Combine kosher salt, coarse black pepper, garlic powder, and onion powder in a small bowl.2.Season the brisket generously on all sides, pressing the rub into the meat.3.Let the brisket sit at room temperature while you fire up the smoker, about 45 minutes.TIPTraditional Central Texas brisket uses only salt and pepper. The garlic and onion powder add depth but are optional. - other · ~30 min
Set up the smoker for low-and-slow cooking.
1.Fill a chimney starter with charcoal and light it. Let it burn until coals are covered with gray ash.2.Arrange hot coals on one side of the smoker for indirect heat.3.Add 2 soaked oak wood chunks on top of the hot coals.4.Adjust vents until the smoker holds steady at 110°C (225°F).5.Place a water pan on the cool side of the smoker to add humidity.TIPPatience here matters. Stabilizing the temperature before the meat goes on avoids bitter, oversmoked brisket. - roast · ~360 min
Smoke the brisket uncovered for the first 6 hours.
1.Place the seasoned brisket fat-side UP on the cool side of the smoker grate.2.Close the lid and maintain 110°C (225°F) adding charcoal and wood chunks as needed.3.Spritz the brisket with water every 60-90 minutes on any dry-looking spots only.4.Smoke until the internal temperature in the thickest part of the flat reaches 71°C (160°F), about 6-7 hours.TIPDon't spritz too much — you want a dark, firm bark to form. Only hit spots that look dry. - roast · ~240 min
Wrap in butcher paper and continue smoking.
1.Once the brisket reaches 71°C (160°F), remove it from the smoker.2.Wrap tightly in a double layer of pink butcher paper.3.Return to the smoker and continue cooking until internal temp reaches 96°C (205°F), about 4-5 more hours.4.The brisket is done when a thermometer probe slides in with almost no resistance.TIPProbe the flat, not the point. The flat is leaner and will tell you when the whole brisket is truly tender. - rest · ~120 min
Rest the brisket before slicing.
1.Remove the wrapped brisket from the smoker and place it in a clean cooler or wrapped in a towel.2.Let it rest for at least 2 hours. Internal temp will slowly drop to about 63°C (145°F).3.This long hold is essential for the juices to redistribute and the meat to relax.TIPNever skip the long rest. A rushed brisket will bleed out all its juices on the cutting board. - serve · ~5 min
Slice against the grain and serve.
1.Unwrap the brisket and place on a large cutting board.2.Separate the flat from the point by cutting through the fat seam.3.Slice the flat across the grain into pencil-width slices (about 1/4 inch).4.Slice the point the same way, rotating as the grain direction changes.5.Arrange on a platter and serve immediately with sliced white bread, pickles, and raw onion.TIPThe grain of the point and flat run in different directions. Always slice perpendicular to the muscle fibers or the meat will be chewy.
What to keep in mind.
7 tips from the recipe — small details that make a real difference to the final dish.
- 1Keep the brisket cold until trimming — a firm fat cap is much easier to cut evenly.
- 2Use coarsely ground black pepper (16-mesh) for a bold bark that doesn't burn.
- 3Let the smoker stabilize at 225°F before adding the brisket to avoid acrid smoke.
- 4Spritz only dry spots sparingly; too much moisture ruins the bark's crunch.
- 5Wrap in pink butcher paper, not foil — paper breathes and preserves bark integrity.
- 6Rest the wrapped brisket in a cooler for at least 2 hours; a short rest makes it tough.
- 7Slice each section against its own grain direction or the meat will be chewy.
Adapt it for your goals.
No-wrap
Skip the butcher-paper wrap and smoke the brisket unwrapped the entire cook for an extra-dark, crunchy bark and a leaner result. Ideal for pitmasters who prioritize bark texture over extreme moisture.
coffee rubCoffee-rub
Add 1 tablespoon of finely ground espresso or dark-roast coffee to the dry rub. The coffee deepens the savory notes and adds a subtle roasted bitterness that complements the beef and smoke.
honey glazedHoney-glazed
During the last hour of the wrapped stage, brush the brisket with a mixture of honey and apple cider vinegar before unwrapping. This adds a sweet-and-tangy lacquer that caramelizes on the bark — great for palates that like a sweet-savory balance.
peppercorn varietyPeppercorn-variety
Replace half the black pepper with a blend of tellicherry, white, and Sichuan peppercorns. This adds floral, citrus, and mild numbing notes that pair well with smoked beef.
Why this is on our healthy list.
Rich in High-Quality Protein
Beef brisket is an excellent source of complete protein, which supports muscle repair and satiety. A 100g serving provides roughly 20g of protein.
Good Source of Iron
Red meat like brisket is rich in heme iron, a form easily absorbed by the body to support oxygen transport and energy levels.
Contains B Vitamins
Beef is loaded with B12, niacin, and B6, which help convert food into energy and maintain healthy nerve function.
Minimal Added Sugar
The classic salt-and-pepper rub contains no added sugars, making this dish suitable for low-sugar or whole30-style diets.
Satiating and Low-Carb
With zero carbohydrates from the rub, this brisket fits well into keto or low-carb meal plans while providing long-lasting fullness.
Frequently asked questions
Yes, but a water pan helps stabilize temperature and adds humidity that prevents the meat from drying out during the long cook.