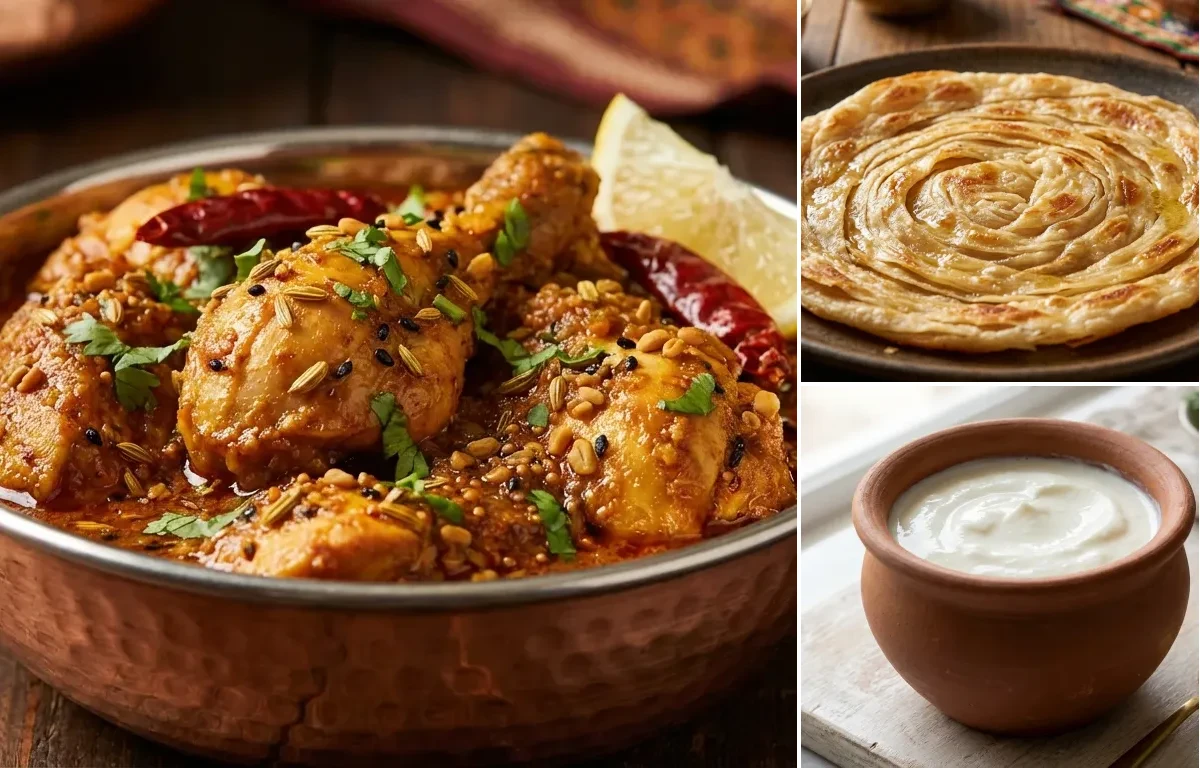
Tender chicken pieces simmered in a tangy, aromatic gravy made with a unique blend of Indian pickling spices. This Punjabi classic offers a burst of savory and sour flavors, perfect with hot naan or roti.
Prep20 min
Cook40 min
Servings4
Serving size: 1 serving
417cal
28gprotein
19gcarbs
27g
Ingredients
500 g Chicken (boneless, skinless thighs or breast, cut into 1.5-inch pieces)
Experience the culinary artistry of North India with Laccha Paratha, a multi-layered flatbread celebrated for its intricate, flaky texture. Each bite reveals delicate, buttery layers that are both crispy and soft. Made from whole wheat flour and pan-fried to golden perfection with ghee, it's the ultimate accompaniment to rich curries, dals, or simply a dollop of yogurt.
Creamy, tangy, and light homemade curd (dahi), a staple in every Indian household. This simple recipe uses just two ingredients to create a probiotic-rich food perfect for raita, lassi, or enjoying on its own. Note that this recipe requires 6-12 hours of inactive time for fermentation.
Prep5 min
Cook15 min
Ferment480 min
About Achari Chicken, Laccha Paratha and Curd
Tangy, aromatic Achari Chicken with flaky paratha and cool curd – a protein-packed homestyle meal!
This punjabi dish is perfect for dinner. With 1034.3500000000001 calories and 44.989999999999995g of protein per serving, it's a nutritious choice for your meal plan.
Other Cuisines to Explore
Discover authentic meals from cuisines around the world.
1 tsp Kashmiri Red Chili Powder (for color, adjust to taste)
1.5 tsp Coriander Powder
0.5 tsp Garam Masala
1 tbsp Lemon Juice (freshly squeezed)
0.5 cup Water (warm)
2 tbsp Fresh Coriander Leaves (chopped, for garnish)
Instructions
1
Prepare the Achari Masala: In a small, dry pan over low heat, roast the fennel, fenugreek, cumin, and mustard seeds for 1-2 minutes until fragrant. Add the nigella seeds and roast for another 30 seconds. Be careful not to burn the fenugreek seeds as they will turn bitter. Let the spices cool completely, then grind them into a coarse powder.
2
Marinate the Chicken: In a mixing bowl, combine the chicken pieces with 1/2 cup of whisked curd, 1 tablespoon of ginger-garlic paste, 1/4 teaspoon of turmeric powder, and 1/2 teaspoon of salt. Mix well to coat the chicken evenly. Cover and let it marinate for at least 30 minutes, or up to 4 hours in the refrigerator.
3
Sauté Aromatics: Heat mustard oil in a heavy-bottomed pan or kadai over medium-high heat until it is lightly smoking, then reduce the heat to medium. Add the asafoetida and whole dry red chilies, and sauté for 30 seconds. Add the finely chopped onions and cook for 8-10 minutes, stirring occasionally, until they are soft and golden brown.
4
Build the Gravy Base: Add the remaining 1/2 tablespoon of ginger-garlic paste and sauté for a minute until the raw aroma disappears. Add the tomato puree and cook for 5-7 minutes, until the mixture thickens and you see oil separating at the edges. Stir in the remaining 1/4 teaspoon turmeric powder, Kashmiri red chili powder, coriander powder, and the freshly ground achari masala. Cook for 1-2 minutes, stirring constantly.
5
Cook the Chicken: Add the marinated chicken along with all the marinade to the pan. Increase the heat and sauté for 5-7 minutes, until the chicken is sealed on all sides. Reduce the heat to low, add the remaining 1/4 cup of whisked curd, and stir continuously for a minute to prevent it from curdling.
6
Simmer and Finish: Pour in 1/2 cup of warm water and the remaining 3/4 teaspoon of salt. Stir well, bring to a gentle simmer, then cover the pan. Cook on low heat for 15-20 minutes, or until the chicken is tender and cooked through. Uncover, stir in the garam masala and fresh lemon juice. Garnish with chopped coriander leaves and serve hot.
456cal
8gprotein
44gcarbs
29gfat
Ingredients
2 cup Atta (Whole wheat flour)
1 tsp Salt
0.5 cup Ghee (Melted, for dough, layering, and cooking)
1 cup Water (Lukewarm, adjust as needed)
Instructions
1
Prepare the Dough (10 mins + 30 mins resting)
In a large mixing bowl, combine 2 cups of atta and 1 tsp of salt.
Add 2 tbsp of the melted ghee to the flour. Rub it in with your fingertips until the mixture resembles coarse breadcrumbs.
Gradually add lukewarm water, a little at a time, and knead to form a soft, smooth, and pliable dough. The dough should be soft but not sticky.
Knead the dough on a clean surface for 8-10 minutes until it is elastic and smooth.
Cover the dough with a damp cloth or lid and let it rest for at least 30 minutes. This step is crucial for relaxing the gluten.
2
Create Layers (15 mins + 15 mins resting)
After resting, knead the dough for another minute. Divide it into 8 equal-sized balls.
Take one dough ball, dust it with dry atta, and roll it into a very thin circle, about 8-9 inches in diameter. The thinner you roll, the more layers you will get.
Spread about 1 tsp of melted ghee evenly over the entire surface of the rolled dough.
Sprinkle a light, even layer of dry atta over the ghee. This helps keep the layers separate.
Starting from one edge, begin to fold the dough into narrow pleats (about 1/2 inch wide), like making a paper fan, until you have a long, pleated strip.
Gently stretch the pleated strip to lengthen it slightly.
Roll this strip tightly into a spiral or pinwheel shape. Tuck the loose end underneath the coil to secure it.
Gently press the spiral flat with your palm. Repeat this process for all the dough balls.
Cover the prepared coils and let them rest for another 10-15 minutes. This second rest makes them easier to roll out.
3
Roll the Parathas (5 mins)
Take one rested coil and lightly dust it with atta.
Gently roll it out into a circle about 5-6 inches in diameter. Apply even, gentle pressure to avoid pressing the layers together and making the paratha dense.
4
Cook the Parathas (25 mins)
Heat a tawa or a flat, heavy-bottomed pan over medium-high heat.
Place a rolled paratha on the hot tawa. Cook for about 30-45 seconds, or until small bubbles appear on the surface.
Flip the paratha. Drizzle about 1/2 tsp of ghee on the top surface and spread it evenly.
Cook for about 1 minute, then flip again. The side with the ghee should now be facing up and have golden-brown spots.
Drizzle another 1/2 tsp of ghee on this side. Press down gently with a spatula and cook for another minute, rotating it occasionally for even browning.
Continue to flip and cook until both sides are golden-brown, crisp, and the layers are visible.
Repeat the process for all remaining parathas, adjusting the heat as necessary.
5
Serve
Remove the cooked paratha from the tawa. While it's still hot, gently crush it between your palms. This action helps to open up and fluff the layers.
Serve immediately with your favorite curry, dal, raita, or pickle.
1 litre Whole Milk (Full-fat milk yields the thickest, creamiest curd. You can use low-fat milk, but the result will be less thick.)
1 tbsp Yogurt Starter (Must contain live active cultures. Ensure the starter is fresh and not sour for the best results.)
Instructions
1
Boil the Milk
Pour the milk into a heavy-bottomed pot or saucepan.
Bring the milk to a rolling boil over medium heat, then reduce the heat to low. Let it simmer for 5-7 minutes, stirring occasionally to prevent a skin from forming and to avoid scorching at the bottom. This process helps thicken the milk slightly, resulting in a creamier curd.
2
Cool to Lukewarm Temperature
Turn off the heat and allow the milk to cool down until it is lukewarm. The ideal temperature is between 40-45°C (105-115°F).
To test without a thermometer, dip a clean finger into the milk. You should be able to hold it in for about 10 seconds without it feeling uncomfortably hot. If it's too hot, it will kill the bacteria; if it's too cold, the curd won't set.
3
Inoculate with Starter
In a small bowl, whisk the yogurt starter until it is smooth and lump-free.
Add 2-3 tablespoons of the warm milk to the starter and mix well. This process, called tempering, helps the culture mix evenly without curdling.
Pour this tempered starter mixture back into the pot of milk and stir gently just a few times to combine everything thoroughly.
4
Ferment and Set the Curd
Pour the inoculated milk into the container you wish to set the curd in (earthenware, glass, or steel containers work well).
Cover the container with a lid and place it in a warm, draft-free spot to ferment. An oven (turned off) with the light on, a warm cupboard, or an Instant Pot on the 'Yogurt' setting are great options.
Let it sit undisturbed for 6 to 12 hours. The time will vary based on the climate; warmer weather requires less time (6-8 hours), while colder weather may take longer (10-12 hours).
5
Chill and Serve
Once the curd is set (it should be firm and not jiggle like a liquid), carefully transfer it to the refrigerator without disturbing it.
Chill for at least 3-4 hours. This crucial step stops the fermentation process (preventing it from becoming too sour) and helps the curd to thicken and set further.
Serve chilled as a side dish, or use it as a base for raita, lassi, or marinades.