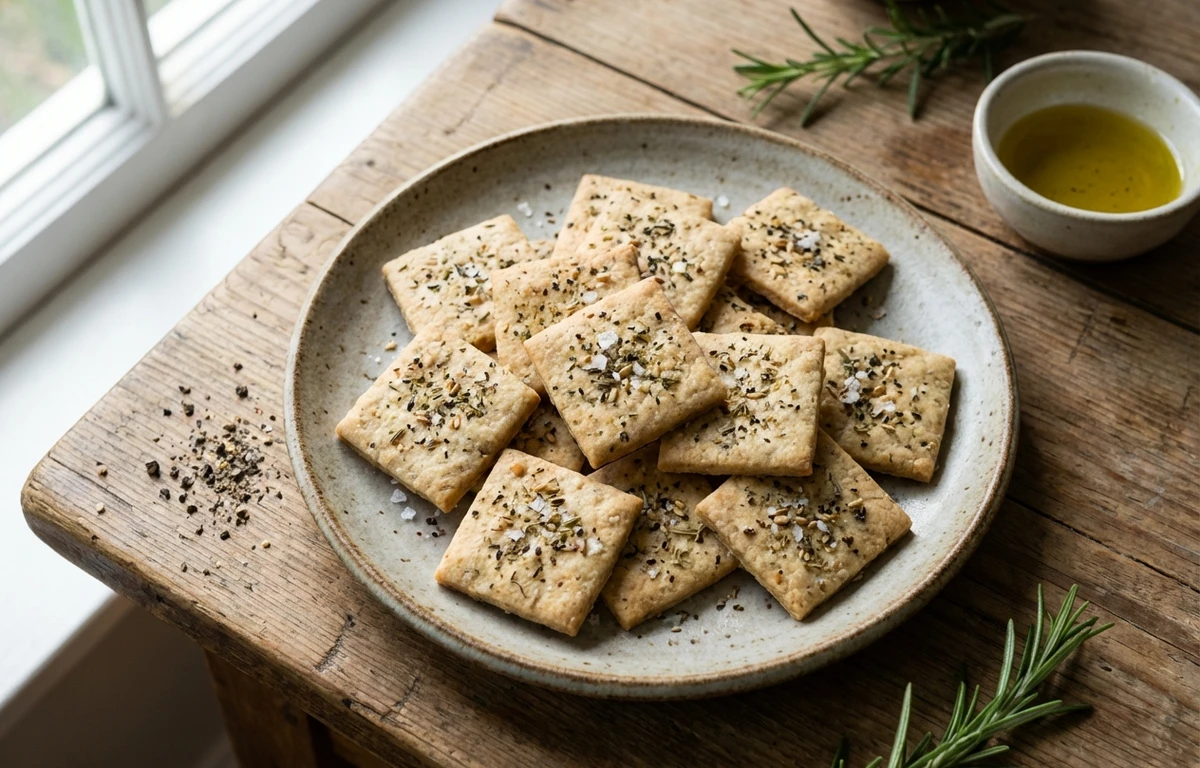
Crackers
Crisp, golden homemade crackers with a satisfying snap and delicate buttery flavor. These easy oven-baked crackers come together with just a few pantry staples and are perfect for pairing with cheese, dips, or soups. Ready in under 30 minutes, they beat anything from a box.
For 4 servings
- prep
Preheat the oven and prepare the baking sheet.
Preheat the oven to 400°F (200°C). Line a baking sheet with parchment paper.
- mix
Mix the dry ingredients.
In a mixing bowl, whisk together the all-purpose flour, salt, and black pepper until evenly distributed.
- mix
Cut in the cold butter.
Add the cold cubed butter to the flour mixture. Using your fingertips or a pastry cutter, work the butter into the flour until the mixture resembles coarse crumbs with pea-sized butter bits.
TIPWork quickly so the butter stays cold — this creates flaky layers. - mix
Add water and form the dough.
Drizzle in the ice-cold water, one tablespoon at a time, mixing gently with a fork after each addition. Stop when the dough just holds together when pressed. Gather into a ball, flatten into a disc.
TIPDon't overwork the dough — mix just until it comes together to keep crackers tender. - prep
Roll out the dough paper-thin.
On a lightly floured surface, roll the dough as thin as possible — aim for about 1/16 inch thick. The thinner the dough, the crispier the crackers. Transfer the rolled dough to the prepared baking sheet.
TIPIf the dough is sticky, chill it for 10 minutes before rolling. - prep
Score and prick the dough.
Use a pizza cutter or sharp knife to score the dough into desired cracker shapes — squares, rectangles, or diamonds. Prick each cracker all over with a fork to prevent puffing during baking.
- prep
Brush with water for golden tops.
Lightly brush the surface of the dough with a little cold water using a pastry brush. This helps the crackers bake to a golden finish.
- bake · ~12 min
Bake until golden and crisp.
Place the baking sheet in the preheated oven and bake for 10 to 12 minutes, or until the crackers are lightly golden brown around the edges. Rotate the pan halfway through for even baking.
TIPWatch closely after 8 minutes — crackers can go from golden to burnt quickly. - rest
Cool completely on the baking sheet.
Remove from the oven and let the crackers cool completely on the baking sheet. They will crisp up further as they cool.
- serve
Break apart and serve.
Once fully cooled, break the crackers along the scored lines. Serve with cheese, dips, or enjoy on their own.
What to keep in mind.
6 tips from the recipe — small details that make a real difference to the final dish.
- 1Chill the dough for 10 minutes if it becomes sticky during rolling.
- 2Roll the dough as thin as a dime (1/16 inch) for maximum crispness.
- 3Prick each cracker thoroughly with a fork to prevent air bubbles.
- 4Rotate the baking sheet halfway through for even browning.
- 5Let crackers cool completely on the sheet — they crisp up as they cool.
- 6Store in an airtight container for up to 5 days to maintain crunch.
Adapt it for your goals.
Herb & garlic
Add 1/2 teaspoon garlic powder and 1 tablespoon finely chopped fresh rosemary or thyme to the flour mixture for savory, aromatic crackers.
cheeseCheese
Mix in 1/4 cup finely grated Parmesan or sharp cheddar with the flour for a cheesy, umami-rich cracker.
seededSeeded
Sprinkle sesame seeds, poppy seeds, or everything bagel seasoning over the brushed dough before baking for extra crunch and flavor.
whole wheatWhole wheat
Substitute half the all-purpose flour with whole wheat flour for a nuttier taste and slightly heartier texture.
Why this is on our healthy list.
Simple, Whole Ingredients
Made from just flour, butter, salt, and water — no preservatives, artificial flavors, or hydrogenated oils found in many store-bought crackers.
Portion Control
Homemade crackers allow you to control serving size and avoid overeating, since you bake exactly what you need.
Lower Sodium Potential
You can easily reduce the added salt compared to commercial crackers, which often contain high sodium levels.
Frequently asked questions
The dough was likely rolled too thick or underbaked — roll to 1/16 inch and bake until the edges are golden brown for full crispness.