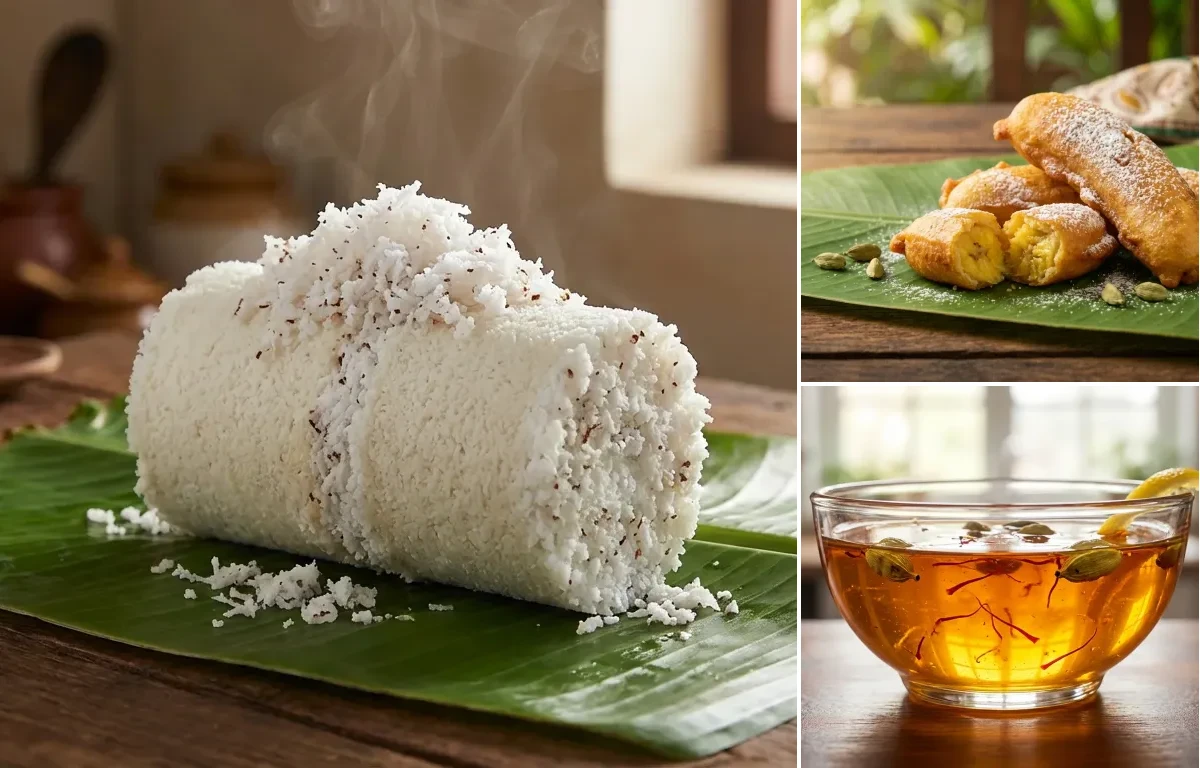
A quintessential Kerala breakfast, these steamed cylinders of rice flour and coconut are wonderfully soft and light. This traditional dish pairs beautifully with kadala curry, banana, or a sprinkle of sugar. The key to perfect puttu lies in achieving the right 'wet sand' moisture level in the flour, resulting in a fluffy, non-sticky texture.
Prep15 min
Cook20 min
Servings4
Serving size: 1 serving
331cal
5gprotein
60gcarbs
8g
Ingredients
2 cup Puttu Podi (Use store-bought roasted rice flour specifically for puttu for best results.)
1 cup Grated Coconut (Freshly grated is best, but thawed frozen coconut works well too.)
0.75 cup Warm Water (Amount is approximate; add slowly until the right texture is achieved.)
0.5 tsp Salt (Adjust to taste.)
Instructions
1
Prepare the Puttu Mixture (10-15 minutes)
In a large mixing bowl, combine the puttu podi and salt. Mix thoroughly with your fingertips.
Begin sprinkling the warm water, a little at a time, over the flour. Use your fingertips to rub the water into the flour in a circular motion to ensure even moistening.
Continue this process until the flour achieves a texture resembling coarse, damp breadcrumbs or wet sand. This is the most critical step for soft puttu.
To check for the correct consistency, take a small amount of the mixture in your fist and press firmly. It should hold its shape. When you gently break it with a finger, it should crumble easily.
Sweet, ripe plantain slices dipped in a lightly spiced batter and deep-fried to golden perfection. This beloved tea-time snack from Kerala is crispy on the outside and wonderfully soft and sweet on the inside.
A simple sugar syrup infused with cardamom and saffron, the heart of many beloved Indian sweets. This recipe explains how to achieve the perfect one-string consistency (ek taar) for desserts like Gulab Jamun or Jalebi.
Prep5 min
Cook12 min
Servings8
Serving size: 1 serving
About Kerala Puttu, Pazham Pori and Chashni
Aromatic Puttu with sweet banana – a soul-satisfying, energy-giving breakfast, mom's recipe style!
This kerala dish is perfect for breakfast or snack or dinner. With 964.9800000000001 calories and 10.15g of protein per serving, it's a nutritious choice for your meal plan.
Other Cuisines to Explore
Discover authentic meals from cuisines around the world.
For a perfectly uniform, lump-free texture, you can pulse the mixture a few times in a mixie/blender or press it through a coarse sieve.
Cover the prepared mixture and let it rest for at least 10 minutes. This allows the rice flour to fully absorb the moisture.
2
Layer the Puttu Maker (5 minutes)
Take the cylindrical puttu maker (puttu kutti) and place the small perforated disc at the bottom.
Start with a base layer of 2-3 tablespoons of grated coconut.
Gently spoon the prepared rice flour mixture on top of the coconut until the cylinder is about half full. Do not press or pack the flour down; it must remain loose.
Add another thin layer of 1-2 tablespoons of grated coconut.
Fill the rest of the cylinder with the flour mixture, leaving about an inch of space at the top. Finish with a final layer of coconut.
3
Steam the Puttu (8-10 minutes per batch)
Fill the base pot (puttu kudam) with 2-3 cups of water and bring it to a vigorous boil.
Carefully place the filled cylinder onto the nozzle of the base pot and close the lid.
Steam on medium-high heat. The puttu is perfectly cooked when a steady stream of steam escapes from the holes on the top lid, which typically takes 8-10 minutes. You will also notice a fragrant aroma of cooked rice and coconut.
Turn off the heat. Using a kitchen towel for safety, carefully remove the hot cylinder from the pot.
4
Serve Hot (5 minutes)
Allow the cylinder to rest for a minute to prevent breakage.
Using the provided rod or the back of a long spoon, gently push the cooked puttu from the bottom out onto a serving plate.
Repeat the layering and steaming process with the remaining mixture.
Serve immediately while hot with kadala curry (black chickpea curry), ripe bananas, pappadam, or a sprinkle of sugar and ghee.
440cal
5gprotein
77gcarbs
14gfat
Ingredients
2 large Ripe Plantains (Use the Nendran variety with blackened skin for authentic sweetness.)
1 cup Maida (Also known as all-purpose flour.)
2 tbsp Rice Flour (This is the key to a crispy coating.)
3 tbsp Sugar (Adjust based on the sweetness of your plantains.)
0.25 tsp Turmeric Powder (Adds the characteristic golden color.)
0.25 tsp Cardamom Powder (For a subtle, sweet aroma.)
0.125 tsp Salt (A small pinch to balance the sweetness.)
0.75 cup Water (Add gradually as needed to achieve the right batter consistency.)
2 cup Coconut Oil (For deep frying; provides an authentic Kerala flavor.)
Instructions
1
Prepare the Plantains
Peel the ripe plantains carefully.
Slice each plantain lengthwise into 3 or 4 even slices, approximately 1/4-inch thick. If the plantains are very long, you can cut them in half crosswise first.
2
Make the Batter
In a medium-sized mixing bowl, combine the maida (all-purpose flour), rice flour, sugar, turmeric powder, cardamom powder, and salt. Whisk the dry ingredients together.
Gradually pour in the water while whisking continuously to create a smooth, lump-free batter.
The batter should be thick enough to coat the back of a spoon, similar to a thick pancake batter. It should not be too runny or too thick.
Let the batter rest for 10-15 minutes. This helps the flavors meld and the flour to hydrate.
3
Fry the Pazham Pori
Heat the coconut oil in a kadai or deep pan over medium-high heat. The oil should be about 350°F (175°C).
To test if the oil is ready, drop a tiny bit of batter into it. If it sizzles and rises to the surface immediately, the oil is at the perfect temperature.
Combine sugar and water in a medium saucepan over medium heat.
2
Bring the mixture to a boil, stirring continuously until the sugar has completely dissolved. This should take about 2-3 minutes.
3
Add the crushed cardamom pods and saffron strands to the syrup. Reduce the heat to low and let it simmer.
4
Simmer the syrup for 5-7 minutes, or until it reaches a 'one-string' consistency. To check, take a drop of syrup on a small plate, let it cool for a few seconds, then touch it with your index finger and press it against your thumb. When you gently pull them apart, a single thread or string should form.
5
Once the desired consistency is reached, stir in the lemon juice. This prevents the syrup from crystallizing. Turn off the heat.
6
Let the chashni cool slightly before using it in your favorite sweets. It will thicken a bit more as it cools.