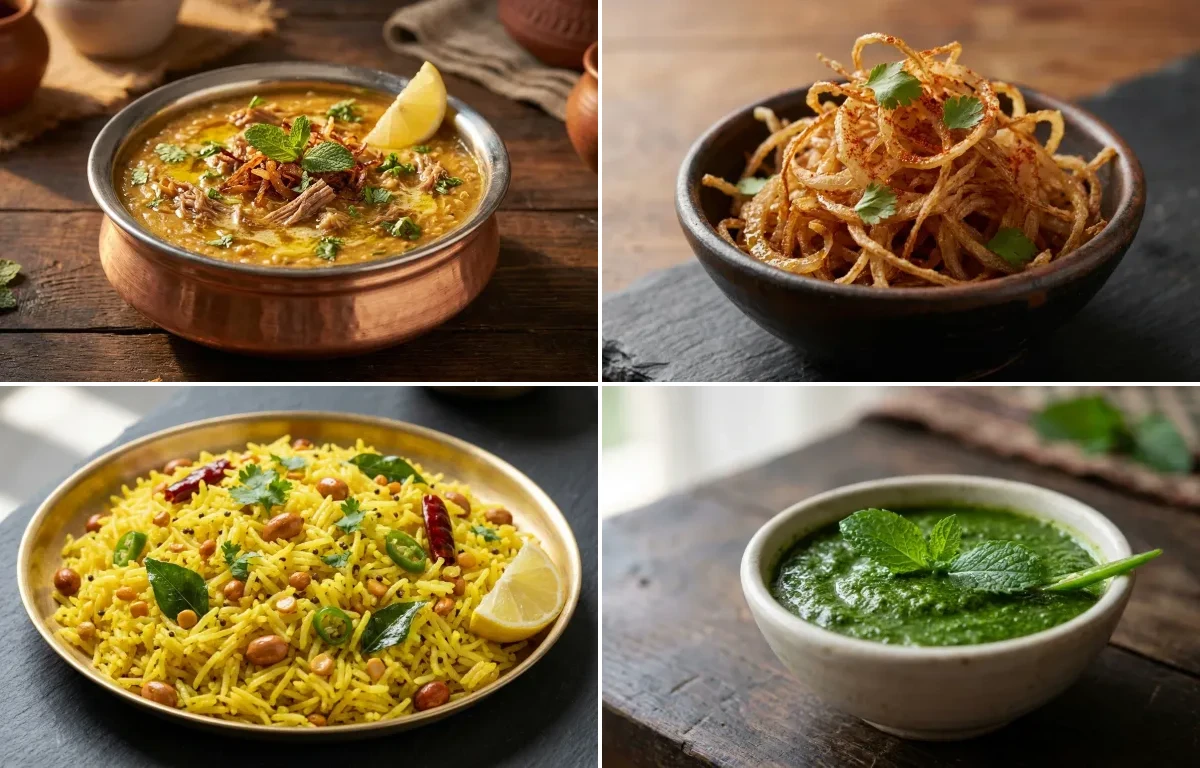
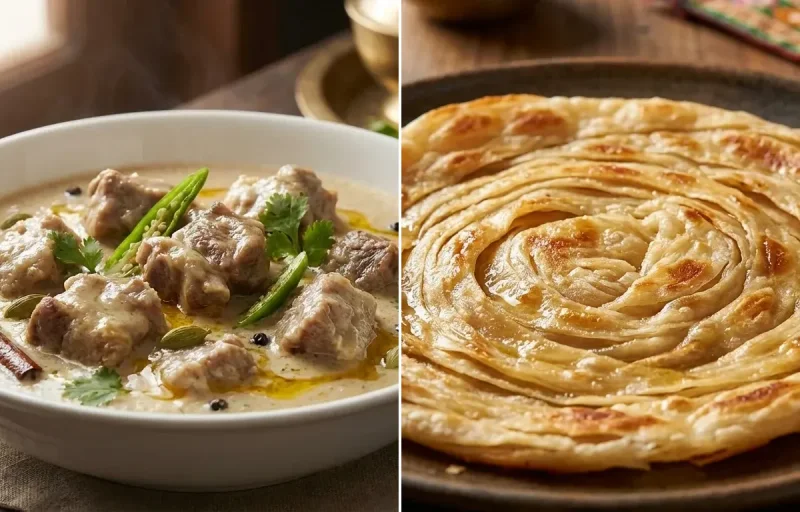
A rich, slow-cooked porridge of tender mutton, lentils, and wheat, pounded to a smooth, sticky consistency. This Hyderabadi specialty is a hearty, aromatic dish, perfect for festive occasions and traditionally enjoyed during Ramadan.
Prep60 min
Cook240 min
Soak360 min
Servings6
Serving size: 1 serving
649cal
45gprotein
49gcarbs
Ingredients
750 g Mutton (Bone-in, cut into pieces)
1 cup Cracked Wheat (Also known as dalia or haleem wheat)
0.25 cup Chana Dal
2 tbsp Urad Dal (Split and skinned black gram)
2 tbsp Masoor Dal (Red lentils)
2 tbsp Moong Dal (Split and skinned green gram)
0.5 cup Ghee (Divided)
3 pcs Onion (Medium-sized, 2 sliced for cooking, 1 thinly sliced for frying)
Crispy, golden-brown fried onions, known as Birista, are an essential garnish in Indian cuisine. Perfect for adding a sweet, savory crunch to biryanis, pulaos, curries, and haleem, this recipe guarantees perfectly caramelized, non-greasy results every time.
A tangy and flavorful South Indian rice dish made with fluffy rice, a crunchy tempering of lentils and peanuts, and a generous squeeze of fresh lemon juice. A quick and easy meal perfect for lunchboxes or a light dinner.
A vibrant and refreshing Indian condiment made with fresh mint, cilantro, and a hint of spice. This classic green chutney, also known as Pudina Chutney, is the perfect zesty accompaniment for samosas, chaat, kebabs, and sandwiches.
Prep10 min
Cook0 min
Servings8
Serving size: 1 serving
About Hyderabadi Mutton Haleem, Fried Onions, Lemon Rice and Mint Chutney
Aromatic, gut-friendly Haleem, slow-cooked to perfection. A protein-packed, soul-satisfying comfort meal!
This mughlai dish is perfect for lunch. With 1123.9599999999998 calories and 55.64999999999999g of protein per serving, it's a nutritious choice for your meal plan.
Other Cuisines to Explore
Discover authentic meals from cuisines around the world.
In a large bowl, combine the cracked wheat, chana dal, urad dal, masoor dal, and moong dal.
Rinse them under running water 3-4 times until the water runs clear.
Soak the mixture in ample water for a minimum of 6 hours, or preferably overnight. This is crucial for a smooth texture.
2
Cook the Mutton
Heat 1/4 cup of ghee in a large pressure cooker over medium heat.
Add the whole spices: cinnamon stick, green cardamoms, cloves, black peppercorns, and shah jeera. Sauté for 1 minute until fragrant.
Add 2 sliced onions and fry for 10-12 minutes until they are deep golden brown.
Add the ginger-garlic paste and slit green chilies. Sauté for 2 minutes until the raw aroma disappears.
Increase the heat to high, add the mutton pieces, and sear for 5-7 minutes until browned on all sides.
Reduce the heat to medium. Add the whisked curd, turmeric powder, red chili powder, coriander powder, and 1.5 tsp of salt. Mix well.
Cook for 5-7 minutes, stirring, until the oil separates from the masala.
Pour in 4 cups of water, stir, and secure the pressure cooker lid.
Cook on high heat until the first whistle, then reduce to medium-low and cook for 45-50 minutes (or about 10-12 whistles) until the mutton is extremely tender and falling off the bone.
3
Cook the Grains Mixture
While the mutton cooks, drain the soaked grains and lentils completely.
Transfer them to a separate large, heavy-bottomed pot or another pressure cooker.
Add 6 cups of water and the remaining 1 tsp of salt.
If using a pot, bring to a boil, then simmer for 40-50 minutes, stirring occasionally, until completely soft and mushy.
If using a pressure cooker, cook for 5-6 whistles (about 20 minutes) until soft.
Once cooked, use an immersion blender to blend the mixture into a thick, coarse paste. Set aside.
4
Combine and Slow Cook (Ghotai)
Allow the mutton pressure cooker to release pressure naturally. Open the lid.
Carefully remove the mutton pieces onto a plate, leaving the stock behind. Let the meat cool slightly.
Using your hands or a fork, shred the meat finely, discarding all bones.
Strain the mutton stock through a fine-mesh sieve directly into the pot containing the blended grain mixture. This removes the whole spices.
Add the shredded mutton to the pot. Mix everything thoroughly.
Place the pot on very low heat. This is the 'ghotai' (mashing) stage. Using a wooden masher (ghotni) or an immersion blender in short bursts, continuously mash and stir the mixture for at least 45-60 minutes.
Continue this process until the meat fibers have completely integrated with the grains, forming a single, homogenous, sticky, and stretchy paste.
Stir in the garam masala and the remaining 1/4 cup of ghee. Cook for another 10 minutes, stirring continuously to prevent scorching.
5
Prepare the Garnish (Birista)
While the haleem is slow-cooking, heat 1 cup of oil in a small pan over medium heat.
Add the remaining 1 thinly sliced onion and fry, stirring occasionally, for 12-15 minutes until evenly golden brown and crisp.
Use a slotted spoon to remove the onions and drain them on a paper towel. They will become crispier as they cool.
6
Serve
Ladle the hot haleem into serving bowls.
Garnish generously with birista (fried onions), chopped mint leaves, and chopped coriander leaves.
Serve immediately with lemon wedges on the side for squeezing over, and an optional drizzle of hot ghee.
102cal
1gprotein
10gcarbs
7gfat
Ingredients
800 g Red Onion (about 4 large onions, thinly sliced)
2 cup Vegetable Oil (for deep frying, or any neutral high-smoke point oil)
1 tbsp Corn Starch (optional, for extra crispiness)
0.25 tsp Salt (for sprinkling after frying)
Instructions
1
Prepare the Onions
Peel the onions, cut them in half from root to stem, and slice them very thinly and uniformly. A mandoline slicer is highly recommended for best results.
Separate the onion slices with your fingers and place them in a large bowl.
If using, sprinkle the corn starch over the onions and toss well to coat them lightly. This helps absorb excess moisture and makes them crispier.
2
Heat the Oil
Pour the oil into a heavy-bottomed kadai or deep pan. Heat over a medium-high flame.
To check if the oil is ready, drop a single slice of onion into it. If it sizzles immediately and floats to the top, the oil is at the right temperature (around 160°C or 320°F).
3
Fry the Onions in Batches
Carefully add about one-third of the sliced onions to the hot oil. Do not overcrowd the pan, as this will lower the oil's temperature and result in soggy, oily onions.
Fry for 15-20 minutes, stirring occasionally with a slotted spoon to ensure they cook evenly.
The onions will first soften, then turn a pale color, and finally start to turn golden brown at the edges.
Be very vigilant during the last few minutes, as they can burn quickly. Remove them from the oil when they are a light, even golden brown.
4
Drain and Cool
Using a slotted spoon, quickly remove the fried onions from the pan, letting the excess oil drip off.
Spread them in a single layer on a wire rack placed over a baking sheet or on a plate lined with paper towels.
Sprinkle with salt immediately while they are still hot.
Let the onions cool completely. They will become perfectly crisp as they cool down.
5
Store
Once completely cool and crisp, store the fried onions in an airtight container.
They can be kept at room temperature for up to 2 weeks or in the refrigerator for over a month.
4 cup Cooked Basmati Rice (Preferably cooled or leftover rice)
2 tbsp Sesame Oil (Gingelly oil is traditional)
1 tsp Mustard Seeds
1 tsp Urad Dal (Split black gram)
1 tbsp Chana Dal (Split Bengal gram)
0.25 cup Raw Peanuts
2 pcs Dried Red Chilies (Broken into halves)
2 pcs Green Chilies (Slit lengthwise)
1 sprig Curry Leaves (About 10-12 leaves)
0.25 tsp Hing (Asafoetida)
0.5 tsp Turmeric Powder
3 tbsp Lemon Juice (Freshly squeezed, from 1-2 large lemons)
1 tsp Salt (Adjust to taste)
0.25 tsp Sugar (Optional, to balance tanginess)
2 tbsp Fresh Coriander (Finely chopped, for garnish)
Instructions
1
Prepare the Rice
If using freshly cooked rice, spread it on a large plate or tray to cool down completely. This prevents the grains from breaking and becoming mushy.
Gently fluff the cooled rice with a fork to separate the grains. Set aside.
2
Create the Tempering (Tadka)
Heat sesame oil in a large, heavy-bottomed pan or kadai over medium heat.
Once the oil is hot, add the mustard seeds and allow them to splutter completely, which takes about 30 seconds.
Reduce the heat to low, then add the chana dal and urad dal. Sauté for 1-2 minutes, stirring continuously, until they turn a light golden brown and become aromatic.
Add the raw peanuts and continue to sauté for another 2-3 minutes until they are crunchy and lightly browned.
Add the broken dried red chilies, slit green chilies, and curry leaves. Be careful as the curry leaves will splutter. Sauté for 30 seconds until the leaves are crisp.
3
Combine with Rice
Add the hing and turmeric powder to the pan and stir for 10 seconds.
2 tablespoon Roasted Chana Dal (Acts as a thickener)
2 tablespoon Lemon Juice (Freshly squeezed)
0.75 teaspoon Salt (Adjust to taste)
0.5 teaspoon Black Salt (Also known as Kala Namak)
0.5 teaspoon Sugar (Optional, to balance flavors)
3 tablespoon Ice Cold Water (Or use ice cubes, add as needed for consistency)
Instructions
1
Prepare the Herbs (4 minutes)
Thoroughly rinse the mint and cilantro leaves under cold running water to remove any dirt or grit.
Pluck the mint leaves from their tough stems; discard the stems as they can be bitter.
For the cilantro, you can use the tender stems along with the leaves as they are full of flavor. Roughly chop the bunch.
Gently pat the herbs dry with a clean kitchen towel or paper towels to remove excess water.
2
Combine Ingredients in Blender (1 minute)
Place the prepared mint leaves, cilantro, green chilies (start with one for less heat), chopped ginger, roasted chana dal, lemon juice, salt, black salt, and sugar into a small, high-speed blender jar.
3
Blend to a Smooth Paste (3 minutes)
Add 2-3 tablespoons of ice-cold water or a couple of ice cubes. Using cold water is crucial to prevent the herbs from oxidizing and helps retain their vibrant green color.
Blend for 1-2 minutes, scraping down the sides of the jar with a spatula as needed, until you achieve a smooth, uniform paste.
If the chutney is too thick, add more cold water, 1 teaspoon at a time, and blend again until you reach your desired consistency. Be careful not to make it too watery.
Immediately add the cooled, fluffed rice, salt, and optional sugar to the pan.
Gently mix everything together, ensuring the tempering is evenly distributed throughout the rice. Be careful not to mash the rice grains. Continue to toss on low heat for 2 minutes until the rice is heated through.
4
Finish and Serve
Turn off the heat completely. Pour the fresh lemon juice over the rice.
Add the chopped fresh coriander.
Give it one final gentle mix to combine. The residual heat will incorporate the flavors.
Serve the Lemon Rice warm, either on its own or with accompaniments like papad, raita, or coconut chutney.
4
Taste, Adjust, and Serve (2 minutes)
Transfer the chutney to a serving bowl.
Taste and adjust the seasoning. You may want to add more salt for savoriness, lemon juice for tang, or a pinch more sugar to balance the flavors.
Serve immediately with snacks like samosas, pakoras, or as a spread. Store leftovers in an airtight glass container in the refrigerator.