Tender, juicy chicken simmered in a smoky chipotle-tomato sauce, then shredded and piled into warm corn tortillas. This authentic Tex-Mex recipe is perfect for a flavorful weeknight dinner and is easily customizable with your favorite toppings.
Prep15 min
Cook25 min
Servings6
Serving size: 1 serving
453cal
45gprotein
28gcarbs
18g
Ingredients
1.5 lb boneless, skinless chicken breast (Can substitute with chicken thighs for more flavor)
1 tbsp vegetable oil
1 medium yellow onion (Finely chopped)
3 cloves garlic (Minced)
2 whole chipotle peppers in adobo (Minced, from a can. Use 1 for mild, 3 for spicy.)
1 tbsp adobo sauce (From the can of chipotle peppers)
Fluffy long-grain rice infused with zesty lime juice and fresh cilantro. This copycat of the famous Chipotle rice is the perfect side for any Mexican-inspired meal, from burritos to tacos.
Hearty and flavorful black beans simmered with onions, garlic, and classic Tex-Mex spices. This simple, one-pot side dish is perfect for tacos, burritos, or serving alongside rice.
Learn to make authentic, crumbly Cotija cheese at home. This salty, aged Mexican cheese is perfect for crumbling over tacos, salads, and elote. This recipe requires patience and precision, but the rewarding, robust flavor is well worth the effort.
Prep45 min
Cook60 min
Ferment43200 min
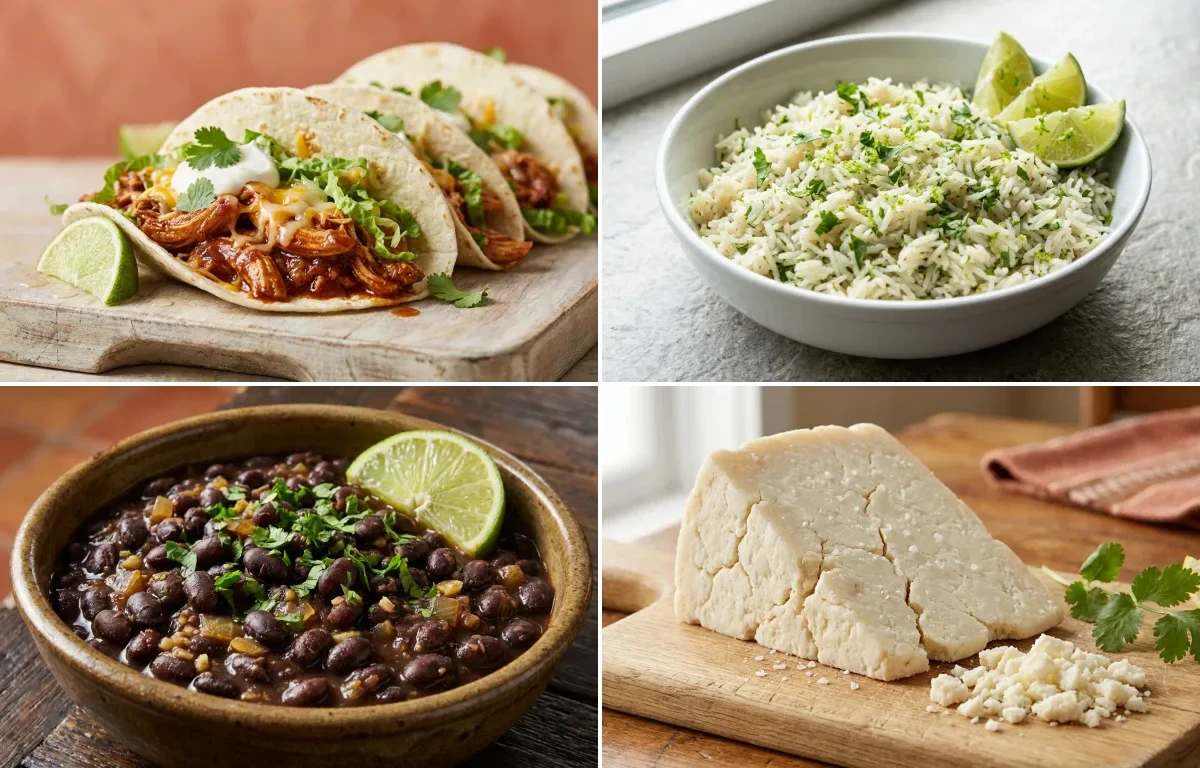
About Shredded Chicken Tacos, Cilantro Lime Rice, Savory Black Beans and Cotija Cheese
Flavorful shredded chicken tacos with zesty cilantro lime rice - a kid-approved, fiber-rich delight!
This tex_mex dish is perfect for dinner. With 1009.6600000000001 calories and 60.43g of protein per serving, it's a nutritious choice for your meal plan.
Other Cuisines to Explore
Discover authentic meals from cuisines around the world.
0.5 cup chicken broth (Low sodium is a good option)
1 tsp salt (Adjust to taste)
0.5 tsp black pepper (Freshly ground)
1 tbsp lime juice (Freshly squeezed)
12 small corn tortillas (For serving)
2 cup romaine lettuce (Shredded, for topping)
1 cup monterey jack cheese (Shredded, for topping)
0.5 cup sour cream (For topping)
0.25 cup cilantro (Freshly chopped, for topping)
1 whole lime (Cut into wedges for serving)
Instructions
1
Sauté Aromatics
Heat vegetable oil in a large skillet or Dutch oven over medium-high heat.
Add the finely chopped onion and cook, stirring occasionally, until it softens and becomes translucent, about 5-6 minutes.
Stir in the minced garlic and cook for another minute until fragrant, being careful not to burn it.
2
Bloom Spices and Create Sauce Base
Add the chili powder, cumin, smoked paprika, and oregano to the skillet. Stir constantly for 30-60 seconds until the spices are fragrant. This step, called blooming, deepens their flavor.
Stir in the minced chipotle peppers and adobo sauce.
Pour in the undrained diced tomatoes and chicken broth. Add salt and pepper, then stir everything together to combine. Bring the sauce to a gentle simmer.
3
Simmer the Chicken
Carefully place the chicken breasts into the simmering sauce, ensuring they are mostly submerged.
Reduce the heat to low, cover the skillet, and let it simmer for 15-20 minutes.
The chicken is done when it is cooked through and tender. Check for an internal temperature of 165°F (74°C) with a meat thermometer.
4
Shred Chicken and Finish
Remove the cooked chicken from the skillet and place it on a cutting board or in a large bowl.
Using two forks, shred the chicken. For a faster method, you can use a stand mixer with the paddle attachment on low speed.
Return the shredded chicken to the skillet with the sauce. Stir to coat the chicken completely.
Stir in the fresh lime juice to brighten the flavors. Let it simmer for another 2-3 minutes for the chicken to absorb the sauce.
5
Warm Tortillas and Assemble Tacos
Warm the corn tortillas one by one. You can do this in a dry skillet over medium heat for 30 seconds per side, or carefully over a gas flame using tongs for a slight char.
Spoon a generous amount of the shredded chicken mixture into each warm tortilla.
Serve immediately with toppings like shredded lettuce, Monterey Jack cheese, sour cream, and fresh cilantro. Offer lime wedges on the side for squeezing over the tacos.
290cal
5gprotein
57gcarbs
4gfat
Ingredients
1.5 cup long-grain white rice (Basmati or Jasmine rice work well)
3 cup water (or use vegetable broth for more flavor)
1 tbsp olive oil
1 tsp salt (adjust to taste)
1 pcs bay leaf (optional, for a subtle aromatic flavor)
0.5 cup cilantro (freshly chopped, packed)
3 tbsp lime juice (freshly squeezed, from about 2 medium limes)
1 tsp lime zest (from 1 lime)
Instructions
1
Rinse the rice thoroughly. Place the rice in a fine-mesh sieve and rinse under cold running water for 1-2 minutes, swishing it with your hand, until the water runs clear. Drain well.
2
Toast the rice. Heat the olive oil in a medium saucepan over medium heat. Add the drained rice and stir constantly for 2-3 minutes until the grains are fragrant and the edges become translucent.
3
Add liquid and bring to a boil. Pour in the water (or broth), add the salt and the optional bay leaf. Stir once to combine, then increase the heat to high and bring the mixture to a rolling boil.
4
Simmer the rice. As soon as it boils, reduce the heat to the lowest possible setting, cover the saucepan with a tight-fitting lid, and let it simmer for 15 minutes. Do not lift the lid during this time.
5
Rest the rice. After 15 minutes, remove the pot from the heat and let it stand, still covered, for an additional 5-10 minutes. This step is crucial for allowing the steam to finish cooking the grains perfectly.
6
Add flavorings and serve. Remove the lid and discard the bay leaf. Add the chopped cilantro, fresh lime juice, and lime zest. Use a fork to gently fluff the rice, separating the grains and evenly distributing the ingredients. Serve immediately.
0.5 cup Cool Non-Chlorinated Water (Used to dilute calcium chloride and rennet)
2 tbsp Non-Iodized Salt (Cheese salt or kosher salt works best)
Instructions
1
Sanitize Equipment & Prepare Ingredients
Before starting, thoroughly wash and sanitize a large stockpot, long-handled spoon, thermometer, long knife, colander, cheesecloth, and your cheese press. This prevents contamination.
In a small bowl, dilute the 1/2 tsp of calcium chloride in 1/4 cup of cool, non-chlorinated water. Set aside.
In a separate small bowl, dilute the 1/2 tsp of liquid rennet in the remaining 1/4 cup of cool, non-chlorinated water. Set aside. Do this just before you need to add it.
2
Heat and Culture the Milk (Approx. 75 minutes)
Pour the gallon of milk into the sanitized stockpot. Attach a thermometer to the side.
Gently heat the milk on medium-low to 90°F (32°C), stirring occasionally to prevent scorching. This should take about 15-20 minutes.
Once at 90°F, turn off the heat. Sprinkle the mesophilic culture over the milk's surface and let it rehydrate for 2-3 minutes.
Stir the culture into the milk using an up-and-down motion for 1 minute to ensure it's fully incorporated.
Stir in the diluted calcium chloride solution.
Cover the pot and let the milk ripen for 1 hour. Try to maintain the temperature around 90°F (a warm spot in the kitchen or a pre-warmed oven turned off works well).
3
Set the Curd (Approx. 60 minutes)
Gently stir the diluted rennet solution into the milk for 1 minute using an up-and-down motion.
Immediately cover the pot and let it sit completely undisturbed for 45 to 60 minutes.
Check for a 'clean break' by inserting a clean knife or thermometer into the curd at an angle and lifting straight up. If the curd splits cleanly and the whey that fills the gap is clear, it's ready. If it's soft or milky, wait another 10-15 minutes.
4
Cut and Cook the Curds (Approx. 70 minutes)
Using a long knife that reaches the bottom of the pot, cut the curd into 1/2-inch cubes. Make vertical cuts first, then turn the pot 90 degrees and repeat. Finally, hold the knife at a 45-degree angle to make diagonal cuts.
Let the cut curds rest and heal for 5 minutes.
Very slowly, heat the curds to 100°F (38°C) over the next 30 minutes. Stir gently with a slotted spoon every 5 minutes to prevent the curds from matting together.
Once the temperature reaches 100°F, hold it there for another 30 minutes, stirring occasionally. The curds will shrink, firm up, and expel more whey.
5
Drain and Salt the Curds (Approx. 30 minutes)
Turn off the heat and let the curds settle to the bottom of the pot for 10 minutes.
Carefully pour off the whey. You can save the whey for baking or other uses.
Line a colander with cheesecloth and transfer the curds into it. Let them drain for 15-20 minutes.
Transfer the drained curds to a large bowl. Break up any large clumps with your fingers and thoroughly mix in the 2 tablespoons of non-iodized salt.
6
Press the Cheese (Approx. 12.5 hours)
Line your cheese press mold with a damp piece of cheesecloth, ensuring it's smooth.
Carefully pack the salted curds into the mold.
Press at 10 lbs of pressure for 20 minutes.
Remove the cheese from the press, carefully unwrap it, flip it over, re-wrap it smoothly, and place it back in the press.
Press at 20 lbs of pressure for 20 minutes.
Repeat the flipping and re-wrapping process one more time. Press at 40-50 lbs of pressure for 12 hours.
7
Air-Dry and Age the Cheese (30+ days)
After pressing, unwrap the cheese. It should be a firm, consolidated wheel. Pat it dry with a clean paper towel.
Place the cheese on a sanitized cheese mat in a cool (50-60°F / 10-15°C), well-ventilated area. Air-dry for 2-4 days, flipping it twice daily, until the surface is completely dry to the touch.
Transfer the cheese to an aging environment (like a wine fridge or a dedicated 'cheese cave') at 55°F (13°C) with 80-85% humidity.
Age for a minimum of 30 days for a mild flavor, or 60-90 days for a sharper, more traditional Cotija. Flip the cheese every 2-3 days to ensure even aging.