Conchas
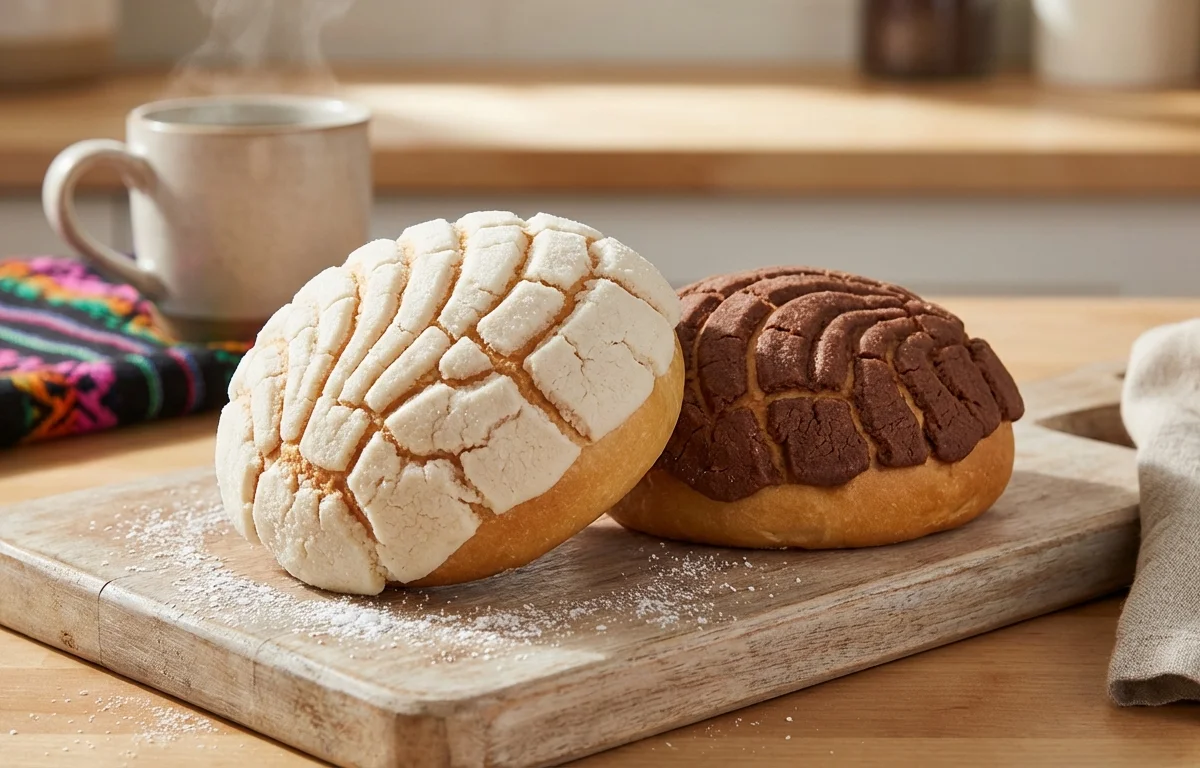
Soft, pillowy Mexican sweet bread topped with a crisp, sugary shell pattern. These beloved pan dulce treats are a staple in Mexican bakeries, perfect for dunking into hot chocolate or coffee. The contrast between the tender, buttery bun and the crumbly vanilla or chocolate topping makes each bite pure comfort.
For 8 servings
- mix · ~10 min
Activate the yeast.
In the bowl of a stand mixer, combine warm milk and 1 tablespoon of the granulated sugar. Sprinkle instant yeast over the top and let sit for 5-10 minutes until foamy.
TIPMake sure milk is warm to the touch, about 110°F — too hot will kill the yeast. - mix · ~3 min
Mix the dough.
Add remaining granulated sugar, eggs, vanilla extract, and salt to the yeast mixture. Mix with the dough hook on low speed. Gradually add flour in 3 additions, mixing until a shaggy dough forms, about 2 minutes.
- knead · ~10 min
Knead the dough with butter.
With the mixer on medium-low speed, add softened butter one tablespoon at a time, waiting until each piece is incorporated before adding the next. Knead for 8-10 minutes until the dough is smooth, elastic, and pulls away from the sides of the bowl. It should pass the windowpane test.
TIPDon't rush the butter addition — slow incorporation creates the tender crumb conchas are known for. - rest · ~80 min
First rise — let the dough double.
Shape the dough into a ball and place in a lightly greased bowl, turning to coat. Cover with plastic wrap or a damp kitchen towel. Let rise in a warm, draft-free spot until doubled in size, about 1 to 1.5 hours.
- mix · ~5 min
Make the topping paste.
While dough rises, prepare the topping. In a medium bowl, beat softened butter and powdered sugar together until creamy and smooth. Add flour and mix until a thick, spreadable paste forms. Divide in half. Add vanilla extract to one half for vanilla topping. Add cocoa powder to the other half for chocolate topping. Mix each until uniform in color.
TIPThe topping should be firm enough to handle but soft enough to spread — refrigerate for 10 minutes if it becomes too sticky. - prep · ~10 min
Portion and shape the dough.
Punch down the risen dough and turn it out onto a lightly floured surface. Divide into 8 equal pieces, about 100g each. Shape each piece into a smooth, tight ball by pulling the edges to the center and pinching the seam underneath. Place balls on parchment-lined baking sheets, leaving 3 inches between each.
- assemble · ~12 min
Apply the topping and score the shell pattern.
Divide each topping flavor into 4 equal portions. Flatten a portion of topping between your palms or between two sheets of plastic into a thin circle about the diameter of the dough ball. Drape the topping circle over the dough ball, gently pressing the edges down around the sides to adhere. Use a concha cutter or sharp knife to score the topping with curved lines that resemble a shell, cutting through the topping but not deep into the dough.
TIPChill the topping circles briefly on a plate if they're too soft to transfer — they'll lift easily with a bench scraper. - rest · ~40 min
Second rise — proof until puffy.
Cover the shaped conchas loosely with plastic wrap and let proof for 30-45 minutes, until visibly puffy and nearly doubled. The topping should crack slightly as the dough rises, revealing the bread beneath.
- bake · ~20 min
Bake the conchas.
Preheat oven to 350°F. Bake conchas for 18-20 minutes, rotating halfway, until the topping is set and the bread underneath is lightly golden. The tops should not brown too much — you want the pale, distinct shell pattern to show.
- rest · ~15 min
Cool and serve.
Transfer conchas to a wire rack and cool for at least 15 minutes before serving. Best enjoyed the same day, split open with fingers or dunked into hot chocolate.
TIPConchas are at their peak within a few hours of baking — the topping stays crisp and the bread is cloud-soft.
What to keep in mind.
7 tips from the recipe — small details that make a real difference to the final dish.
- 1Use a digital scale to portion dough into 100g balls for even baking and a uniform look.
- 2Chill the topping discs for 10 minutes if they become sticky — they’ll transfer cleanly onto the dough.
- 3Score the topping with a concha cutter or a sharp knife, cutting only through the paste, not into the dough.
- 4Warm milk to 110°F — too hot kills the yeast, too cool slows activation.
- 5Add butter one tablespoon at a time during kneading for a tender, airy crumb.
- 6Let conchas cool on a wire rack for 15 minutes before serving so the topping sets and doesn’t crumble.
- 7Store leftover conchas in an airtight container at room temperature for up to 2 days; refresh in a 300°F oven for 5 minutes.
Adapt it for your goals.
Pink Strawberry Conchas
Add 1/2 teaspoon strawberry extract and a drop of pink gel food coloring to the vanilla topping — a fun, fruit-flavored twist popular in some Mexican bakeries.
Whole Wheat ConchasWhole Wheat Conchas
Replace half the all-purpose flour with whole wheat flour and increase milk by 2 tablespoons for a nuttier flavor and extra fiber.
Cinnamon Sugar ToppingCinnamon Sugar Topping
Mix 1 teaspoon ground cinnamon into the topping dough for a warm, spiced shell that pairs beautifully with coffee.
Stuffed ConchasStuffed Conchas
After shaping the dough balls, press a 1-tablespoon dollop of dulce de leche or cream cheese filling into the center before sealing and topping — adds a surprise sweet center.
Why this is on our healthy list.
Moderate Energy from Carbs
Made primarily with all-purpose flour, conchas provide a source of carbohydrates that can help fuel daily activities.
Source of Protein from Eggs and Milk
Eggs and milk in the dough contribute protein to support muscle repair and keep you feeling satisfied longer.
Contains Vitamin A from Butter
Butter in both the dough and topping provides vitamin A, which supports vision and immune function.
Optional Antioxidants from Cocoa
The chocolate topping contains unsweetened cocoa powder, which offers natural antioxidant flavonoids.
Frequently asked questions
If the topping is too dry, it won’t stretch with the rising dough; if too wet, it won’t crack. Adjust with a teaspoon of milk or flour until it’s pliable but not sticky.