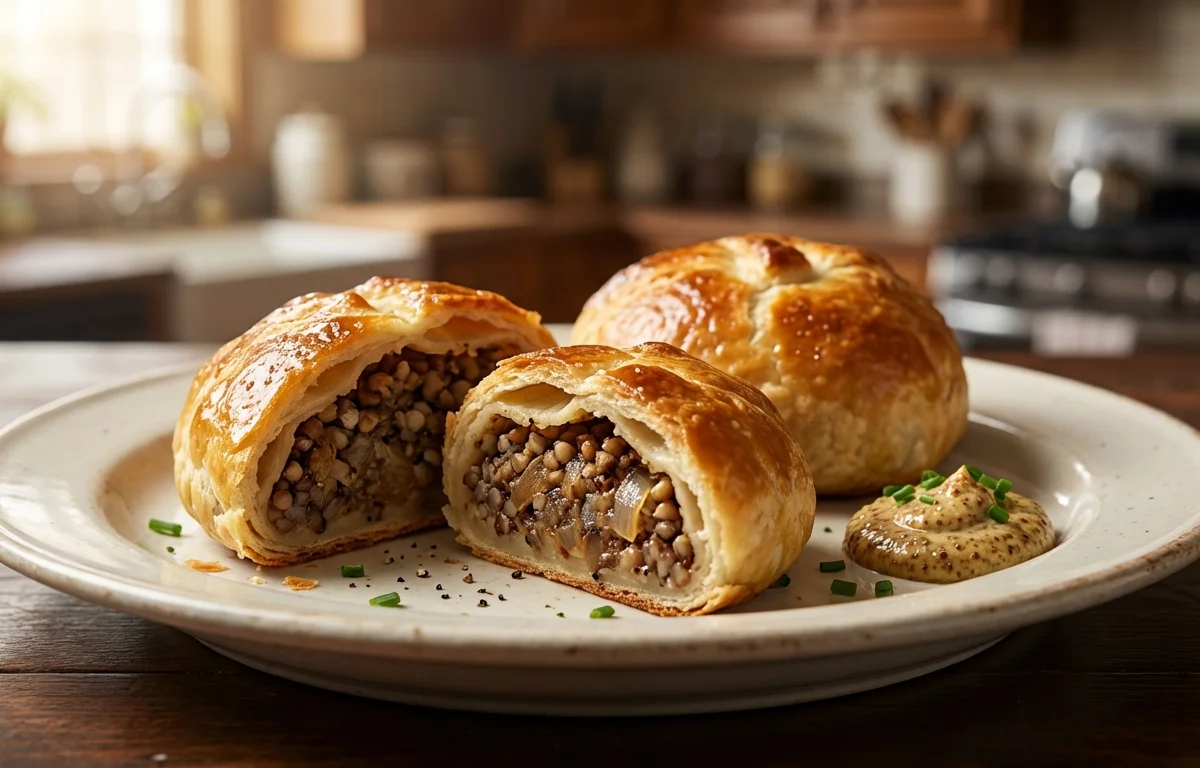
Kasha Knishes
A taste of the old world! These classic Jewish-American pastries feature a tender, flaky dough wrapped around a savory filling of toasted buckwheat groats (kasha) and sweet caramelized onions. Perfect as a hearty snack or side dish.
For 4 servings
Prepare the Dough
- In a large bowl, whisk together 2 cups of all-purpose flour and 1/2 tsp of salt.
- In a separate medium bowl, whisk together 1/4 cup vegetable oil, 1/2 cup warm water, 1 large egg, and 1 tsp white vinegar.
- Pour the wet ingredients into the dry ingredients. Mix with a fork until a shaggy dough forms.
- Turn the dough out onto a lightly floured surface and knead for 5-7 minutes, until it becomes smooth and elastic.
- Place the dough in a lightly oiled bowl, cover with a clean cloth or plastic wrap, and let it rest at room temperature for at least 30 minutes, or up to 1 hour.
Make the Kasha Filling
- While the dough rests, prepare the filling. In a medium bowl, combine 1 cup of dry kasha with 1 lightly beaten large egg. Stir until every grain is coated. This is called 'varnishing'.
- Heat a large, dry skillet or pot over medium heat. Add the egg-coated kasha and cook, stirring constantly, for 3-4 minutes until the grains are separate, dry, and smell nutty.
- Remove the toasted kasha from the skillet and set aside.
- In the same skillet, heat 3 tbsp of vegetable oil over medium-low heat. Add the chopped onions and cook slowly, stirring occasionally, for 15-20 minutes until they are deeply golden brown and caramelized.
- Return the toasted kasha to the skillet with the onions. Add 2 cups of vegetable broth, the remaining 1 tsp of salt, and 1/2 tsp of black pepper. Stir to combine.
- Bring the mixture to a boil, then reduce the heat to low, cover tightly, and simmer for 10-15 minutes, until all the liquid is absorbed and the kasha is tender.
- Remove from heat, fluff with a fork, and spread onto a baking sheet to cool completely. This is crucial for easy assembly.
Assemble the Knishes
- Preheat your oven to 375°F (190°C). Line a large baking sheet with parchment paper.
- Divide the rested dough into two equal pieces. Work with one piece at a time, keeping the other covered.
- On a large, lightly floured surface, roll the dough into a very thin rectangle, approximately 10x14 inches. The dough should be almost translucent.
- Spoon half of the cooled kasha filling in a 2-inch wide log along one of the long edges of the dough, leaving a 1-inch border.
- Carefully roll the dough over the filling, jelly-roll style, to form a long, tight log. Pinch the seam and the ends to seal completely.
- Using the side of your hand, press indentations into the log every 3 inches to create 4-5 individual knishes.
- Cut the log at the indentations with a sharp knife. Pinch the open ends of each knish to seal the filling inside, then gently flatten the top.
- Place the knishes seam-side down on the prepared baking sheet. Repeat with the remaining dough and filling.
Bake and Serve
- In a small bowl, whisk the last large egg with 1 tbsp of water to create an egg wash.
- Brush the tops and sides of each knish generously with the egg wash for a golden, shiny finish.
- Bake for 25-30 minutes, or until the knishes are a deep golden brown and sound hollow when tapped.
- Let them cool on the baking sheet for at least 10 minutes before serving. They are best served warm with a side of spicy brown mustard.
What to keep in mind.
6 tips from the recipe — small details that make a real difference to the final dish.
- 1For an authentic, richer flavor, use schmaltz (rendered chicken fat) instead of vegetable oil to caramelize the onions.
- 2Don't skip the 'varnishing' step (coating kasha with egg). It prevents the grains from becoming mushy and ensures a perfect texture.
- 3The filling must be completely cool before assembly. A warm filling will make the dough sticky and difficult to handle.
- 4Stretch the dough as thinly as you can without tearing it. A thinner dough creates a better filling-to-dough ratio and a more delicate pastry.
- 5Knishes freeze beautifully. After baking and cooling completely, wrap them individually in plastic wrap and then place in a freezer bag. Reheat from frozen in a 350°F (175°C) oven for 15-20 minutes.
- 6If your dough is too elastic and keeps shrinking back, let it rest for an additional 10-15 minutes to allow the gluten to relax.
Adapt it for your goals.
Filling
For a classic potato knish, replace the kasha filling with 2 lbs of boiled and mashed russet potatoes mixed with the caramelized onions.
DoughDough
For a heartier dough, substitute 1/2 cup of the all-purpose flour with whole wheat flour.
FlavorFlavor
Add 8 ounces of sautéed mushrooms to the kasha and onion mixture for an earthier flavor profile.
Why this is on our healthy list.
High in Fiber
Buckwheat groats (kasha) are an excellent source of dietary fiber, which aids in digestion, helps maintain stable blood sugar levels, and promotes a feeling of fullness.
Complete Plant-Based Protein
Unlike many grains, buckwheat is a complete protein, containing all nine essential amino acids. This makes kasha knishes a satisfying and nutritious option, especially for vegetarians.
Rich in Minerals
Kasha is packed with essential minerals like magnesium, which is vital for muscle and nerve function, and manganese, an important antioxidant.
Frequently asked questions
Each kasha knish contains approximately 250-300 calories, depending on the exact size and amount of oil used. This recipe makes about 8-10 knishes.