Crispy corn tostadas piled high with smoky, spicy shredded chicken simmered in a chipotle-tomato sauce. A vibrant and satisfying Mexican classic, perfect for a fun weeknight dinner and easily customized with your favorite toppings.
Prep20 min
Cook40 min
Servings4
Serving size: 1 serving
774cal
62gprotein
44gcarbs
38g
Ingredients
1.5 lb Chicken Breast (Boneless and skinless)
1.5 pcs White Onion (Half for poaching, one sliced for the sauce)
4 cloves Garlic (2 whole for poaching, 2 minced for the sauce)
1 pcs Bay Leaf (For poaching the chicken)
1.5 tsp Salt (Divided for poaching and seasoning)
14.5 oz Fire-Roasted Diced Tomatoes (Use one can, undrained)
3 pcs Chipotle Peppers in Adobo Sauce (Adjust to your preferred spice level)
1 tbsp Adobo Sauce (From the can of chipotle peppers)
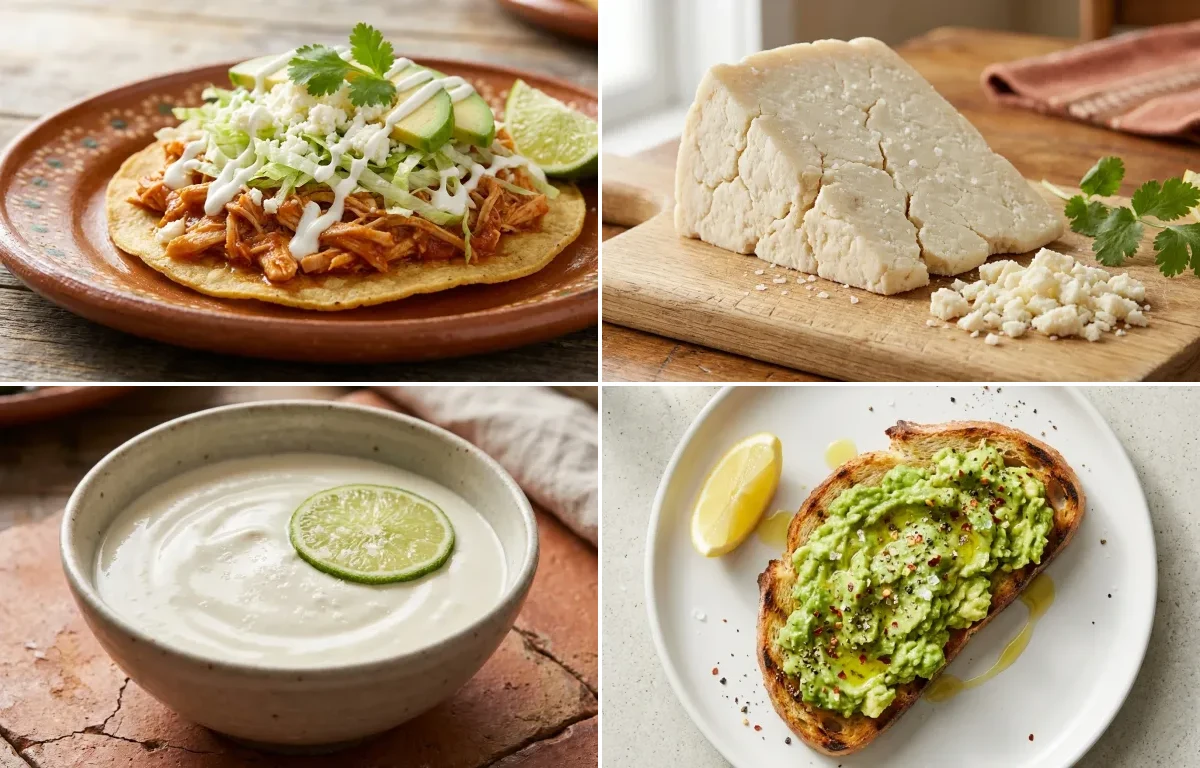
Learn to make authentic, crumbly Cotija cheese at home. This salty, aged Mexican cheese is perfect for crumbling over tacos, salads, and elote. This recipe requires patience and precision, but the rewarding, robust flavor is well worth the effort.
A versatile, tangy, and slightly thickened cream that's the perfect cooling topping for tacos, enchiladas, and spicy soups. This authentic recipe is incredibly easy to make at home with just two main ingredients and a little patience for the magic of fermentation.
A quintessential California classic, this recipe features creamy mashed avocado on perfectly toasted sourdough, seasoned with a hint of zesty lemon, sea salt, and a pinch of red pepper flakes. A simple, nutrient-dense, and incredibly satisfying breakfast or snack ready in under 10 minutes.
Prep5 min
Cook3 min
Servings2
Serving size: 1 serving
About Chicken Tinga Tostadas, Cotija Cheese, Mexican Crema and Avocado Toast
Crispy chicken tinga tostadas with creamy avocado – smoky, soul-satisfying, and absolutely delicious!
This tex_mex dish is perfect for dinner. With 1406.23 calories and 78.84g of protein per serving, it's a nutritious choice for your meal plan.
Other Cuisines to Explore
Discover authentic meals from cuisines around the world.
1 cup Iceberg Lettuce (Finely shredded, for topping)
0.5 cup Queso Fresco (Crumbled, for topping)
0.5 cup Mexican Crema (For drizzling)
1 pcs Avocado (Medium size, sliced or diced)
0.25 cup Cilantro (Freshly chopped, for garnish)
1 pcs Lime (Cut into wedges for serving)
Instructions
1
Poach and Shred Chicken
In a medium pot, combine chicken breasts, half an onion, 2 whole garlic cloves, the bay leaf, and 1 teaspoon of salt. Cover with water by at least one inch.
Bring to a boil over high heat, then immediately reduce to a gentle simmer. Cook for 15-20 minutes, until the chicken is cooked through (reaches 165°F or 74°C).
Carefully remove the chicken and place it on a cutting board to cool. Reserve 1 cup of the poaching broth for the sauce, then discard the rest.
Once the chicken is cool enough to handle, use two forks or your fingers to shred it into bite-sized pieces.
2
Prepare the Tinga Sauce
While the chicken cooks, heat 1 tbsp of avocado oil in a large skillet or Dutch oven over medium heat. Add the sliced onion and cook, stirring occasionally, for 6-8 minutes until soft and translucent.
Add the 2 minced garlic cloves and cook for another minute until fragrant.
In a blender, combine the fire-roasted tomatoes (with their juice), chipotle peppers, adobo sauce, Mexican oregano, cumin, and the reserved 1 cup of chicken broth. Blend until the sauce is completely smooth.
Pour the blended sauce into the skillet with the onions. Bring to a simmer and cook for 5 minutes, stirring occasionally, to allow the flavors to meld.
3
Simmer the Chicken Tinga
Add the shredded chicken to the skillet with the simmering sauce. Stir thoroughly to ensure all the chicken is coated.
Season with the remaining 1/2 teaspoon of salt and the black pepper. Reduce the heat to low, cover, and let it simmer for at least 10 minutes for the chicken to absorb the sauce's flavor. The mixture should be thick but still moist.
4
Fry the Tostadas
In a separate large, heavy-bottomed skillet, pour vegetable oil to a depth of about 1/2 inch. Heat over medium-high heat until the oil shimmers (about 350°F or 175°C).
Working in batches, carefully place a corn tortilla into the hot oil. Fry for 1-2 minutes per side, using tongs to flip, until it's golden brown and crispy.
Remove the fried tortilla and let it drain on a wire rack or a plate lined with paper towels. Immediately sprinkle with a pinch of salt. Repeat with the remaining tortillas.
5
Assemble and Serve
Lay out the crispy tostadas on a serving platter.
Spoon a generous amount of the warm chicken tinga mixture onto each tostada.
Garnish with your desired toppings: shredded lettuce, crumbled queso fresco, a drizzle of Mexican crema, sliced avocado, and a sprinkle of fresh cilantro.
Serve immediately with lime wedges on the side for squeezing over the top.
Servings
16
Serving size: 1 serving
144cal
8gprotein
11gcarbs
8gfat
Ingredients
1 gallon Whole Milk (Must not be ultra-pasteurized (UHT))
0.25 tsp Mesophilic Direct-Set Culture (A starter culture for cheese)
0.5 tsp Calcium Chloride (Helps firm up the curd, especially with pasteurized milk)
0.5 cup Cool Non-Chlorinated Water (Used to dilute calcium chloride and rennet)
2 tbsp Non-Iodized Salt (Cheese salt or kosher salt works best)
Instructions
1
Sanitize Equipment & Prepare Ingredients
Before starting, thoroughly wash and sanitize a large stockpot, long-handled spoon, thermometer, long knife, colander, cheesecloth, and your cheese press. This prevents contamination.
In a small bowl, dilute the 1/2 tsp of calcium chloride in 1/4 cup of cool, non-chlorinated water. Set aside.
In a separate small bowl, dilute the 1/2 tsp of liquid rennet in the remaining 1/4 cup of cool, non-chlorinated water. Set aside. Do this just before you need to add it.
2
Heat and Culture the Milk (Approx. 75 minutes)
Pour the gallon of milk into the sanitized stockpot. Attach a thermometer to the side.
Gently heat the milk on medium-low to 90°F (32°C), stirring occasionally to prevent scorching. This should take about 15-20 minutes.
Once at 90°F, turn off the heat. Sprinkle the mesophilic culture over the milk's surface and let it rehydrate for 2-3 minutes.
Stir the culture into the milk using an up-and-down motion for 1 minute to ensure it's fully incorporated.
Stir in the diluted calcium chloride solution.
Cover the pot and let the milk ripen for 1 hour. Try to maintain the temperature around 90°F (a warm spot in the kitchen or a pre-warmed oven turned off works well).
3
Set the Curd (Approx. 60 minutes)
Gently stir the diluted rennet solution into the milk for 1 minute using an up-and-down motion.
Immediately cover the pot and let it sit completely undisturbed for 45 to 60 minutes.
Check for a 'clean break' by inserting a clean knife or thermometer into the curd at an angle and lifting straight up. If the curd splits cleanly and the whey that fills the gap is clear, it's ready. If it's soft or milky, wait another 10-15 minutes.
4
Cut and Cook the Curds (Approx. 70 minutes)
Using a long knife that reaches the bottom of the pot, cut the curd into 1/2-inch cubes. Make vertical cuts first, then turn the pot 90 degrees and repeat. Finally, hold the knife at a 45-degree angle to make diagonal cuts.
Let the cut curds rest and heal for 5 minutes.
Very slowly, heat the curds to 100°F (38°C) over the next 30 minutes. Stir gently with a slotted spoon every 5 minutes to prevent the curds from matting together.
Once the temperature reaches 100°F, hold it there for another 30 minutes, stirring occasionally. The curds will shrink, firm up, and expel more whey.
5
Drain and Salt the Curds (Approx. 30 minutes)
Turn off the heat and let the curds settle to the bottom of the pot for 10 minutes.
Carefully pour off the whey. You can save the whey for baking or other uses.
Line a colander with cheesecloth and transfer the curds into it. Let them drain for 15-20 minutes.
Transfer the drained curds to a large bowl. Break up any large clumps with your fingers and thoroughly mix in the 2 tablespoons of non-iodized salt.
6
Press the Cheese (Approx. 12.5 hours)
Line your cheese press mold with a damp piece of cheesecloth, ensuring it's smooth.
Carefully pack the salted curds into the mold.
Press at 10 lbs of pressure for 20 minutes.
Remove the cheese from the press, carefully unwrap it, flip it over, re-wrap it smoothly, and place it back in the press.
Press at 20 lbs of pressure for 20 minutes.
Repeat the flipping and re-wrapping process one more time. Press at 40-50 lbs of pressure for 12 hours.
7
Air-Dry and Age the Cheese (30+ days)
After pressing, unwrap the cheese. It should be a firm, consolidated wheel. Pat it dry with a clean paper towel.
Place the cheese on a sanitized cheese mat in a cool (50-60°F / 10-15°C), well-ventilated area. Air-dry for 2-4 days, flipping it twice daily, until the surface is completely dry to the touch.
Transfer the cheese to an aging environment (like a wine fridge or a dedicated 'cheese cave') at 55°F (13°C) with 80-85% humidity.
Age for a minimum of 30 days for a mild flavor, or 60-90 days for a sharper, more traditional Cotija. Flip the cheese every 2-3 days to ensure even aging.
In a very clean or sterilized glass jar, pour in the heavy cream and buttermilk.
Whisk gently for about 30 seconds until the mixture is smooth and fully combined. Avoid over-mixing.
If using, stir in the optional lime juice and salt until dissolved.
2
Culture the Crema
Cover the jar loosely. You can use the jar's lid without tightening it, or cover the opening with cheesecloth or a coffee filter secured with a rubber band. This allows air to circulate while keeping contaminants out.
Place the jar in a warm, draft-free spot (around 70-75°F or 21-24°C) and let it sit undisturbed for 12 to 24 hours.
Check the cream after 12 hours. It is ready when it has thickened to the consistency of pourable yogurt and has a pleasant, tangy aroma. The time will vary depending on the temperature of your room.
3
Chill and Store
Once the crema has reached your desired thickness and tang, give it a gentle stir.
Secure the lid tightly and transfer the jar to the refrigerator.
Chill for at least 6 hours before serving. The crema will thicken considerably more as it cools.
Store in the refrigerator for up to 2 weeks. Stir before each use if any separation occurs.
Toast the bread slices until golden brown and crisp. This can be done in a toaster, under a broiler, or in a hot skillet for about 2-3 minutes.
2
While the bread is toasting, prepare the avocado. Slice the avocado in half lengthwise, remove the pit, and scoop the flesh into a small bowl.
3
Add the fresh lemon juice, sea salt, and black pepper to the avocado. Using a fork, gently mash the avocado to your desired consistency. For a better texture, leave some small chunks.
4
Once the toast is ready, place it on a plate. Immediately spread the mashed avocado mixture evenly over each slice, going all the way to the edges.
5
Drizzle with extra virgin olive oil and sprinkle with red chili flakes (if using). Serve immediately for the best experience.