A beloved Andhra breakfast classic, Dibba Rotti is a thick, savory pancake with a delightfully crispy, golden-brown crust and a soft, spongy interior. Made from a fermented batter of lentils and rice, it's slow-cooked to perfection and best enjoyed with a spicy chutney.
Prep20 min
Cook35 min
Soak240 min
Ferment480 min
Servings4
Serving size: 1 serving
627cal
19gprotein
104gcarbs
Ingredients
1 cup Urad Dal (Skinned and split black gram lentils)
2 cup Idli Rava (Also known as cream of rice)
0.5 tsp Methi Seeds (Also known as fenugreek seeds)
1.5 tsp Salt (Adjust to taste)
3 cup Water (Approximately, for soaking and grinding)
1 medium Onion (Finely chopped)
3 piece Green Chillies (Finely chopped, adjust to your spice preference)
The king of Andhra pickles! This fiery, tangy raw mango pickle gets its bold, pungent flavor from coarsely ground mustard seeds and garlic, all preserved in rich sesame oil. A treasured recipe that brings a burst of flavor to any meal.
Creamy, tangy, and light homemade curd (dahi), a staple in every Indian household. This simple recipe uses just two ingredients to create a probiotic-rich food perfect for raita, lassi, or enjoying on its own. Note that this recipe requires 6-12 hours of inactive time for fermentation.
Prep5 min
Cook15 min
Ferment480 min
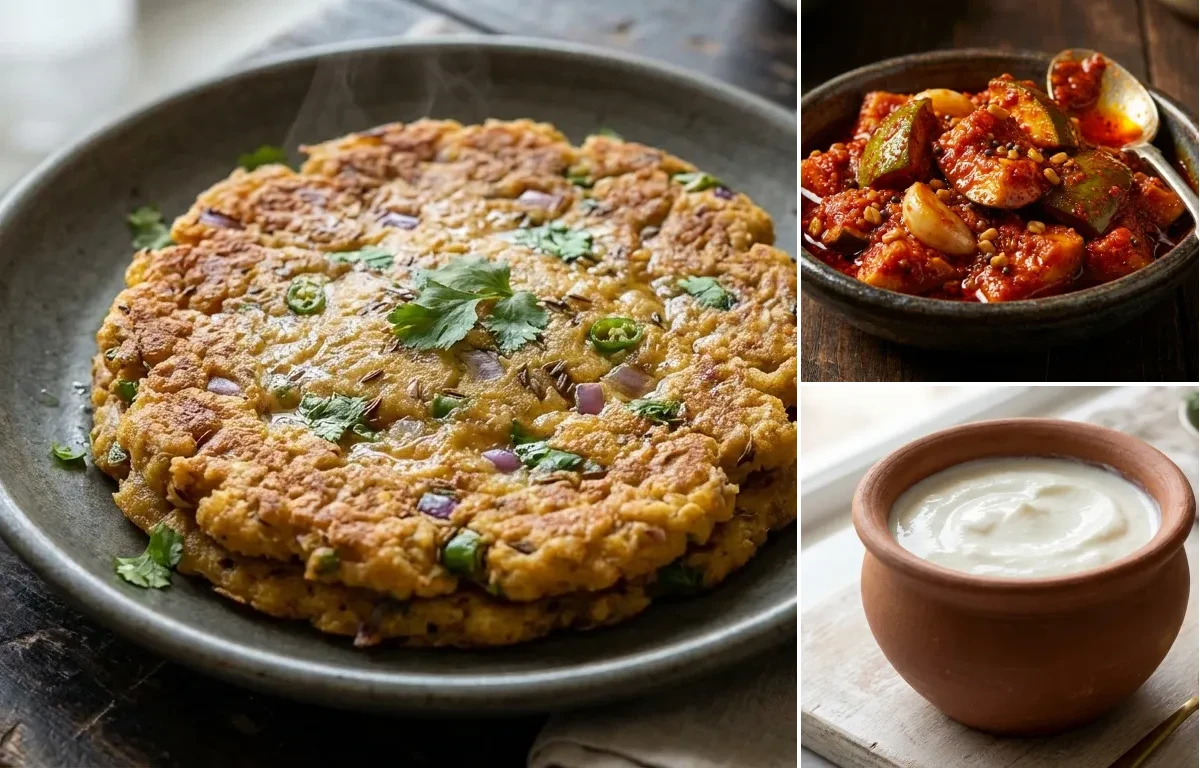
About Dibba Rotti, Avakaya Pickle and Curd
Crispy Dibba Rotti with tangy Avakaya & cool, gut-friendly curd. A soul-satisfying, energy-giving treat!
This andhra dish is perfect for dinner. With 834.6600000000001 calories and 28.49g of protein per serving, it's a muscle-gain option for your meal plan.
Other Cuisines to Explore
Discover authentic meals from cuisines around the world.
Dibba Rotti Recipe with Avakaya & Curd - South Indian Dinner
15gfat
Cumin Seeds
3 tbsp Coriander Leaves (Freshly chopped)
4 tbsp Sunflower Oil (Or any other neutral cooking oil like groundnut oil)
Instructions
1
Prepare the Batter (Soaking & Grinding)
Rinse urad dal and methi seeds until the water runs clear. Soak them together in 2 cups of water for at least 4-6 hours.
In a separate large bowl, rinse the idli rava once. Add enough water to cover it and let it soak for the same duration (4-6 hours).
After soaking, drain the water from the urad dal. Transfer the dal and methi seeds to a high-speed blender or wet grinder.
Grind to a very smooth, light, and fluffy paste, adding about 1/2 to 3/4 cup of fresh water incrementally. The batter should be airy. Transfer this paste to a large mixing bowl.
Squeeze out all the excess water from the soaked idli rava completely. Add the squeezed rava to the ground urad dal paste.
Add salt. Mix everything thoroughly with your clean hands for 2-3 minutes. This helps in initiating the fermentation process. The final batter should be thick, similar to idli batter.
2
Ferment the Batter
Cover the bowl with a lid (not airtight) and place it in a warm, draft-free spot to ferment for 8 to 12 hours, or overnight.
The batter is perfectly fermented when it has nearly doubled in volume, looks bubbly, and has a pleasant sour aroma.
3
Cook the Dibba Rotti
Once fermented, gently stir the batter once or twice. Do not overmix, as this will deflate the air pockets.
Gently fold in the finely chopped onion, green chilies, grated ginger, cumin seeds, and chopped coriander leaves.
Heat a small, deep, heavy-bottomed pan or kadai (about 6-7 inches in diameter) on a low flame.
Add 2 tablespoons of oil to the pan. Once the oil is moderately hot, pour in about 2 ladles of batter, filling the pan to a thickness of about 1.5 inches. Do not spread it.
Cover the pan with a lid and cook on the lowest possible flame for 15-18 minutes. The low heat is crucial for the inside to cook through without burning the outside.
After 15-18 minutes, the top should look set and the edges will start to pull away from the pan. The bottom should be a deep golden brown and very crispy.
Drizzle the remaining 2 tablespoons of oil around the edges and on top. Using two spatulas, carefully and quickly flip the rotti.
Cook the other side, uncovered, for another 10-12 minutes on low flame until it is also golden brown and crisp. Check for doneness by inserting a skewer into the center; it should come out clean.
4
Serve Hot
Carefully slide the cooked Dibba Rotti onto a plate or cutting board.
Let it rest for 2-3 minutes before cutting it into wedges, like a cake.
Serve immediately with traditional Andhra accompaniments like Avakaya (mango pickle) or Allam Pachadi (ginger chutney).
Servings
150
Serving size: 1 serving
46cal
1gprotein
3gcarbs
4gfat
Ingredients
1 kg Raw Mangoes (Use a firm, sour variety specifically for pickling)
200 g Mustard Seeds (Preferably black or brown mustard seeds)
200 g Red Chilli Powder (Use a vibrant, spicy variety like Guntur for authentic flavor)
200 g Crystal Salt (Non-iodized salt is essential for proper preservation)
50 g Fenugreek Seeds (Also known as Methi seeds)
150 g Garlic (Peeled and left as whole cloves)
500 ml Gingelly Oil (Also known as cold-pressed sesame oil)
2 tbsp Turmeric Powder
1 tsp Hing (Also known as Asafoetida)
Instructions
1
Prepare the Mangoes (Approx. 1 hour)
Wash the raw mangoes thoroughly under running water. Wipe each mango completely dry with a clean, lint-free cloth. This is the most critical step; any moisture can spoil the pickle.
Using a large, sharp knife or a special mango cutter, chop the mangoes into 1-inch cubes. Traditionally, the hard inner shell (tenka) is kept attached to the piece.
Discard the soft seed from within the shell.
Spread the cut mango pieces on a dry cloth or tray and let them air dry for at least 1-2 hours to remove any residual surface moisture.
2
Prepare the Spice Mix (Approx. 10 minutes)
In a dry grinder, pulse the mustard seeds in short bursts until they form a coarse powder (rava consistency). Do not over-grind into a fine powder, as this can make the pickle bitter.
In a large, completely dry mixing bowl or basin, combine the coarse mustard powder, red chilli powder, crystal salt, whole fenugreek seeds, turmeric powder, and hing.
Mix these dry spices thoroughly with a dry spoon until evenly distributed.
1 litre Whole Milk (Full-fat milk yields the thickest, creamiest curd. You can use low-fat milk, but the result will be less thick.)
1 tbsp Yogurt Starter (Must contain live active cultures. Ensure the starter is fresh and not sour for the best results.)
Instructions
1
Boil the Milk
Pour the milk into a heavy-bottomed pot or saucepan.
Bring the milk to a rolling boil over medium heat, then reduce the heat to low. Let it simmer for 5-7 minutes, stirring occasionally to prevent a skin from forming and to avoid scorching at the bottom. This process helps thicken the milk slightly, resulting in a creamier curd.
2
Cool to Lukewarm Temperature
Turn off the heat and allow the milk to cool down until it is lukewarm. The ideal temperature is between 40-45°C (105-115°F).
To test without a thermometer, dip a clean finger into the milk. You should be able to hold it in for about 10 seconds without it feeling uncomfortably hot. If it's too hot, it will kill the bacteria; if it's too cold, the curd won't set.
3
Inoculate with Starter
In a small bowl, whisk the yogurt starter until it is smooth and lump-free.
Add 2-3 tablespoons of the warm milk to the starter and mix well. This process, called tempering, helps the culture mix evenly without curdling.
Pour this tempered starter mixture back into the pot of milk and stir gently just a few times to combine everything thoroughly.
4
Ferment and Set the Curd
Pour the inoculated milk into the container you wish to set the curd in (earthenware, glass, or steel containers work well).
Cover the container with a lid and place it in a warm, draft-free spot to ferment. An oven (turned off) with the light on, a warm cupboard, or an Instant Pot on the 'Yogurt' setting are great options.
Let it sit undisturbed for 6 to 12 hours. The time will vary based on the climate; warmer weather requires less time (6-8 hours), while colder weather may take longer (10-12 hours).
5
Chill and Serve
Once the curd is set (it should be firm and not jiggle like a liquid), carefully transfer it to the refrigerator without disturbing it.
Chill for at least 3-4 hours. This crucial step stops the fermentation process (preventing it from becoming too sour) and helps the curd to thicken and set further.
Serve chilled as a side dish, or use it as a base for raita, lassi, or marinades.
Add the air-dried mango pieces and the peeled whole garlic cloves to the spice mixture.
Using clean, dry hands or a large dry spoon, toss everything together gently but thoroughly, ensuring every mango piece is generously coated with the masala.
Pour in about 400 ml of the gingelly oil. Mix again until the oil is well incorporated with the spices and mangoes.
4
Jar and Initial Fermentation (3 days)
Carefully transfer the prepared pickle mixture into a sterilized, completely dry ceramic jar (jaadi) or a large glass jar.
Press the mixture down firmly with the back of a spoon to pack it tightly.
Pour the remaining 100 ml of oil over the top. This layer of oil acts as a natural preservative, protecting the pickle from air.
Cover the mouth of the jar with a clean, dry cotton cloth and secure it with a string or a rubber band. Do not use an airtight lid at this stage to allow gases to escape.
Place the jar in a cool, dry, and dark place for 3 days.
5
Final Mixing and Storage (Approx. 5 minutes)
After 3 days, open the jar. You will notice the mangoes have released their juices, creating a thick, luscious gravy with the spices and oil.
Using a long, clean, and completely dry spoon, stir the pickle from the bottom up to ensure everything is mixed well.
The Avakaya is now ready to be enjoyed, but its flavor will deepen and mature over the next few weeks. For long-term storage, close the jar with an airtight lid and store in a cool, dry place. It can last for over a year if stored properly.