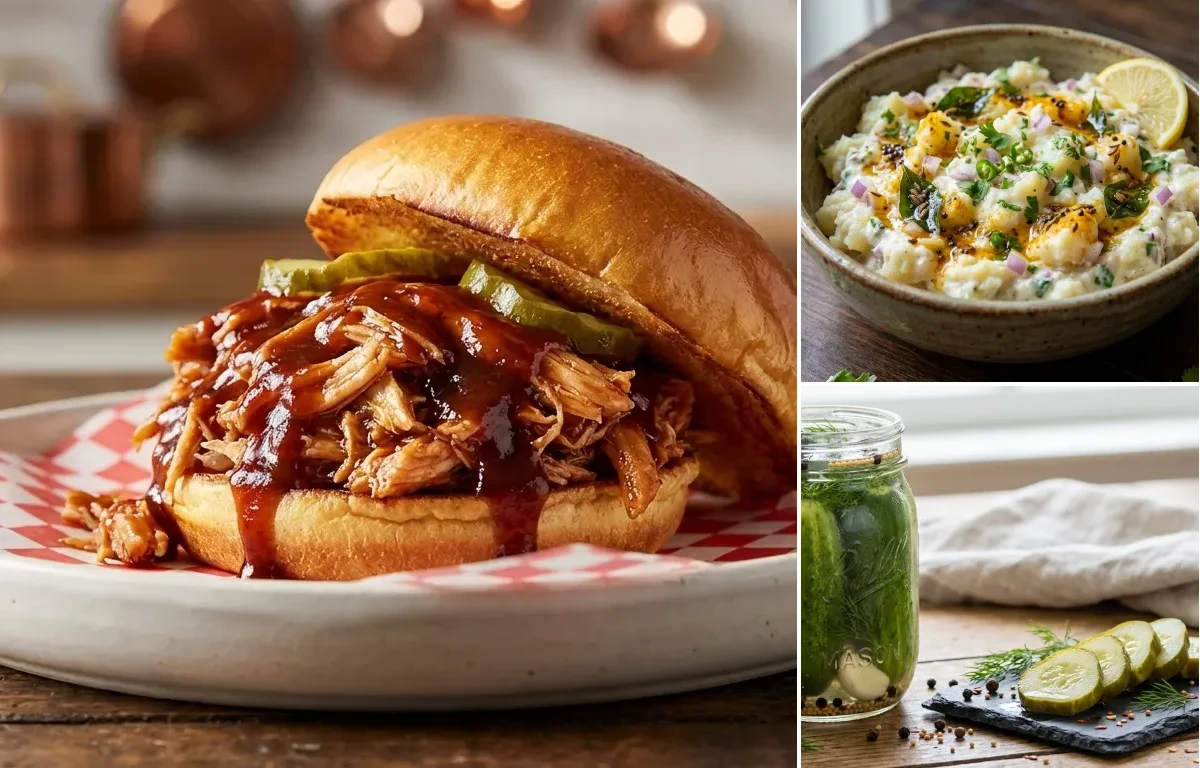
Tender, juicy shredded chicken simmered in a smoky, tangy homemade BBQ sauce, all piled high on a soft brioche bun. This Southern classic is the ultimate comfort food, perfect for game day or a weeknight dinner.
Prep15 min
Cook45 min
Servings4
Serving size: 1 serving
704cal
41gprotein
67gcarbs
32g
Ingredients
680 g Boneless Skinless Chicken Thighs (About 1.5 lbs)
A refreshing Indian-style potato salad featuring tender boiled potatoes in a creamy, spiced yogurt dressing. Finished with a fragrant tempering of mustard seeds and curry leaves, this 'Aloo Raita' is a flavorful and cooling side dish perfect for any meal.
Create exceptionally crisp, tangy, and flavorful homemade dill pickles with this classic canning recipe. Packed with fresh dill and garlic, these pickles are a superior alternative to store-bought versions and the perfect crunchy addition to sandwiches, burgers, or as a standalone snack.
Prep40 min
Cook25 min
Servings32
Serving size: 1 serving
About Pulled Chicken Sandwich, Potato Salad and Dill Pickles
Aromatic smoked pulled chicken sandwich with creamy potato salad – a protein-packed, soul-satisfying meal!
This southern dish is perfect for dinner. With 897.43 calories and 46.94g of protein per serving, it's a nutritious choice for your meal plan.
Other Cuisines to Explore
Discover authentic meals from cuisines around the world.
Pat the chicken thighs dry with paper towels. In a small bowl, mix together the salt, black pepper, onion powder, and garlic powder.
Season the chicken generously on all sides with the spice mixture.
Heat vegetable oil in a large Dutch oven or heavy-bottomed pot over medium-high heat. Once shimmering, carefully place the chicken in the pot in a single layer.
Sear for 3-4 minutes per side until a deep golden-brown crust forms. Do not overcrowd the pot; work in batches if necessary. Remove the chicken and set aside on a plate.
2
Build the BBQ Sauce Base
Reduce the heat to medium. In the same pot, add the chopped onion and cook, stirring occasionally, until softened and translucent, about 5-6 minutes.
Add the minced garlic and cook for another minute until fragrant, stirring constantly to prevent burning.
3
Simmer the Chicken
Pour in the chicken broth to deglaze the pot, scraping up any browned bits from the bottom with a wooden spoon.
Stir in the ketchup, apple cider vinegar, brown sugar, Worcestershire sauce, and smoked paprika. Whisk until the sauce is smooth.
Bring the sauce to a gentle simmer.
Return the seared chicken thighs (and any accumulated juices) to the pot. Spoon some sauce over the top to cover them.
Reduce the heat to low, cover the pot, and let it simmer for 30-35 minutes, or until the chicken is cooked through and fork-tender. The internal temperature should reach at least 165°F (74°C).
4
Shred and Finish
Carefully remove the chicken from the pot and place it on a cutting board. Let it rest for 5 minutes.
Using two forks, shred the chicken. It should pull apart with very little effort.
Return the shredded chicken to the pot with the BBQ sauce. Stir well to ensure all the chicken is coated.
Let the mixture simmer uncovered on low heat for another 5-10 minutes, allowing the chicken to absorb the flavors of the sauce and for the sauce to thicken slightly.
5
Assemble the Sandwiches
While the chicken finishes simmering, prepare the buns. Melt the butter in a skillet over medium heat.
Place the buns cut-side down and toast for 1-2 minutes until golden brown and slightly crisp.
Pile a generous amount of the warm pulled chicken onto the bottom buns. Add your favorite toppings like coleslaw, pickles, or sliced red onion.
Place the top bun on and serve immediately.
170cal
5gprotein
28gcarbs
5gfat
Ingredients
500 g Potatoes (About 3-4 medium waxy potatoes like Yukon Gold or red potatoes)
1 cup Curd (Use thick, full-fat plain yogurt, whisked until smooth)
1 small Red Onion (Finely chopped)
1 pcs Green Chili (Finely chopped, adjust to your spice preference)
3 tbsp Coriander Leaves (Freshly chopped, plus more for garnish)
1 tbsp Lemon Juice (Freshly squeezed)
1 tsp Salt (Adjust to taste)
0.5 tsp Sugar (Optional, to balance the tanginess of the yogurt)
2 tsp Vegetable Oil (For tempering)
0.5 tsp Mustard Seeds
0.5 tsp Cumin Seeds
0.25 tsp Hing (Asafoetida)
6 leaves Curry Leaves (Fresh or dried)
0.25 tsp Turmeric Powder
Instructions
1
Boil the Potatoes: Place the whole, unpeeled potatoes in a medium pot and cover with cold water. Add a pinch of salt. Bring to a boil and cook for 15-20 minutes, or until they are tender when pierced with a fork. Drain the water and let the potatoes cool completely to room temperature.
2
Prepare the Salad Base: Once cooled, peel the potatoes and cut them into 1-inch cubes. Transfer them to a large mixing bowl. Add the finely chopped red onion, green chili, and 3 tablespoons of coriander leaves.
3
Combine with Dressing: In a separate small bowl, whisk the curd until it's smooth and creamy. Stir in the salt, sugar (if using), and lemon juice. Pour this dressing over the potato mixture and gently fold everything together until the potatoes are evenly coated. Be careful not to mash them.
4
Prepare the Tempering (Tadka): Heat the vegetable oil in a small pan or tadka pan over medium heat. Once the oil is hot, add the mustard seeds. Wait for them to splutter, which should take about 30 seconds. Then, add the cumin seeds, hing, and curry leaves. Sauté for another 30 seconds until the curry leaves are crisp and the spices are fragrant.
5
Finish the Salad: Add the turmeric powder to the hot oil, give it a quick stir for 2-3 seconds, and immediately pour the entire tempering over the potato salad. Gently mix to incorporate the spices and oil throughout the salad.
6
Chill and Serve: Cover the bowl and refrigerate the potato salad for at least 30-60 minutes. This allows the flavors to meld and deepen. Garnish with extra coriander leaves before serving cold.
4 cup water (Use filtered or distilled water for best results)
4 cup white vinegar (Must be 5% acidity for safe canning)
0.5 cup pickling salt (Do not use iodized table salt)
8 large sprigs fresh dill (With flower heads if possible for extra flavor)
12 cloves garlic (Peeled and lightly smashed)
4 tsp black peppercorns
4 tsp mustard seeds (Yellow or brown)
2 tsp red pepper flakes (Optional, for a little heat)
Instructions
1
Sterilize Jars and Lids (15 minutes)
Wash 4 quart-sized canning jars, lids, and rings in hot, soapy water and rinse well.
Place the jars on a rack in a large water bath canner or stockpot. Cover with water by at least 1 inch and bring to a simmer (180°F/82°C). Keep jars hot until ready to use to prevent cracking.
Place lids and rings in a small saucepan of hot water; do not boil. Keep them warm.
2
Prepare the Cucumbers (15 minutes)
Thoroughly wash cucumbers under cold running water, gently scrubbing away any spines or dirt.
Trim 1/16th of an inch from the blossom end of each cucumber. This end contains an enzyme that can cause mushy pickles.
For extra crispness, submerge the trimmed cucumbers in an ice water bath for 30 minutes while you prepare other ingredients.
Cut cucumbers into spears, slices, or leave whole as desired.
3
Pack the Jars (10 minutes)
Carefully remove one hot jar at a time from the canner, pouring the water back into the pot.
In the bottom of each jar, place 2 sprigs of fresh dill, 3 smashed garlic cloves, 1 tsp black peppercorns, 1 tsp mustard seeds, and 1/2 tsp red pepper flakes (if using).
Tightly pack the prepared cucumbers into the jars, leaving a 1/2-inch headspace at the top.
4
Make the Pickling Brine (5 minutes)
In a large non-reactive saucepan (stainless steel or enamel), combine the 4 cups of water, 4 cups of white vinegar, and 1/2 cup of pickling salt.
Bring the mixture to a rolling boil over medium-high heat, stirring until the salt has completely dissolved.
5
Fill and Seal the Jars (5 minutes)
Carefully ladle the hot brine into each packed jar, covering the cucumbers completely while maintaining the 1/2-inch headspace.
Remove air bubbles by sliding a bubble remover tool or a thin wooden skewer around the inside of the jar.
Wipe the jar rims with a clean, damp cloth to ensure a proper seal. Center the lid on the jar and screw on the ring until it is 'fingertip-tight'—just snug, not forced.
6
Process in Water Bath (20 minutes)
Using a jar lifter, carefully place the sealed jars back into the canner. Ensure the water level is at least 1-2 inches above the tops of the jars, adding more boiling water if necessary.
Cover the canner and bring the water to a full rolling boil.
Once boiling, start a timer and process the jars for 10 minutes (for altitudes up to 1,000 ft).
After 10 minutes, turn off the heat, remove the lid, and let the jars stand in the hot water for 5 more minutes to acclimate.
7
Cool, Check Seal, and Store
Remove the jars from the canner and place them upright on a towel-lined countertop, leaving space between them to cool.
Let the jars cool undisturbed for 12-24 hours. Do not tighten the rings. You should hear 'pinging' sounds as the lids seal.
After 24 hours, check the seals. Press the center of each lid; if it does not flex up or down, the jar is sealed. Remove the rings, wipe the jars, label, and date them.
Store sealed jars in a cool, dark place for at least 2 weeks to allow flavors to develop. They are best after 4-6 weeks and will keep for up to 18 months.