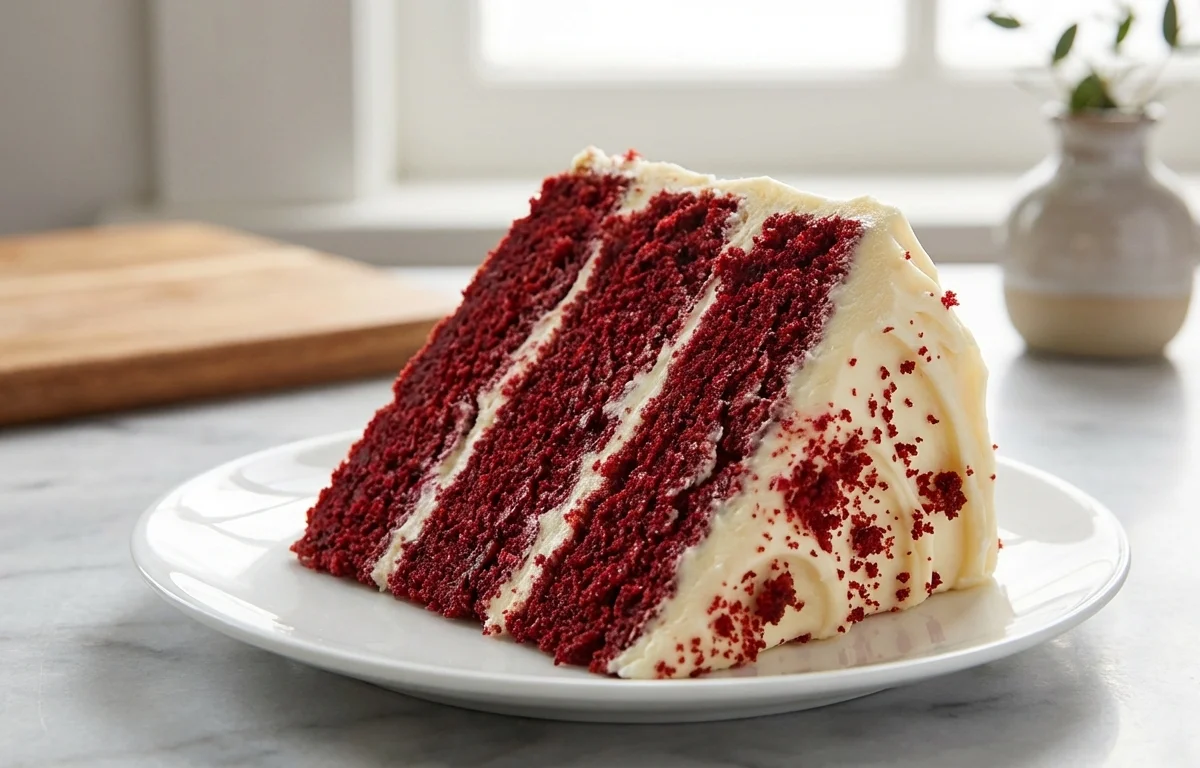
Red Velvet Cake
A strikingly beautiful, deep-red layer cake with a whisper of cocoa and a tender, velvety crumb. Sandwiched and frosted with a tangy, cloud-like cream cheese frosting, this Southern classic is the undisputed star of Christmas feasts, Valentine's Day desserts, and every celebration in between.
For 8 servings
- prep · ~5 min
Preheat oven and prepare cake pans.
1.Preheat the oven to 350°F (175°C).2.Grease two 9-inch round cake pans with butter or oil.3.Line bottoms with parchment paper, grease the paper, then dust the pans lightly with flour and tap out the excess.TIPParchment paper guarantees the cakes release cleanly — don't skip it. - mix · ~2 min
Whisk together the dry ingredients.
In a medium bowl, whisk the sifted all-purpose flour, sugar, cocoa powder, baking soda, and salt until evenly combined and free of lumps.
- mix · ~3 min
Combine the wet ingredients.
1.In a large bowl or the bowl of a stand mixer, combine the buttermilk, eggs, vegetable oil, vanilla extract, white vinegar, and red food coloring.2.Mix on low speed until the eggs are fully incorporated and the color is even, about 1 to 2 minutes.TIPAll cold ingredients must be at room temperature so the batter emulsifies properly. Cold buttermilk or eggs can make the cake dense. - mix · ~3 min
Make the velvety batter.
1.Add the dry ingredients to the wet ingredients in three batches, mixing on low speed just until each addition disappears.2.Scrape down the sides and bottom of the bowl with a rubber spatula.3.Mix for another 10 seconds only — the batter will be thin and smooth.TIPStop mixing the moment the flour is absorbed. Over-mixing develops gluten and makes the cake tough instead of velvety. - bake · ~30 min
Divide batter and bake until done.
1.Pour the batter evenly into the two prepared cake pans.2.Tap each pan gently on the counter twice to release large air bubbles.3.Bake for 28 to 32 minutes, or until a toothpick inserted into the center comes out clean.TIPRotate the pans halfway through baking so the layers rise evenly. - rest · ~55 min
Cool the cakes completely.
1.Let the cakes cool in their pans on a wire rack for 10 minutes.2.Run a thin knife around the edges, invert the pans to release the layers, and peel off the parchment paper.3.Flip the cakes right side up and let them cool completely on the wire rack, about 45 minutes.TIPFrosting warm cakes is a disaster — the frosting will melt and slide off. Cool them until they feel room temperature to the touch. - mix · ~6 min
Beat the cream cheese frosting.
1.In a large bowl, beat the softened cream cheese and butter with an electric mixer on medium speed until completely smooth and lump-free, about 2 minutes.2.Reduce the mixer to low, gradually add the sifted powdered sugar, and beat until incorporated.3.Increase speed to medium-high and whip for 1 to 2 minutes until light, fluffy, and spreadable.TIPFull-fat block cream cheese is critical. Spreadable tub cream cheese has extra water and will make the frosting runny. - assemble · ~8 min
Assemble the layer cake.
1.Place one completely cooled cake layer on a serving plate or turntable.2.Mound about 1 cup of the cream cheese frosting on top and spread it evenly to the edges using an offset spatula.3.Place the second cake layer on top, bottom-side up for a flat surface, and spread the remaining frosting over the top and sides.4.Smooth the frosting and make decorative swirls with the back of a spoon if desired. - serve
Slice and serve.
Slice the cake with a sharp knife, wiping the blade clean between each cut to keep the red and white layers sharply defined.
TIPThis cake tastes even better the next day. Cover and store it in the refrigerator, then let slices sit at room temperature for 20 minutes before serving.
What to keep in mind.
6 tips from the recipe — small details that make a real difference to the final dish.
- 1Room-temperature ingredients are non-negotiable — cold buttermilk or eggs will make the batter curdle and the cake dense.
- 2Use gel food coloring for a more intense red without thinning the batter; liquid coloring may require 2–3 tablespoons.
- 3Rotate the pans halfway through baking so the layers rise evenly and develop a flat top.
- 4Test doneness at 28 minutes; a few moist crumbs on the toothpick are better than overbaking, which dries out the crumb.
- 5Chill the assembled cake for 20 minutes before slicing to make cleaner cuts and keep the frosting from smearing.
- 6Wrap cooled cake layers tightly in plastic wrap if frosting later; they stay moist for up to 24 hours at room temperature.
Adapt it for your goals.
Naturally-colored
Swap red food coloring for 3–4 tablespoons of unsweetened beetroot purée or 1 teaspoon of natural red gel made from pomegranate for those avoiding artificial dyes.
gluten freeGluten-free
Replace all-purpose flour with a 1:1 gluten-free baking blend that contains xanthan gum; the batter will be slightly thicker but the cake stays tender.
high proteinHigh-protein
Substitute ¼ cup of the flour with unflavored whey or plant protein powder to add 8–10 g of protein per slice; the crumb may be a bit more delicate.
Why this is on our healthy list.
Buttermilk Aids Digestion
Buttermilk contains lactic acid and probiotics (if cultured) that can help support a healthy gut microbiome.
Cocoa Is Rich in Antioxidants
The small amount of unsweetened cocoa powder provides flavonoids, which may support heart health and reduce inflammation.
Calcium from Cream Cheese
Cream cheese is a source of calcium and phosphorus, important for maintaining strong bones and teeth.
Frequently asked questions
Too much cocoa or natural cocoa (not Dutch-processed) can darken the color. Use Dutch-processed cocoa and a vibrant liquid or gel red dye to keep the color true.