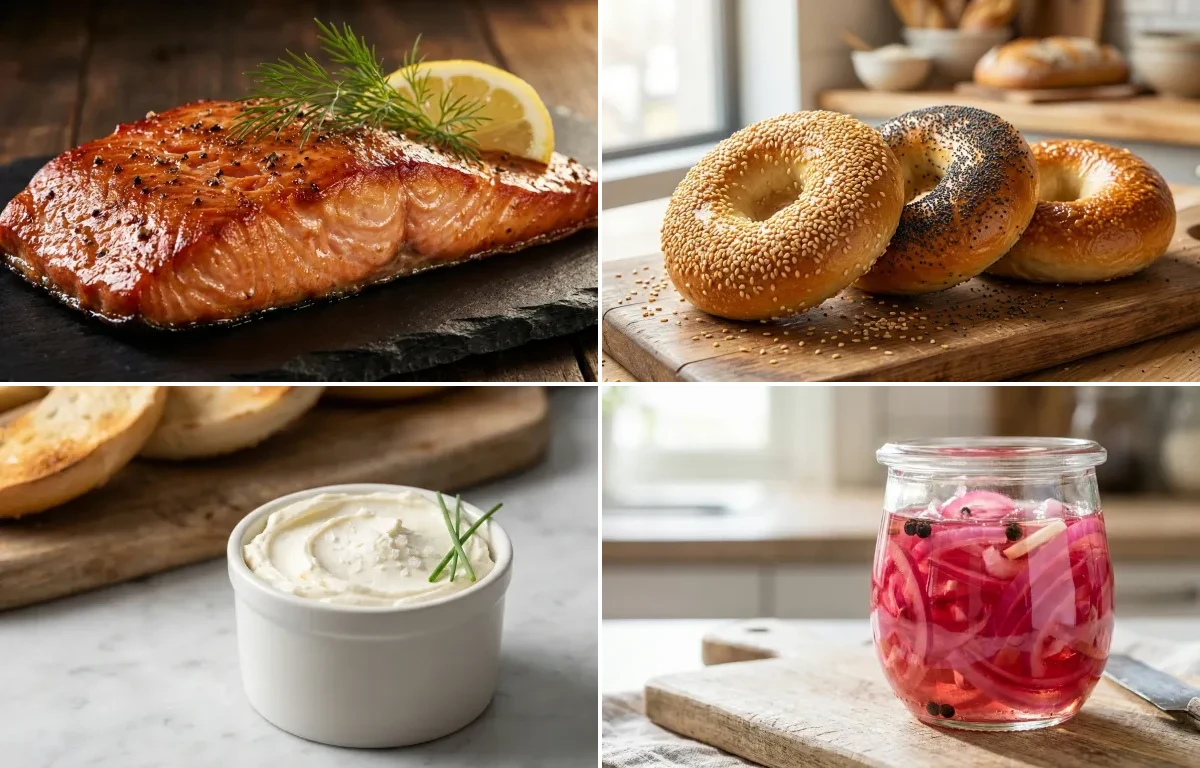
Flaky, moist salmon with a deep, smoky flavor from alder wood. This Pacific Northwest classic is brined in a sweet and salty mixture, then slowly smoked to perfection. It's fantastic on its own, in salads, or with crackers and cream cheese.
Prep20 min
Cook150 min
Soak240 min
Servings4
Serving size: 1 serving
363cal
35gprotein
2gcarbs
Ingredients
680 g Salmon Fillet (Skin-on, pin bones removed)
950 ml Water (For the brine)
70 g Kosher Salt (Coarse grain)
100 g Brown Sugar (Packed)
3 g Black Pepper (Coarsely ground)
3 g Garlic Powder
Instructions
1
Prepare the Brine
In a large non-reactive container (glass, ceramic, or stainless steel) or a large zip-top bag, combine 950 ml of cold water, kosher salt, and brown sugar.
Stir vigorously for 2-3 minutes until the salt and sugar are completely dissolved.
Chewy on the inside, crisp on the outside, these authentic New York bagels are a true classic. The secret lies in the slow cold fermentation and the traditional boil before baking, creating that unmistakable texture and complex flavor. Perfect for a weekend baking project that brings a taste of the Big Apple to your kitchen!
Whip up a batch of rich, tangy, and incredibly smooth cream cheese right in your own kitchen! With just four simple ingredients, you can have fresh, preservative-free spread for your morning bagels or favorite desserts. It's easier than you think!
Quick, tangy, and vibrant pickled red onions that add a pop of flavor to tacos, salads, and sandwiches. Ready in under 30 minutes, this simple recipe is a must-have condiment in your fridge.
Tender, thin chicken cutlets pan-fried to golden perfection, then smothered in a bright, tangy lemon-butter sauce with briny capers. A classic Italian-American restaurant favorite you can easily make at home in under 30 minutes.
Prep15 min
Cook15 min
Servings4
Serving size: 1 serving
About Hot Smoked Salmon, New York Bagels, Cream Cheese, Pickled Red Onions and Chicken Piccata
Tangy smoked salmon with a fresh bagel and creamy cheese. A protein-packed brunch to kickstart your day!
This american dish is perfect for brunch. With 1495.1299999999999 calories and 96.44g of protein per serving, it's a nutritious choice for your meal plan.
Other Cuisines to Explore
Discover authentic meals from cuisines around the world.
Submerge the salmon fillet in the brine, ensuring it is fully covered. If needed, place a small plate on top to keep it submerged.
Cover the container and refrigerate for 4 to 6 hours. Use a shorter time (4 hours) for thinner fillets and a longer time (up to 6 hours) for very thick fillets.
3
Dry and Form the Pellicle (2-4 hours)
Remove the salmon from the brine and briefly rinse it under cold running water to remove excess salt.
Pat the fillet completely dry with paper towels. This is a critical step.
Place the salmon, skin-side down, on a wire rack set over a baking sheet.
Refrigerate, uncovered, for 2 to 4 hours. The surface of the fish will become dry and tacky to the touch. This sticky layer is called a pellicle and it helps the smoke adhere beautifully to the fish.
4
Prepare the Smoker (30 minutes)
About 30 minutes before you plan to smoke, soak the alder wood chips in water.
Preheat your smoker to 107°C (225°F).
Drain the soaked wood chips and add them to your smoker's wood chip box or tray according to the manufacturer's instructions.
5
Smoke the Salmon (2-3 hours)
Lightly season the top of the salmon with coarse black pepper and garlic powder.
Place the salmon on the wire rack directly onto the smoker grate, skin-side down.
Smoke for 2 to 3 hours, maintaining a consistent temperature. The salmon is done when the internal temperature of the thickest part reaches 63°C (145°F) on an instant-read thermometer.
The fish should be opaque and flake easily with a fork.
6
Rest and Serve
Carefully remove the salmon from the smoker and let it rest on a cutting board for 10-15 minutes. This allows the juices to redistribute, resulting in a moister fillet.
Serve warm, at room temperature, or chilled. It can be flaked into salads, pasta, or served on crackers with cream cheese and capers.
Servings8
Serving size: 1 serving
279cal
11gprotein
51gcarbs
3gfat
Ingredients
500 g bread flour (High-gluten flour is highly recommended for the best chew)
300 ml warm water (Around 105-115°F or 40-46°C)
7 g active dry yeast (Equivalent to one 1/4-oz packet or 2.25 tsp)
2 tbsp barley malt syrup (For the dough)
1.5 tsp salt (Fine sea salt is ideal)
1 tbsp baking soda (For the water bath)
1 pc egg (Optional, for egg wash to add shine and help toppings stick)
1 tbsp water (Optional, for egg wash)
2 tbsp sesame seeds (Optional, for topping)
2 tbsp poppy seeds (Optional, for topping)
Instructions
1
Activate Yeast and Mix Dough
In the bowl of a stand mixer, combine the warm water, active dry yeast, and 2 tbsp of barley malt syrup. Stir gently and let it sit for 5-7 minutes until the mixture becomes foamy.
Add the bread flour and salt to the bowl.
Using the dough hook attachment, mix on low speed until a shaggy, stiff dough forms. Increase the speed to medium-low and knead for 10-12 minutes. The dough should be very smooth, firm, and elastic. It will be much stiffer than typical bread dough.
2
First Proof (Bulk Fermentation)
Form the dough into a tight ball and place it in a lightly oiled bowl, turning it once to coat the surface.
Cover the bowl with plastic wrap or a damp kitchen towel. Let it rise in a warm, draft-free place for 60-90 minutes. The dough will not double in size; it should rise by about 50%.
3
Divide and Shape Bagels
Gently turn the dough out onto a clean, un-floured work surface. Do not punch it down.
Divide the dough into 8 equal pieces, each weighing about 110g. Using a kitchen scale is highly recommended for uniform bagels.
In a heavy-bottomed pot, combine the whole milk and heavy cream. Heat over medium heat, stirring occasionally to prevent scorching, until it reaches 185°F (85°C). If you don't have a thermometer, heat until it's steaming and small bubbles form around the edges, but do not let it come to a rolling boil. This should take about 10-12 minutes.
2
Remove the pot from the heat and gently stir in the lemon juice. You will see the mixture begin to curdle almost immediately. Stop stirring and let the pot sit undisturbed for 10 minutes to allow the curds to fully separate from the whey.
3
Line a colander with a few layers of cheesecloth or a clean nut milk bag and place it over a large bowl. Carefully pour the curdled milk mixture into the cheesecloth to strain. Let the whey drain for at least 30 minutes. For a thicker, block-style cream cheese, gather the corners of the cheesecloth, tie it up, and let it hang to drain for 1-2 hours.
4
Transfer the thick curds from the cheesecloth to a food processor. Add the salt and blend on high for 2-3 minutes, scraping down the sides as needed, until the cheese is completely smooth and creamy.
5
Transfer the finished cream cheese to an airtight container. Refrigerate for at least 1 hour to allow it to firm up and the flavors to meld. It will thicken considerably as it chills.
Prepare the Onions: Using a sharp knife or a mandoline for best results, slice the red onion into thin, uniform rings (about 1/8-inch thick). Tightly pack the sliced onions into a clean 16-ounce (pint-sized) glass jar. This step should take about 5 minutes.
2
Create the Pickling Brine: In a small saucepan, combine the apple cider vinegar, water, granulated sugar, and kosher salt. Add the black peppercorns and smashed garlic cloves. Bring the mixture to a gentle simmer over medium-high heat, stirring occasionally until the sugar and salt are fully dissolved. This process takes about 3-5 minutes.
3
Combine and Pickle: Carefully pour the hot brine over the sliced onions in the jar, ensuring they are completely submerged. Use a spoon to gently press the onions down into the liquid. Tap the jar on the counter a few times to release any trapped air bubbles. This should take about 2 minutes.
4
Cool and Refrigerate: Let the jar sit at room temperature for 20-30 minutes to cool down. Once cooled, screw the lid on tightly and transfer the jar to the refrigerator. The onions are ready to eat in as little as 30 minutes, but their flavor and vibrant pink color will intensify after a few hours or overnight.
0.5 cup Dry White Wine (Such as Sauvignon Blanc or Pinot Grigio)
0.5 cup Low-Sodium Chicken Broth
0.25 cup Lemon Juice (Freshly squeezed)
3 tbsp Capers (Drained and rinsed)
2 tbsp Fresh Parsley (Chopped, for garnish)
Instructions
1
Prepare the Chicken Cutlets (5 minutes)
Place chicken breasts between two sheets of plastic wrap. Using a meat mallet or heavy rolling pin, pound them to an even 1/4-inch thickness.
In a shallow dish, whisk together the all-purpose flour, 1 teaspoon of salt, and 1/2 teaspoon of black pepper.
Pat the chicken cutlets completely dry with paper towels. Dredge each piece in the seasoned flour, ensuring it's lightly coated on all sides. Shake off any excess flour.
2
Pan-Fry the Chicken (6-8 minutes)
In a large, heavy-bottomed skillet, heat 2 tablespoons of olive oil and 2 tablespoons of the butter over medium-high heat. The butter should be melted and foamy.
Carefully place two chicken cutlets in the hot pan, ensuring not to overcrowd it. Cook for 3-4 minutes per side, until golden brown and cooked through (internal temperature of 165°F / 74°C).
Remove the cooked chicken and place it on a plate or wire rack. Repeat with the remaining chicken cutlets.
Tent the cooked chicken with foil to keep warm.
3
Create the Lemon-Caper Sauce (5 minutes)
Reduce the skillet heat to medium. Add the minced garlic and sauté for 30-60 seconds until fragrant, being careful not to burn it.
Roll each piece into a tight, smooth ball. To shape, poke your thumb through the center of the ball to create a hole. Gently stretch the hole with your fingers until it's about 1.5-2 inches in diameter. The bagel will shrink during proofing and puff up during boiling.
Place the shaped bagels on a baking sheet lined with parchment paper and lightly dusted with cornmeal or flour to prevent sticking.
4
Cold Fermentation (Overnight Proof)
Cover the baking sheet tightly with plastic wrap. Refrigerate for at least 12 hours and up to 24 hours.
This slow, cold fermentation is the most critical step for developing the classic, complex flavor and chewy texture of a New York bagel.
5
Prepare for Boiling and Baking
When ready to bake, arrange two oven racks in the upper and lower thirds of the oven and preheat to 425°F (220°C).
Bring a large, wide pot of water (at least 3-4 quarts) to a rolling boil. Add 1 tbsp of barley malt syrup and the baking soda to the water.
Perform the 'float test': Place one bagel in a small bowl of cold water. If it floats within 10-15 seconds, the bagels are ready to be boiled. If not, let them sit at room temperature for another 20-30 minutes and test again.
6
Boil the Bagels
Gently lower 2-3 bagels at a time into the boiling water, ensuring they have room to float freely.
Boil for 45-60 seconds on the first side, then flip and boil for another 45-60 seconds on the other side. A longer boil results in a thicker, chewier crust.
Using a spider strainer or slotted spoon, remove the bagels from the water, allowing excess water to drip off, and place them back on the parchment-lined baking sheet.
7
Top and Bake
If using, whisk the egg with 1 tbsp of water to create an egg wash. Lightly brush the tops of the boiled bagels.
Immediately sprinkle generously with your desired toppings (sesame seeds, poppy seeds, everything seasoning, etc.).
Bake for 18-22 minutes, rotating the baking sheet halfway through, until the bagels are a deep golden-brown with a glossy, blistered crust.
8
Cool and Serve
Transfer the hot bagels to a wire rack to cool completely. This is important for the interior crumb to set properly.
Do not slice into a bagel until it has cooled for at least 20-30 minutes for the best texture.
Pour in the white wine to deglaze the pan. Use a wooden spoon to scrape up any flavorful browned bits from the bottom. Let the wine simmer and reduce by about half, which takes 1-2 minutes.
Stir in the chicken broth, fresh lemon juice, and drained capers. Bring the sauce to a simmer and let it cook for 2-3 minutes for the flavors to meld together.
Taste the sauce and season with additional salt and pepper if needed.
4
Finish and Serve (2 minutes)
Turn off the heat completely. Add the remaining 2 tablespoons of cold butter to the skillet. Whisk continuously until the butter is fully melted and incorporated, creating a smooth, emulsified sauce.
Return the cooked chicken cutlets to the pan. Spoon the sauce generously over each piece.
Garnish with fresh chopped parsley and serve immediately.