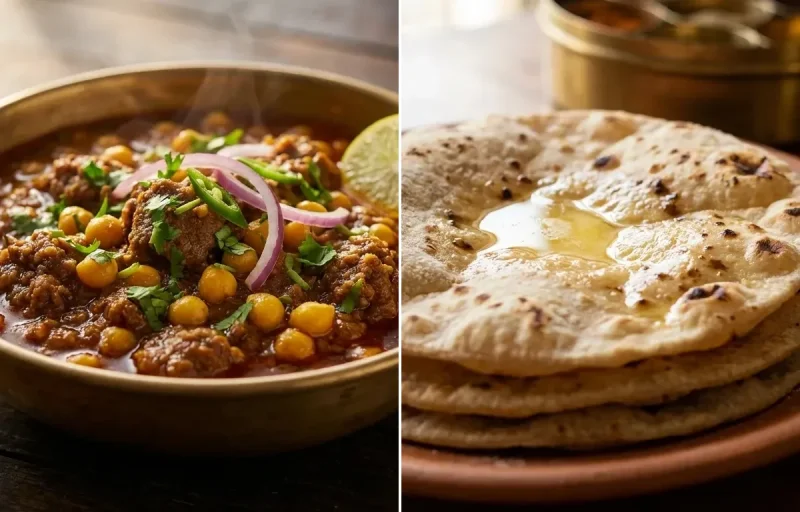
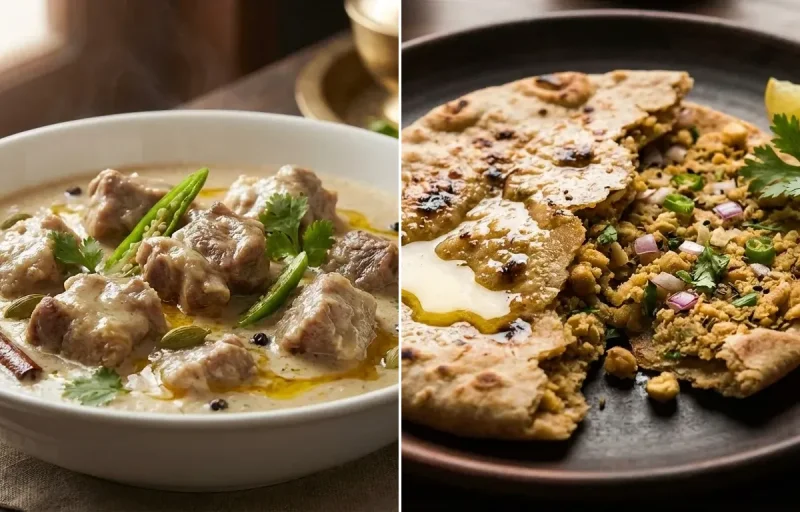
A hearty Bengali street food classic! This flavorful curry combines tender minced mutton and soft yellow peas, simmered in a fragrant blend of spices. Perfect as a snack or a light meal.
Golden, puffy, and irresistibly crisp, these deep-fried Indian breads are a festive favorite. Made from a simple whole wheat dough, they pair perfectly with savory curries like chole or a sweet shrikhand.
A classic North Indian condiment, 'Aam ka Achar' is made with raw, tangy mangoes, a robust blend of aromatic spices, and pungent mustard oil. This traditional sun-cured pickle is the perfect spicy and sour accompaniment to any meal, from dal-rice to stuffed parathas.
Prep45 min
Cook10 min
Ferment10080 min
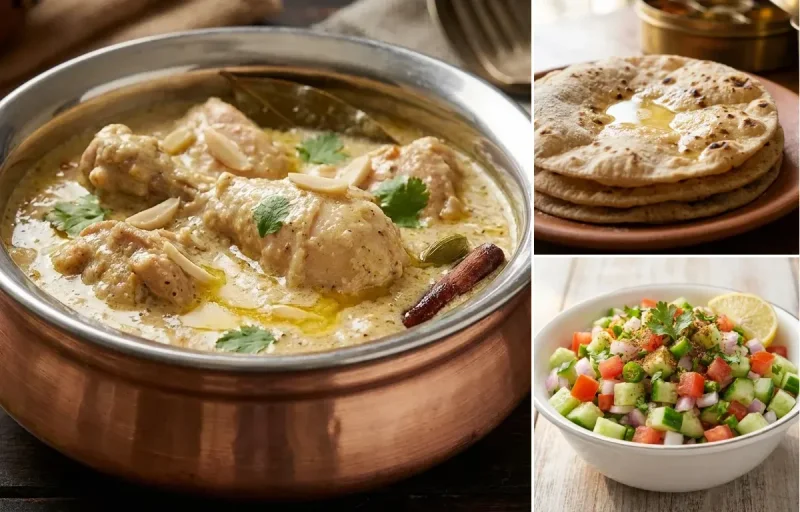
About Keema Ghugni, Puri and Mango Pickle
Protein-packed Keema Ghugni with crispy puris and tangy pickle. A flavorful and soul-satisfying meal!
This bihari dish is perfect for lunch. With 1103.3899999999999 calories and 40.26g of protein per serving, it's a nutritious choice for your meal plan.
Other Cuisines to Explore
Discover authentic meals from cuisines around the world.
3 tbsp Coriander Leaves (finely chopped, for garnish)
1 whole Lime (cut into wedges, for serving)
Instructions
1
Cook the Yellow Peas
Wash the dried yellow peas and soak them in ample water for at least 8 hours or overnight.
Drain the soaking water. Transfer the peas to a pressure cooker, add 3 cups of fresh water and 0.5 tsp of salt.
Pressure cook on medium heat for 4-5 whistles, or until the peas are soft but still hold their shape. Do not overcook them into a mush. Set aside, retaining the cooking liquid.
2
Prepare the Masala Base
Heat mustard oil in a heavy-bottomed pan or kadai over medium-high heat until it is fragrant and just begins to smoke slightly.
Reduce the heat to medium. Add the bay leaf, cinnamon stick, cloves, and crushed green cardamom pods. Sauté for 30 seconds until they release their aroma.
Add the finely chopped onions and sauté for 7-8 minutes, stirring occasionally, until they are soft and golden brown.
Add the ginger and garlic paste. Cook for 2 minutes, stirring continuously, until the raw smell disappears.
3
Cook the Keema
Add the mutton keema to the pan. Use a spatula to break up any lumps and cook for 8-10 minutes, stirring frequently, until the keema is well-browned and has released its moisture.
Add the turmeric powder, red chili powder, cumin powder, and coriander powder. Sauté for 1 minute until the spices are fragrant.
Stir in the tomato puree, the remaining 1 tsp of salt, and the sugar. Cook for 6-8 minutes, until the tomatoes are cooked down and oil begins to separate at the edges of the masala.
4
Combine and Simmer
Pour the cooked yellow peas along with all their cooking liquid into the keema masala.
Add the slit green chilies and mix everything gently.
If the gravy seems too thick, add up to 1 cup of hot water to reach your desired consistency. Bring the mixture to a boil.
Reduce the heat to low, cover the pan, and let it simmer for 10-15 minutes. This allows the keema and peas to absorb the flavors of the spices.
5
Garnish and Serve
Turn off the heat. Stir in the garam masala powder and half of the chopped coriander leaves.
Let the Keema Ghugni rest, covered, for 5 minutes before serving.
Serve hot, garnished with the remaining fresh coriander leaves. Offer lime wedges on the side for squeezing over, and optionally, some finely chopped raw onions for extra crunch.
426cal
9gprotein
47gcarbs
24gfat
Ingredients
2 cup Atta (Also known as whole wheat flour.)
2 tbsp Rava (Use fine semolina (sooji) for extra crispiness.)
1 tsp Salt (Adjust to taste.)
1 tbsp Ghee (Can be substituted with a neutral oil.)
0.75 cup Lukewarm Water (Add gradually as needed to form a stiff dough.)
3 cup Vegetable Oil (For deep frying. Use a high smoke point oil like canola or sunflower.)
Instructions
1
Prepare the Dough
In a large mixing bowl, combine the atta, rava, and salt. Whisk to mix everything evenly.
Add the ghee to the flour mixture. Using your fingertips, rub the ghee into the flour until it resembles coarse breadcrumbs. This process, known as 'moin', is key for a flaky texture.
Gradually add lukewarm water, a little at a time, while mixing. Knead to form a stiff and firm dough. It should be noticeably tighter than a chapati dough to prevent it from absorbing too much oil during frying.
2
Knead and Rest the Dough
Transfer the dough to a clean work surface and knead for 5-7 minutes until it is smooth and firm.
Cover the dough with a damp cloth or place it in a container with a lid. Let it rest for at least 20-30 minutes. This step is crucial for relaxing the gluten, which makes rolling easier and the puris softer inside.
3
Shape and Roll the Puris
After resting, knead the dough again for one minute to make it smooth.
Divide the dough into 16-20 small, equal-sized balls. Roll each ball between your palms until smooth and crack-free.
Lightly grease your rolling pin and rolling surface with a drop of oil. Avoid using dry flour for dusting, as it can burn in the hot oil and affect its quality and color.
Take one dough ball and roll it into an even circle, about 3-4 inches in diameter and 2-3 mm thick. Ensure the thickness is uniform to help it puff up perfectly.
4
Fry the Puris
Heat the oil for deep-frying in a kadai or deep pan over medium-high heat. The ideal temperature is 180-190°C (355-375°F). To test, drop a tiny piece of dough into the oil; it should sizzle and rise to the top quickly without changing color too fast.
Gently slide a rolled puri into the hot oil. It will sink briefly before floating to the surface.
Using a slotted spoon, gently press down on the center of the puri as it fries. This pressure helps trap steam inside, causing it to puff up beautifully.
Once puffed (this takes about 10-15 seconds), flip it over and fry the other side for another 10-15 seconds until it's a light golden brown.
Fry one or two puris at a time to maintain the oil temperature and avoid overcrowding the pan.
5
Drain and Serve
Remove the fried puri with the slotted spoon, allowing excess oil to drip back into the pan.
Place the puris on a wire rack or a plate lined with paper towels to drain any remaining oil.
Repeat the frying process for all the dough balls.
Serve immediately while hot and puffy with your favorite accompaniments like Aloo Sabzi, Chole, or Shrikhand.
1 kg Raw Mangoes (Use a firm, sour, pickling variety like Ramkela or Rajapuri)
2 cup Mustard Oil (To be heated to smoking point and then cooled completely)
0.75 cup Salt (Use non-iodized or sea salt for best results)
5 tbsp Red Chili Powder (Adjust to your spice preference)
2 tbsp Turmeric Powder
4 tbsp Fennel Seeds (Also known as Saunf)
4 tbsp Split Mustard Seeds (Also known as Rai ki Dal)
2 tbsp Fenugreek Seeds (Also known as Methi Dana)
2 tsp Nigella Seeds (Also known as Kalonji)
1 tsp Asafoetida (Also known as Hing)
Instructions
1
Prepare the Mangoes (Day 1)
Wash the raw mangoes thoroughly. Wipe them completely dry with a clean kitchen towel. It is critical that there is no moisture.
Cut the mangoes into 1-inch cubes, discarding the inner stone but keeping the peel on.
Place the mango pieces in a large, dry glass or ceramic bowl. Add 1/2 cup of the salt and all the turmeric powder.
Mix well to coat every piece. Cover the bowl with a cloth or a loose lid and let it sit at room temperature for 24 hours. The mangoes will release a significant amount of water.
2
Dry the Mangoes (Day 2)
After 24 hours, drain all the water released by the mangoes. You can discard this brine.
Spread the mango pieces in a single layer on a clean cloth or a large tray.
Let them dry under a fan or in a shady, well-ventilated area for 4-5 hours until the surface moisture has evaporated. They should feel dry to the touch but not hard.
3
Prepare the Spice Mix and Oil
While the mangoes are drying, gently dry roast the fennel seeds and fenugreek seeds in a pan on low heat for 1-2 minutes until fragrant. Let them cool completely.
Grind the roasted seeds along with the split mustard seeds into a coarse powder using a spice grinder or mortar and pestle.
In a large, dry mixing bowl, combine this coarsely ground spice mix, red chili powder, nigella seeds, asafoetida, and the remaining 1/4 cup of salt.
In a separate pan, heat the mustard oil until it reaches its smoking point (you'll see faint white fumes). Turn off the heat and let it cool down completely to room temperature. This step is crucial to mellow the oil's raw pungency.
4
Combine and Bottle the Pickle
Add the dried mango pieces to the bowl containing the spice mix. Toss well until each piece is thoroughly coated.
Pour about 1.5 cups of the completely cooled mustard oil over the mango-spice mixture. Mix everything thoroughly with a clean, dry spoon.
Carefully transfer the pickle into a sterilized, completely dry glass or ceramic jar (a 'barnī'). Pack it down gently to remove air pockets.
5
Mature the Pickle (7-10 Days)
Cover the mouth of the jar with a clean piece of muslin cloth and secure it with a string. This allows moisture to escape while keeping dust out.
Place the jar in direct sunlight for 7 to 10 days. Shake the jar gently or stir with a dry spoon once every day to redistribute the oil and spices.
After 3-4 days, the mango pieces will have softened and settled. Pour the remaining 0.5 cup of cooled mustard oil over the top to create a protective layer that submerges the mangoes.
After the sunning period, the mangoes will have softened and absorbed the flavors. The pickle is now ready. Replace the muslin cloth with an airtight lid and store in a cool, dry place. It can last for over a year.