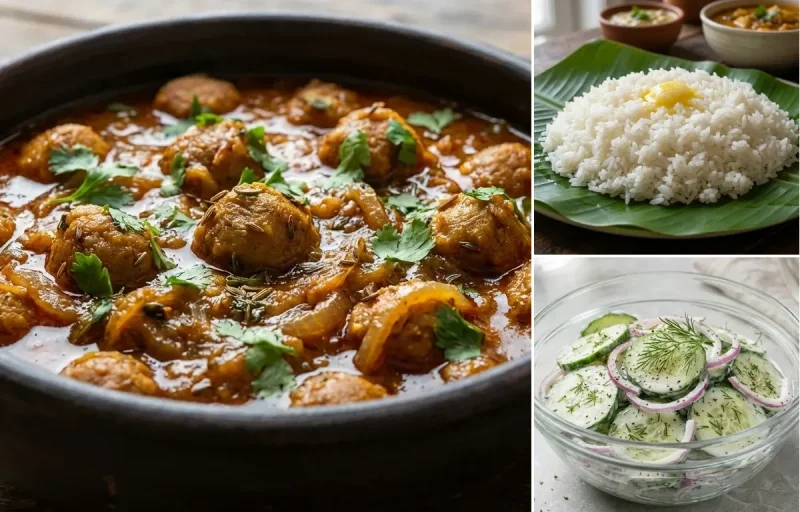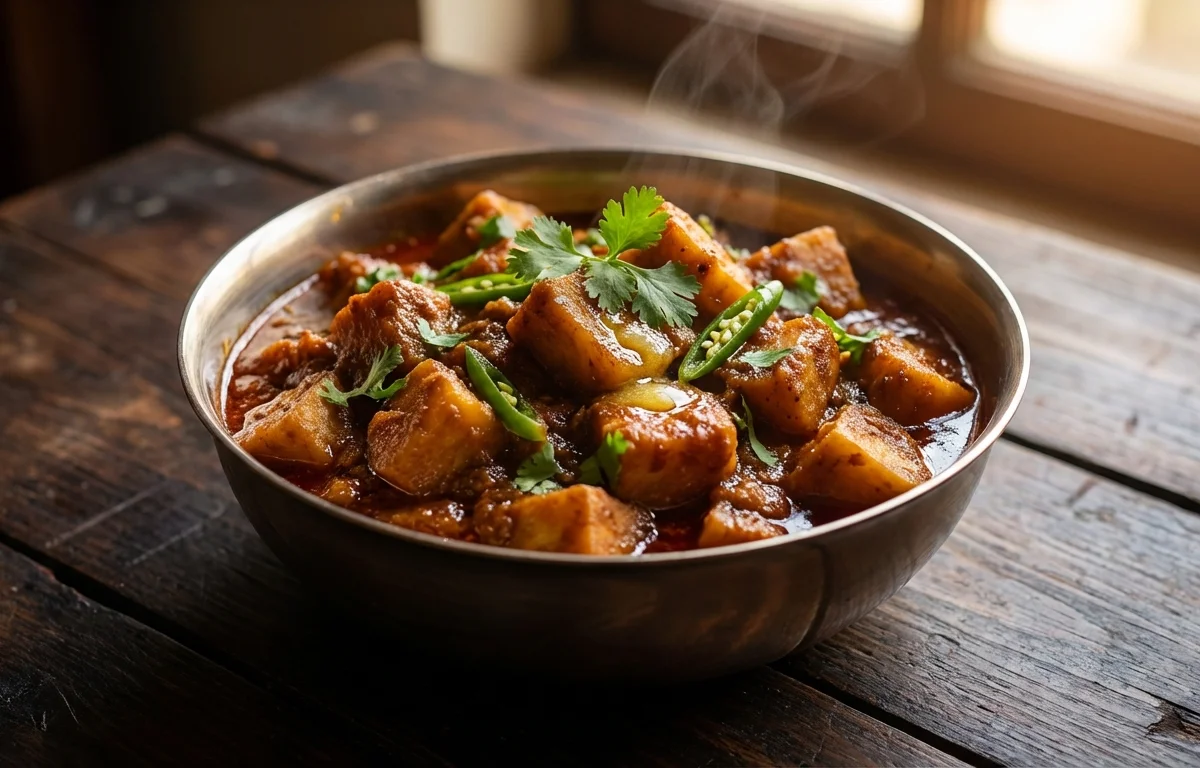
Kochur Kosha
Chunky taro root slow-cooked in a rich, spiced mustard oil gravy until melt-in-the-mouth tender. This Bengali delicacy balances the earthy sweetness of kochu with the sharp heat of mustard oil and a fragrant blend of garam masala. A rustic, hearty dish best mopped up with a stack of warm, fluffy luchis.
For 4 servings
- prep · ~10 min
Prep the taro root.
1.Wash and peel 500g taro root under running water. Rub hands with oil first if skin irritates.2.Cut into 1-inch cubes and rinse well. Pat completely dry with a kitchen towel.3.Sprinkle a pinch of salt and 0.25 tsp turmeric powder over the cubes and toss to coat.TIPWear gloves or oil your hands well before peeling — taro skin can cause itching. - fry · ~10 min
Shallow-fry the taro root.
1.Heat 2 tbsp mustard oil in a heavy-bottomed pan until it reaches smoking point, then cool slightly.2.Add the taro cubes in a single layer and fry on medium heat, turning occasionally.3.Cook until golden-brown and crisp on all sides, about 8-10 minutes.4.Remove with a slotted spoon and set aside on a plate.TIPDon't overcrowd the pan — fry in batches for even browning. - temper · ~1 min
Make the tempering.
1.Add the remaining 2 tbsp mustard oil to the same pan and heat until smoking, then cool slightly.2.Add 2 bay leaves, 0.5 tsp cumin seeds, 1-inch cinnamon stick, and 3 crushed green cardamom pods.3.Let them crackle and release aroma for about 30 seconds. - saute · ~15 min
Build the aromatic base.
1.Add the sliced onions and sauté until deep golden brown, about 8-10 minutes.2.Add 2 tsp ginger paste and 1 tsp garlic paste. Cook until the raw smell disappears, about 1-2 minutes.3.Add chopped tomatoes and slit green chilies. Cook until tomatoes are soft and mushy.4.Add 0.25 tsp turmeric powder, 0.5 tsp red chili powder, 1 tsp cumin powder, 1 tsp coriander powder, and 1 tsp sugar.5.Sprinkle a splash of water and cook the spices until oil separates, about 3-4 minutes.TIPTake your time browning the onions — this is where the deep, sweet flavor of the kasha comes from. - simmer · ~20 min
Cook the taro with the masala.
1.Add the fried taro cubes to the pan and stir gently to coat with the spice mixture.2.Add 0.5 tsp salt and ½ cup of warm water. Mix well and bring to a boil.3.Reduce heat to low, cover the pan with a lid, and simmer for 15-20 minutes.4.Stir occasionally, and add a splash of water if it starts sticking to the bottom.5.Uncover and cook off any excess moisture until the masala clings to the taro pieces. - garnish · ~2 min
Finish with garam masala and garnish.
1.Sprinkle 0.5 tsp garam masala over the cooked kochur kosha and give it a final gentle stir.2.Turn off the heat, garnish with chopped coriander leaves, and let it rest for 2 minutes.TIPLetting it rest for a few minutes allows the flavors to meld beautifully. - serve
Serve the Kochur Kosha.
Serve hot in a bowl, paired with steamed rice or warm luchis for a classic Bengali meal.
What to keep in mind.
7 tips from the recipe — small details that make a real difference to the final dish.
- 1Wear gloves or oil your hands before peeling taro to avoid skin irritation from its calcium oxalate crystals.
- 2Pat the taro cubes completely dry before frying — any moisture will cause splattering in hot oil.
- 3Fry the taro in a single layer without overcrowding to achieve a crispy, golden-brown crust on all sides.
- 4Heat mustard oil until it smokes, then let it cool slightly — this tames its pungency and deepens the nutty flavor.
- 5Sauté the onions until deep golden brown, not just translucent; this builds the sweet, caramelized base essential for a proper 'kasha'.
- 6Let the finished dish rest for 2-3 minutes off the heat before serving so the spices meld into the taro.
- 7Store leftovers in the fridge for up to 3 days; the flavor improves overnight as the masala infuses.
Adapt it for your goals.
Vegan
This recipe is already vegan — simply ensure the sugar is vegan-friendly (unrefined or organic). No other changes needed.
low oilLow-oil
Reduce mustard oil to 2 tbsp total: use 1 tbsp for frying taro (or skip frying and boil taro until tender) and 1 tbsp for tempering. The dish will be lighter but still flavorful.
gluten freeGluten-free
This dish is naturally gluten-free. Pair it with gluten-free rotis (like besan or rice flour) or steamed rice for a safe meal.
spicierSpicier
Double the green chilies and add 1 tsp of Kashmiri red chili powder for extra heat and a vibrant red color without overwhelming pungency.
Why this is on our healthy list.
Rich in Dietary Fiber
Taro root is a great source of fiber, which aids digestion and promotes a feeling of fullness.
Good Source of Resistant Starch
When taro is cooked and cooled, it develops resistant starch, which acts as a prebiotic to support gut health.
Contains Anti-inflammatory Spices
Turmeric, ginger, and mustard oil in this dish are known for their anti-inflammatory properties.
High in Potassium
Taro root provides potassium, which helps maintain healthy blood pressure levels.
Frequently asked questions
Taro contains calcium oxalate crystals that irritate skin. Wear gloves or rub oil on your hands before handling, and rinse peeled pieces well.