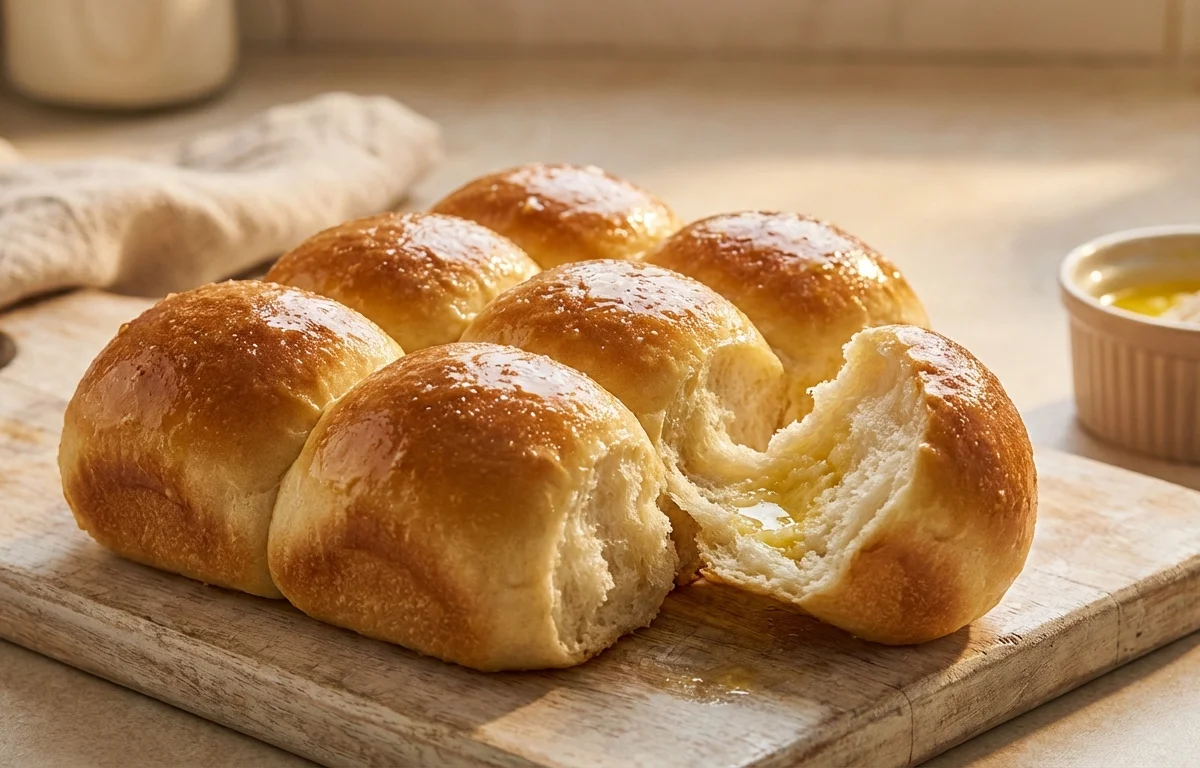
Ladi Pav
These soft pull-apart bread rolls are a bakery favorite across western India. Lightly sweet, fluffy, and brushed with butter after baking, they are perfect with bhaji, chai, or a simple spread of jam.
For 8 servings
- mix · ~5 min
Mix the dough ingredients.
1.Add all-purpose flour, instant yeast, sugar, and salt to a large bowl.2.Pour in the lukewarm milk and mix to bring everything together.3.Add softened butter and keep mixing until a shaggy dough forms.TIPKeep the milk just warm, not hot, so the yeast rises well. - knead · ~10 min
Knead the dough until smooth.
Transfer the dough to a work surface and knead for 8 to 10 minutes until soft, smooth, and slightly tacky. Shape it into a ball.
- rest · ~60 min
Let the dough rise.
Place the dough in a lightly buttered bowl, cover, and let it rise in a warm spot until doubled in size.
TIPA warm, draft-free place gives the best rise. - assemble · ~8 min
Shape and arrange the pav.
1.Grease a small square or rectangular baking tray with a little butter.2.Punch down the risen dough and divide it into 8 equal portions.3.Shape each portion into a smooth ball by tucking the edges underneath.4.Arrange the dough balls in the tray with a little space between them. - rest · ~30 min
Proof the shaped dough.
Cover the tray and let the dough balls rise again until puffy and almost touching each other.
- bake · ~22 min
Bake the pav until golden.
Bake in a preheated oven at 200°C until the tops are lightly golden and the rolls are cooked through.
TIPIf the tops brown too quickly, place a loose sheet of foil over the tray for the last few minutes. - garnish
Brush the hot pav with butter.
- serve
Cool slightly and serve warm.
What to keep in mind.
7 tips from the recipe — small details that make a real difference to the final dish.
- 1Knead until the dough turns smooth and slightly tacky; a dry dough will give dense pav.
- 2While shaping, tuck each portion tightly underneath to create a smooth top and even rise.
- 3Arrange the dough balls close but not touching at first so they expand into classic pull-apart sides during proofing.
- 4For extra-soft tops, brush the pav with butter as soon as they come out of the oven.
- 5If your kitchen is cool, proof the dough in an oven with just the light on for a steadier rise.
- 6Let the baked pav cool for 10 minutes before pulling apart so the crumb sets without turning gummy.
- 7Store leftover pav in an airtight box once fully cool, then warm briefly before serving to restore softness.
Adapt it for your goals.
Eggless-bakery-style
This recipe is already eggless; use a slightly richer butter brushing at the end for an even more classic bakery finish.
whole wheatWhole-wheat
Replace part of the all-purpose flour with whole wheat flour for a nuttier taste and more fiber, though the pav will be slightly less fluffy.
veganVegan
Swap the milk for lukewarm plant milk and use vegan butter to make a dairy-free pav that still stays soft.
garlic butterGarlic-butter
Brush the baked pav with garlic butter instead of plain butter for rolls that pair especially well with bhaji or masala fillings.
Why this is on our healthy list.
Energy-Giving Bread
The flour and milk provide carbohydrates that make these pav useful as a satisfying base for meals like bhaji or snacks with chai.
Some Protein from Milk
Milk adds a bit of protein along with softness, making the rolls more nourishing than a simple water-based bread.
Portion-Friendly Rolls
Because the dough is divided into individual pav, it is easier to serve and pair them with balanced accompaniments.
Frequently asked questions
Usually the dough was too stiff, under-kneaded, or under-proofed. The dough should be soft and slightly tacky, and both rises should be allowed until visibly puffy.