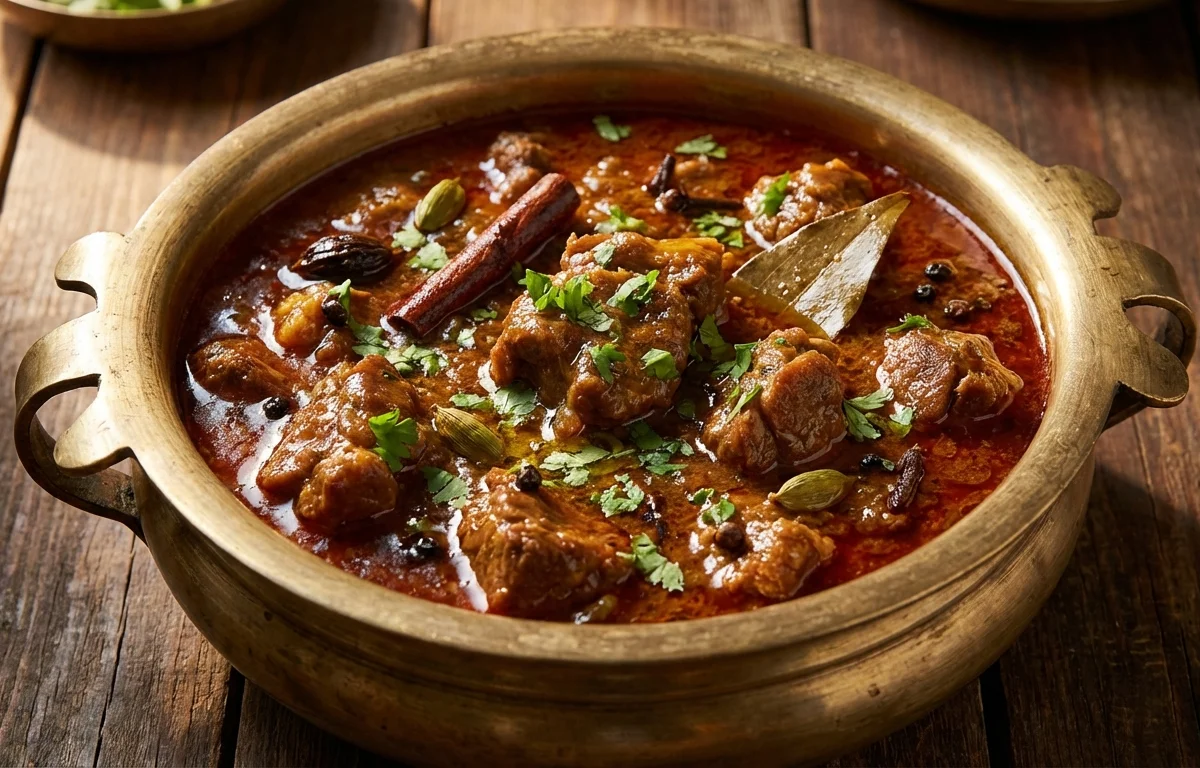
Shikari Mutton Curry
A rustic North Indian-style mutton curry with browned onions, warming whole spices, yogurt, and black pepper. Slow cooking gives the meat a deep, hearty flavor and a rich gravy that pairs well with roti or rice.
For 4 servings
- prep · ~10 min
Prep the mutton and aromatics.
1.Wash the mutton and drain well.2.Slice the onions thinly.3.Crush the ginger and garlic.4.Whisk the yogurt until smooth. - saute · ~12 min
Brown the onions and whole spices.
1.Heat mustard oil in a heavy pan until hot, then lower the heat slightly.2.Add bay leaf, cinnamon, green cardamom, cloves, and black peppercorns.3.Add the sliced onions and cook until deep golden brown, stirring often.TIPDeep golden onions give the curry its color and depth, so do not rush this step. - saute · ~10 min
Cook the ginger, garlic, and mutton.
1.Add crushed ginger and garlic to the pan and cook for 1 minute.2.Add the mutton and cook on medium-high heat until the pieces lose their raw color and start to brown.3.Stir in coriander powder, red chili powder, turmeric powder, crushed black pepper, and salt. - simmer · ~7 min
Add yogurt and cook the masala.
Lower the heat and add the yogurt in batches, stirring well after each addition so it blends smoothly into the masala. Cook until the oil starts to separate and the mixture looks rich and glossy.
TIPKeep the heat low while adding yogurt to stop it from splitting. - simmer · ~50 min
Slow cook the curry.
Add the green chili and hot water. Cover and cook on low heat until the mutton is tender and the gravy thickens, stirring a few times in between.
TIPIf the curry dries too much before the mutton softens, add a small splash of hot water. - garnish
Finish with coriander leaves.
Sprinkle chopped coriander leaves over the curry and give it a final stir.
- serve
Serve hot.
Serve the Shikari Mutton Curry hot with roti, naan, or steamed rice.
What to keep in mind.
7 tips from the recipe — small details that make a real difference to the final dish.
- 1Let the mustard oil reach a light smoking point first, then reduce the heat to mellow its raw sharpness.
- 2Slice the onions evenly so they brown at the same rate and melt smoothly into the gravy.
- 3Add the whisked yogurt a little at a time on low heat; cold yogurt straight into a hot pan can split.
- 4Bone-in mutton takes time; it is ready when a piece yields easily to a fork but still holds shape.
- 5Use hot water during simmering so the cooking temperature stays steady and the meat does not tighten.
- 6Rest the curry for 10 to 15 minutes before serving so the black pepper and whole spices settle into the gravy.
- 7This curry tastes even better the next day after refrigeration, once the fat and spice flavors have mingled.
Adapt it for your goals.
Pressure-cooker
After browning and adding yogurt, pressure-cook with water for faster tender mutton while keeping the same rustic flavor profile.
spicierSpicier
Increase crushed black pepper and green chilies for a hotter, more pepper-forward version that suits lovers of robust North Indian curries.
bonelessBoneless
Use boneless mutton for easier eating and shorter cooking time, though the gravy will be slightly less rich than bone-in.
dhaba styleDhaba-style
Finish with a spoon of ghee and extra crushed black pepper for a richer, more aromatic roadside-style curry.
Why this is on our healthy list.
Protein-Rich Main Dish
Mutton provides substantial protein, making this curry a filling option that pairs well with simple rice or roti.
Digestive Aromatics
Ginger, garlic, black pepper, and whole spices add flavor while traditionally helping make a rich meat curry feel more balanced.
Calcium and Tang from Yogurt
Yogurt adds gentle tang and creaminess while contributing dairy-based nutrients to the masala.
Frequently asked questions
Usually the heat was too high or the yogurt was added too quickly. Lower the flame and stir in whisked yogurt gradually.