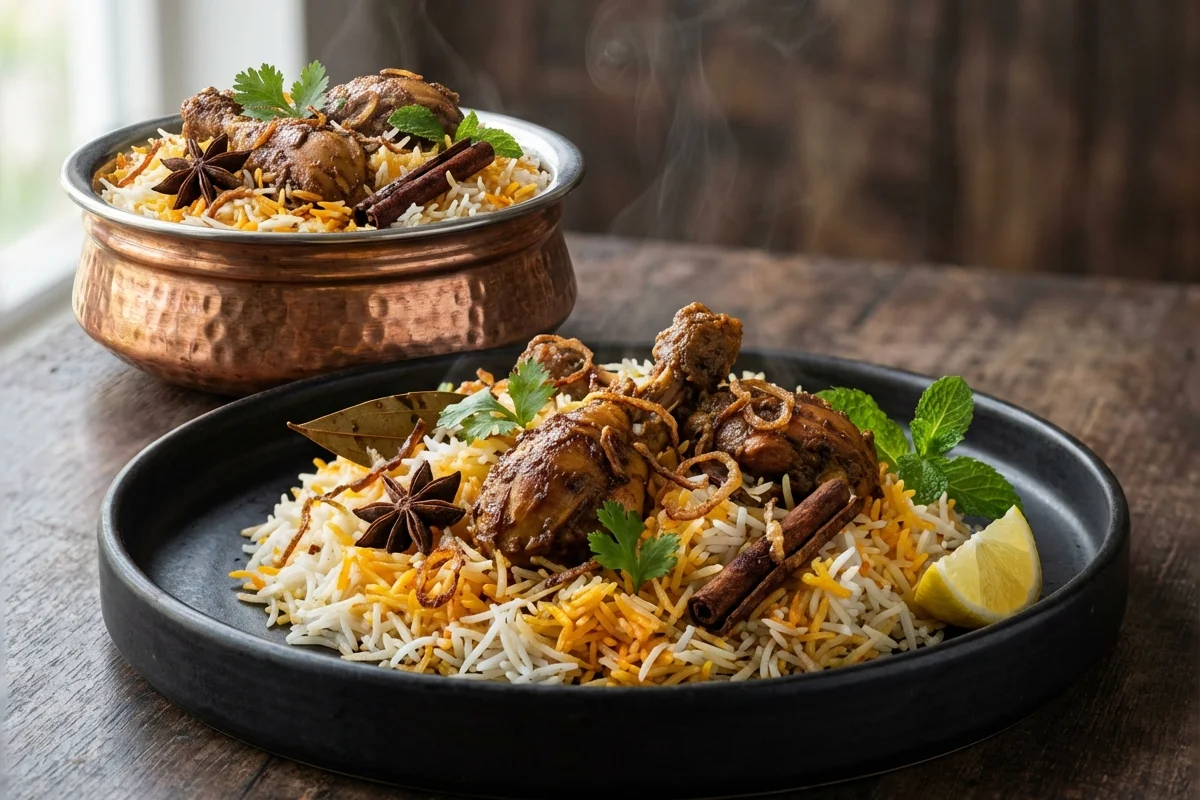
Andhra Chicken Biryani
Bold, fiery, and deeply aromatic, this Andhra-style chicken biryani layers succulent marinated chicken with fragrant basmati rice. Green chilies, fresh herbs, and a generous dose of garam masala bring the heat, while slow dum cooking seals in every drop of flavor. A feast-worthy centerpiece from the spice-loving kitchens of coastal Andhra.
For 4 servings
- prep
Marinate the chicken.
1.In a large bowl, combine yogurt, ginger-garlic paste, red chili powder, turmeric, and half the salt.2.Add chicken pieces and mix until each piece is well coated.3.Cover and rest for at least 30 minutes at room temperature, or refrigerate for 2 hours for deeper flavor.TIPLonger marination makes the chicken juicier and more flavorful. - prep · ~7 min
Parboil the rice.
1.In a large pot, bring 3 cups of water to a rolling boil with whole spices (cardamom, cloves, cinnamon, bay leaf) and the remaining salt.2.Add soaked and drained basmati rice to the boiling water.3.Cook until the rice is 70% done — grains should be slightly firm when bitten.4.Drain the rice immediately and set aside.TIPThe rice will continue cooking during dum, so do not fully cook it now. - fry · ~10 min
Fry the onions.
1.Heat oil in a heavy-bottomed pot over medium-high heat.2.Add sliced onions and fry until deep golden brown and crisp (8-10 minutes).3.Remove half the fried onions and set aside for layering and garnish.TIPStir continuously after the 5-minute mark to prevent burning — fried onions turn bitter fast. - saute · ~12 min
Cook the chicken masala.
1.To the remaining onions in the pot, add cumin seeds and let them sizzle (20 seconds).2.Add marinated chicken with all the marinade and cook on high heat, stirring occasionally, until the chicken pieces are sealed and lightly browned (5-7 minutes).3.Add chopped tomatoes and slit green chilies — cook until tomatoes soften and oil begins to separate from the sides (4-5 minutes).4.Sprinkle garam masala and mix well.TIPDo not add water — the chicken will release its own juices and yogurt. - assemble · ~2 min
Layer the biryani.
1.Level the chicken masala across the bottom of the pot.2.Spread parboiled rice in an even layer over the chicken.3.Generously sprinkle chopped coriander, mint, reserved fried onions, and lemon juice over the rice.4.Drizzle the saffron milk and ghee evenly on top.TIPDistribute the saffron for pops of color — it makes the biryani look stunning. - steam · ~40 min
Seal and cook on dum.
1.Seal the pot tightly with aluminum foil, then place a heavy lid on top.2.Cook on very low heat for 25-30 minutes — you should hear a gentle sizzle.3.Turn off the heat and let it rest, covered, for 10 minutes.TIPPlace the pot on an old tawa or griddle underneath to diffuse direct heat and prevent the bottom from burning. - serve
Fluff gently and serve hot.
1.Uncover the pot and gently fold the rice and chicken together using a flat spatula.2.Transfer to a serving platter, ensuring every portion gets a piece of chicken.3.Top with any remaining fried onions and serve immediately with raita.TIPFold from the bottom up with a light hand — we want separate fluffy grains, not mashed rice.
What to keep in mind.
7 tips from the recipe — small details that make a real difference to the final dish.
- 1Use bone-in chicken for deeper flavor and juicier meat in the final biryani.
- 2Soak basmati rice for exactly 30 minutes to ensure long, separate grains after dum.
- 3Parboil the rice to 70% doneness—it will finish cooking during the dum process.
- 4Fry onions until deep golden brown, not pale—they add essential sweetness and texture.
- 5Seal the pot with foil before placing the lid to trap steam for proper dum cooking.
- 6Let the biryani rest for 10 minutes after cooking to allow the layers to settle.
- 7Fold the rice gently from the bottom using a flat spatula to keep grains intact.
Adapt it for your goals.
Low-oil
Reduce oil to 1 tbsp and skip ghee; use a non-stick pan for the onions. The yogurt keeps the chicken moist, so you don't miss the extra fat.
high proteinHigh-protein
Swap half the rice for cauliflower rice or brown rice (increase parboiling time slightly). Ideal for fitness-focused eaters wanting more protein and fiber.
jainJain
Omit onion, garlic, and ginger; replace with asafoetida (hing) and extra green chili. Use a dairy-free yogurt alternative. This retains the core biryani experience while adhering to Jain dietary restrictions.
veganVegan
Substitute chicken with 400g of firm paneer or chickpeas, use coconut yogurt instead of dairy yogurt, and replace ghee with coconut oil. A plant-forward take that still delivers Andhra heat.
Why this is on our healthy list.
Rich in Lean Protein
Chicken provides high-quality protein essential for muscle repair and satiety, while bone-in cuts add minerals like calcium from the marrow.
Digestive Aid from Spices
Cumin, cardamom, and cloves in garam masala are known in Ayurveda to stimulate digestion and reduce bloating, making this a comfortingly spiced meal.
Antioxidants from Green Chilies & Herbs
Green chilies, coriander, and mint are rich in vitamin C and flavonoids that support immunity and fight oxidative stress.
Good Fats from Ghee
Ghee provides butyrate, a short-chain fatty acid that supports gut health, and helps the body absorb fat-soluble vitamins from the other ingredients.
Frequently asked questions
You likely overcooked the rice during parboiling. It should be only 70% done—firm at the center—because it will continue cooking during the dum stage.